
La version française.
Zur deutschen Version.
With the latest v2.0 update for the DT25/DT50 amplifiers, you must send MIDI parameters to the amp to change the settings such as the preamp models. Here are the links to the MIDI documentation to reference when programming your MIDI gear to send the proper parameters to control the settings of the DT series amplifiers:
http://line6.com/media/dt50/DT50_MIDI_CC_Reference_v2_0_RevA_English.pdf
http://line6.com/media/dt50/DT25_MIDI_CC_Reference_v2_0_RevA_English.pdf
http://line6.com/media/dt50/DT_MIDIGuide_v2_0_RevA_English.pdf
Using the POD HD500/HD500x to Send MIDI Parameters to the DT amplifiers
You can use the POD HD500 as a MIDI controller to send MIDI CC parameters to change. Just connect the MIDI OUT from the POD HD500/HD500x to the MIDI IN on the DT amplifier with a MIDI cable. Then, go in the POD HD500/HD500x's MIDI assign screen (by holding the MOVE button for a few seconds) to assign a footswitch to send the desired MIDI parameters to change the settings on the DT amplifier.
From here, you need to reference the DT amplifier's MIDI CC reference charts above to assign the proper MIDI CC to a footswitch on the POD HD500/HD500x.
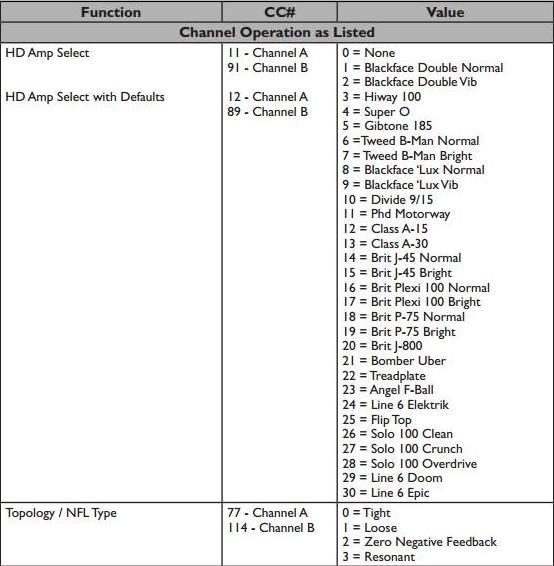
For example, on the DT50 amplifiers, sending MIDI CC# 11 with a value of 0-30 will change the assigned HD amp model set to any one of the voicings on Channel A of the DT50.
So, if you want to change Voicing I of Channel A on the DT50 amp from the original Fender Blackface to be a Hiway 100 amp model instead, do the following:
- On any preset (blank or not) on the POD, go to the POD's MIDI Assign screen by holding the MOVE button for a few seconds. We suggest doing this on a blank new preset so that you can use this preset to send these MIDI messages to your DT amplifier.
- Let's assign Footswitch 1 (FS1) to send MIDI CC# 11 with a value of 003.
- Press on FS1 so that the arrow is pointing to it in the POD's screen. Turn Knob 1 to select MIDI CH: Base.
- Turn Knob 2 to select Message: CC.
- Turn Knob 3 to select CC# 011.
- Turn Knob 4 to select Value: 003.
- You can exit the MIDI Assign screen by pressing the View button once.
- Now, by simply pressing the FS1 footswitch, you will be sending MIDI CC# 11 value 003 to the DT50 amp which will change the Voicing I of Channel A on the DT50 amp from the original Fender Blackface to be a Hiway 100 amp model.
-
Press the Save button once, rename the preset with the knobs below the screen, then press the Save button once again to store these settings to the POD's preset.
MIDI CC#11 value 0-30 will change the HD amp model on Channel A of the selected voicing on the DT25/DT50 amp.
MIDI CC#12 value 0-30 will change the HD amp model on Channel B of the selected voicing on the DT25/DT50 amp.
Here are reference charts for both the DT25 and the DT50 from the MIDI Reference guide to help you set your values when programming MIDI to the switches of the POD HD500/HD500x. MIDI can be assigned to any of the footswitches of the POD HD500/HD500x EXCEPT for the Bank Up and Bank Down switches.
Using MIDI OX to send MIDI parameters to the DT amplifiers
You can also use MIDI OX software to send the desired MIDI messages to your DT amplifier when using a dedicated MIDI interface connected between your computer set to work with MIDI OX and the DT amplifier's MIDI IN port.
In MIDI OX, click on the Send MIDI Controller Messages button to see the following window:

You’ll want to use the drop down window to select the desired controller event (as referenced in the documentation above such as MIDI CC# 11 or CC#12, etc.) and then select the value on the right (as in the previous example above, value of 0-30, etc.) then, hit the Send button to send that MIDI message to the DT amplifier.
Notice the text by the numbers which are simply part of the standard MIDI spec. These descriptors are irrelevant for the DT amps – again, just look for the number that correlates to the DT parameter you want to send. It also may be confusing that the numbers are not listed sequentially.

If you wanted to change the preamp for the current Voicing of channel A you would select number 11 (labeled expression in the MIDI OX drop down) and number 3 (if you wanted to load the Hiway 100 model for example) using the up/down buttons in the field labeled Value. Hit send and the current Voicing on Channel A should be the Hiway 100.
Avec la dernière mise à jour 2.0 pour le DT25 et DT50, vous devez transférer des paramètres MIDI pour changer des configurations comme les modèles préamplis. Documentation MIDI :
http://line6.com/med...evA_English.pdf
http://line6.com/med...evA_English.pdf
http://line6.com/med...evA_English.pdf
L’utilisation du POD HD500 ou HD500x pour la transmission des paramètres MIDI :
Vous pouvez utiliser POD HD 500 ou HD 500x comme contrôleur MIDI pour transmettre des informations MIDI CC. Connectez le MIDI OUT du POD HD500/500x au MIDI IN de l’ampli DT avec un câble MIDI. Dans le menu MIDI Assign (maintenez le bouton MOVE pour quelques secondes) et assignez la fonction MIDI désirée a un des commutateurs au pied pour changer les configurations sur le DT.
D’ici, utilisez la référence MIDI CC des amplis DT au-dessus pour assigner des commandes MIDI CC propres à un commutateur au pied POD HD500/HD500x.
Exemple : Sur l’ampli DT50, envoyer une commande MIDI CC# 11 avec une valeur de 0 à 30 changera le modèle ampli HD à un des tons sur le canal A du DT50.
Donc, si vous voulez changer le ton 1 du canal A sur le DT50 d’un Fender Blackface à un modèle Hiway 100 :
- Sur un des presets (vide ou pas) sur le POD naviguez dans l’écran MIDI Assign (en maintenant le bouton MOVE pour quelques secondes.) Nous suggérons de faire ca avec un preset vide, comme ca, vous pouvez l’utiliser pour transmettre des commandes MIDI à l’ampli DT.
- Assignez Footswitch 1 (FS1) la commande MIDI CC# 11 avec une valeur de 003.
- Cliquez FS1 (la flèche doit pointer au FS1 sur l’écran du POD). Tournez le bouton pour sélectionner MIDI CH : Base.
- Tournez-le pour sélectionner Message : CC.
- Tournez-le pour sélectionner CC# 011.
- Tournez-le pour sélectionner Value : 003.
- Quittez l’écran MIDI Assign avec le bouton View.
- Poussez FS1 pour envoyer la commande MIDI CC#11 avec valeur 003 à l’ampli DT. Cette action changera le ton 1 du canal A sur le DT de Fender Blackface à Hiway 100.
-
Poussez le bouton Save, renommez le preset avec les boutons dessous l’écran et poussez Save encore une fois pour enregistrer les configurations.
MIDI CC#11 avec une valeur de 0 à 30 changera le modèle ampli HD sur canal A du ton sélecté sur l’ampli DT25/DT50.
MIDI CC#12 avec une valeur de 0 à 30 changera le modèle ampli HD sur canal B du ton sélecté sur l’ampli DT25/DT50.
Tableaux de référence :
Vous pouvez assigner MIDI à tous les commutateurs à pied sur le POD HD500/HD500x sauf les commutateurs Bank Up et Bank Down.
L’utilisation de MIDI OX pour envoyer des paramètres MIDI aux amplis DT :
Vous pouvez utiliser le logiciel MIDI OX pour transmettre des paramètres MIDI à votre ampli DT si vous utilisez une interface MIDI connecté à votre ordinateur et le MIDI IN du DT.
En MIDI OX, cliquez « Send MIDI Controller Messages » pour voir cet écran :
Utilisez le menu déroulant pour sélecter la commande, comme MIDI CC#11 ou CC#12. Après, vous pouvez sélecter la valeur sur le côté droit. (Une valeur de 0 à 30). Cliquez « Send » pour transmettre le paramètre à votre ampli DT.
Ici vous pouvez voir les descriptions a côté des nombres, ignorez-les. Cherchez le nombre que vous voulez configurer sur le DT.
Exemple : Si vous voulez changer le préampli du ton sélectez sur canal A, vous sélectez #11 (le texte dit que c’est « Expression » mais ignorez ca.) et 3 dans le menu « Value » si vous voulez le Hiway 100.
Seit der neusten Aktualisierung 2.0 für die DT25 und DT50 Verstärker müssen Sie MIDI Parameter and den Verstärker senden um Eisntellungen wie Vorverstärkermodelle zu verändern. Quellen zur MIDI Programmierung:
http://line6.com/med...evA_English.pdf
http://line6.com/med...evA_English.pdf
http://line6.com/med...evA_English.pdf
MIDI Parameter per POD HD500/HD500x übertragen:
Sie können das POD HD500 als MIDI Controller verwenden um MIDI CC Parameter zu übertragen. Schließen Sie dazu den MIDI OUT Ausgang des POD HD500/500x an den MIDI IN Eingang am DT Verstärker mit einem MIDI Kabel an. Öffnen Sie dann das MIDI Assign Menu auf dem POD indem Sie den MOVE Knopf gedrückt halten um hier nun einen Fußschalter zuzuweisen, der dann die MIDI Parameter and den DT Verstärker versendet.
Von hier an sollten Sie das oben erwähnte Referenzmaterial verwenden um die korrekten MIDI Parameter auf den Fußschalter zuzuweisen.
Zum Beispiel: Wenn Sie vom POD die MIDI Parameter MIDI CC#11 mit einm Wert von 0 bis 30 an den DT Verstärker verschicken, wird das ausgewählte HD Verstärkermodell auf einen der Töne des Kanals A vom DT50 umstellen.
Was also bedeutet, dass wenn Sie Voicing 1 des Kanals A auf dem Verstärker vom original Fender Blackface auf einen Hiway 100 umstellen wollen, machen Sie folgendes:
- Von irgendeinem Preset aus, öffnen Sie das MIDI Assign Menu indem Sie den MOVE Knopf gedrückt halten. Wir empfehlen, dass Sie einen freien Preset Slot verwenden, sodass Sie weiterhin von diesem Slot aus die MIDI Parameter versenden können.
- Verwenden wir nun Fußschalter 1 (FS 1) um die Parameter MIDI CC#11 mit Wert 003 zu versenden.
- Drücken Sie dazu auf den FS1 sodass der Pfeil auf den POD Bildschirm zeigt. Drehen Sie dann Knopf 1 um MIDI CH: Base auszuwählen.
- Drehen Sie an Knopf 2 um Message: CC auszuwählen.
- Drehen Sie an Knopf 3 um CC#011 auszuwählen.
- Drehen Sie an Knopf 4 um Value: 003 auszuwählen.
- Jetzt können Sie das Fenster verlassen indem Sie den View Knopf drücken.
- Nun können Sie, indem Sie FS1 drücken, die zugewählten MIDI Parameter an den Verstärker senden, was in unserem Fall dazu führt, dass Voicing 1 auf Kanal A auf das Hiway 100 Modell umgestellt wird.
-
Drücken Sie den Save Knopf. Bennen Sie das Preset mit den Knöpfen unter dem Bildschirm um und drücken Sie dann wiederum Save um alle Einstellungen auf dem Preset abzuspeichern.
MIDI CC#11 Wert 0-30 verändert das HD Verstärker Modell auf dem gewählten Voicing des Kanals A des DT Verstärkers.
MIDI CC#12 Wert 0-30 verändert das HD Verstärker Modell auf dem gewählten Voicing des Kanals B des DT Verstärkers.
Hier noch Listen der MIDI Parameter als Referenz:
MIDI Parameter mit MIDI OX versenden:
Sie können auch die MIDI OX Software verwenden um MIDI Parameter an den DT Verstärker zu schicken. Dazu benötigen Sie eine MIDI Schnittstelle für Ihren Computer, den Sie dann an den MIDI IN des Verstärkers anschließen, sowie an Ihren Computer.
Klicken Sie im MIDI OX Fenster auf Send MIDI „Controller Messages“. Folgendes Fenster öffnet sich:
Verwenden Sie dann das Dropdown Menu um den gewünschten MIDI CC# auszuwählen. Wählen Sie dann einen Wert aus auf der rechten Seite und klicken Sie den „Send“ Knopf.
Achtung, im Dropdown Menu werden den Zahlen verschiedene Texte zugewiesen. Ignorieren Sie diese einfach. Die Beschreibungen sind hier irrelevant. Suchen Sie nach der Nummer und wählen Sie diese aus. Die Zahlen Sind außerdem nicht immer geordnet.
Wenn Sie also das Voicing des Kanals A einstellen wollen, wählen Sie Nummer 11. Nummer 11 hat bei uns zum Beispiel die Beschreibung „Expression“, die uns aber nicht weiter interessiert. Außerdem wählen Sie die Nummer 3 im „Value“ Feld. Klicken Sie dann „Send“. Das derzeitige Voicing des A Kanals sollte nun auf Hiway 100 gestellt sein.