

Helix/HX 3.10 (released April 15, 2021) includes a new amp, new effects, new features, improvements, and bug fixes and is recommended for all users.
Helix/HX Firmware 3.11 (released April 27, 2021) includes additional important bug fixes:
- HX Stomp, HX Stomp XL only—If a custom label is not assigned, tapping a stomp switch with multiple assignments would display "MULTIPLE [X]" instead of displaying its assignments—FIXED
- HX Stomp, HX Stomp XL only—Stomp mode footswitches would not follow the Global Settings > Displays > LED Ring Brightness value—FIXED
- HX Stomp XL only—The colors for Distortion and Reverb boxes on Play view were reversed—FIXED
- Receiving a MIDI CC67 could cause Helix LT to freeze—FIXED
- In some cases, a MIDI snapshot (CC69) message could fail to be recognized if sent immediately after a PC message—FIXED
Helix Native/HX Edit 3.11 (released June 1, 2021) includes important fixes:
- Full support for macOS 11 Big Sur
- HX Stomp/HX Stomp XL only—Renamed snapshots would not appear in HX Edit's Command Center window—FIXED
- HX Stomp only—On rare occasions after restoring from a backup, HX Stomp's Input block could appear as "None"—FIXED
How do I update to 3.11?
Any chance you've already updated HX Edit to 3.01 (released on Feb 2, 2021) or 3.10 (released on April 15, 2021)? If so, just connect Helix/HX to your computer via USB and launch HX Edit. The software will walk you through the entire procedure, including backing everything up to your computer.
I updated but why don't I see [Model X]?
HX Edit can't magically see new models added to your Helix/HX hardware; you must update HX Edit at well. Here's a link:
- macOS: https://line6.com/software/readeula.html?rid=10574
- Windows: https://line6.com/software/readeula.html?rid=10576
My Helix/HX is at version X.XX. Can I go straight to 3.11?
Absolutely, but note that if you're starting with a version lower than 2.80, the update will appear to happen twice. This is normal.
Anything else I should know?
Yes. We STRONGLY recommend performing a factory reset AFTER UPDATING your Helix/HX firmware to 3.11 and THEN RESTORING YOUR BACKUP. (Backing up is part of the update process). Here's how to perform a factory reset. IMPORTANT: MAKE SURE YOU HAVE A BACKUP FIRST, AS A FACTORY RESET WILL ERASE ALL YOUR WORK!
- Helix Floor/LT: While holding footswitches 9 & 10 (bottom row, 2 middle switches), turn on Helix Floor/LT
- Helix Rack: While holding knobs 5 & 6 (2 furthest right knobs below the screen), turn on Helix Rack
- HX Effects: While holding footswitches 6 & TAP (2 farthest right switches on the bottom row), turn on HX Effects
- HX Stomp: While holding footswitches 2 & 3, turn on HX Stomp
- HX Stomp XL: While holding footswitches C & D, turn on HX Stomp
New Amp in 3.10
Helix Floor, Helix Rack, Helix LT, Helix Native, HX Stomp, HX Stomp XL

- Mandarin Rocker, based on* the Orange® Rockerverb 100 MKIII (Dirty Channel). NOTE: We decided to slightly alter the model so that at lower settings, the Drive knob's taper exhibits a smoother transition into distortion.
New Effects in 3.10
Helix Floor, Helix Rack, Helix LT, Helix Native, HX Effects, HX Stomp, HX Stomp XL

-
Distortion > Ratatouille Dist (Mono, Stereo), based on* the 1984 Pro Co RAT. Turns out our Vermin Dist model was broken. Sorry! We were going to replace it completely but a bunch of people had presets with the old version. On top of that, we found out our RAT's LM308 chip had crapped out since we modeled it last so we decided to get it into perfect working order and start from scratch.
- Gain—Sets the amount of distortion
- Filter—Sets the amount of high cut (low pass) filter applied to the distortion, basically letting more treble through (lower values) or filtering it out (higher values)
- Level—Sets the overall level of the block
-
Modulation > Retro Reel (Mono, Stereo), Line 6 Original effect that simulates playing a signal back from an analog tape machine. This signal can be distorted, filtered to sound older or more lo-fi, and modulated with wow and flutter. TIP: Helix Native users should definitely try Retro Reel on all sorts of tracks—vocals, drums, keyboards, strings, busses, effects returns, you name it. Anything that needs a bit more punch or vibe.
- Wow Fluttr—Determines how much warbly tape sound is heard
- Saturation—Adds analog tape saturation and at high enough settings, distortion. At lower settings, it's great for simply warming up a tone
- Low Cut—Determines the frequency of the Low Cut (High Pass) filter. At higher settings, can provide a lo-fi effect
- High Cut—Determines the frequency of the High Cut (Low Pass) filter. At lower settings, can provide the natural high-end roll-off of old tape
- Tape Speed—Changes both the rate of the modulation applied by the Wow Fluttr control and the filtering response of the analog tape emulation
- Level—Sets the overall level of the block
- Texture—Adjusts the amount of the NAB tape EQ in the simulated tape path. When Saturation is set to 0.0, the texture is invisible. When Saturation is turned up, the texture will affect the tightness (or looseness) of the distortion
-
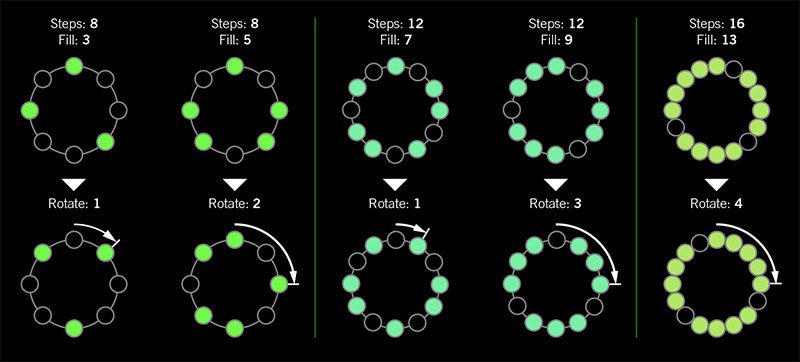
Delay > Euclidean Delay (Mono, Stereo), Line 6 Original delay based on Euclidean algorithms. Creates multitap patterns by setting the length of the pattern (Steps) and the number of taps (Fill) in the pattern. The Euclidean algorithm spaces taps as evenly as possible throughout the pattern, resulting in rhythms from traditional to highly complex. Settle in because this one'll require diagrams and charts and whatnot. TIP: Add two Euclidean Delays in parallel (with different settings) for interesting polyrhythm patterns. When using a stereo playback system, try panning Paths A and B in the Mixer to L100 and R100.
- Step Time—Sets the time between steps. The total delay time is Time x Steps, so [Time: 1/16 x Steps: 8] is a 1/2-note. Press the knob to toggle between ms/sec and note values
- Feedback—Controls the overall number of repeats heard for the entire sequence. If you want to hear all fills in the sequence only once, set to 0%
- Steps—Determines the number of steps in the sequence (1-16; see diagram below)
- Fill—The number of active taps, whose spacing is set by Euclidean algorithms (1-16, see diagram below). If Fill is higher than Steps, the extra taps are ignored
- Rotate—Rotates all fills forward by the same amount (0-15; see diagram below). Used If you like the sound of a repeat pattern but want the fills and gaps shifted forward
- Mix—Controls the wet/dry mix of the delay. When set to 0%, no delay is heard; when set to 100%, no dry signal is heard
- Low Cut—Applies a low cut (high pass) filter to the fills, letting you remove the effected signal below a certain frequency
- High Cut—Applies a high cut (low pass) filter to the fills, letting you remove the effected signal above a certain frequency
- Level—Controls the overall output level of the block
- Trails—When on, delay repeats continue to ring out after the block is bypassed
I was told there'd be no math!
Sorry. If you'd like to read more about Euclidean rhythms, check this out: https://splice.com/blog/euclidean-rhythms/ Or if you'd like to know more about Euclidean math, see ya' in a semester or two! https://en.wikipedia.org/wiki/Euclidean_algorithm
-
Reverb > Dynamic Hall (Mono, Stereo), Line 6 Original hall reverb
- Decay—Sets the decay of the reverb (0.1 sec ~ 45.0 sec, or Infinity) TIP: Assign a second stomp switch to toggle between a lower Decay value and Infinity. Label it "ForEVER ever?"
- Predelay—Determines the amount of delay heard before the signal enters the hall. Can sometimes result in more definition between the dry and effected signals
- Room Size—Sets the size of the hall (10, 20, or 30 meters). NOTE: This parameter actually changes the algorithm so you'll hear a small bump when changing it. Therefore, we don't recommend assigning Room Size to snapshots or other controllers
- Diffusion—Sets the amount of smearing between discrete echoes, sometimes resulting in a softer effected signal
- Damping—Determines the frequency above which the reverb will be absorbed. For example, if your hall is full of people wearing fake ocelot jumpsuits, more high frequencies would be absorbed than if the room were empty
- Mix—Controls the wet/dry mix of the reverb. When set to 0%, no reverb is heard; when set to 100%, no dry signal is heard
- Motion—Sets the amount of randomization, which can be helpful to minimize any metallic artifacts common in static reverbs. At higher values, can impart a bit of modulation to the effected signal
- Low Freq—Sets the frequency below which the Low Gain parameter is applied
- Low Gain—Sets the reverb time for frequencies below the Low Freq value. Values below 0.0dB mean the bass frequencies decay faster than the treble frequencies; values above 0.0dB mean the bass frequencies decay slower than the treble frequencies
- Low Cut—Applies a low cut (or high pass) filter to the reverb, letting you remove the effected signal below a certain frequency
- High Cut—Applies a high cut (or low pass) filter to the reverb, letting you remove the effected signal above a certain frequency
- Level—Controls the overall output level of the block
- Trails—When on, reverb decay continues to ring out after the block is bypassed
-
Reverb > Hot Springs (Mono, Stereo), Line 6 Original spring reverb
- Dwell—Adjusts the strength of the signal sent into the spring tank. Higher values result in a longer decay
- Spring Count—Sets how many springs are in the tank (1, 2, or 3, and numerous values in between)
- Drip—Adjusts the intensity of the spring reverb, or how much "ploink" you might hear
- Low Cut—Applies a low cut (or high pass) filter to the reverb, letting you remove the effected signal below a certain frequency
- High Cut—Applies a high cut (or low pass) filter to the reverb, letting you remove the effected signal above a certain frequency
- Mix—Controls the wet/dry mix of the reverb. When set to 0%, no reverb is heard; when set to 100%, no dry signal is heard
- Level—Controls the overall output level of the block
- Trails—When on, reverb decay continues to ring out after the block is bypassed
*NOTE: All product names used in this document are trademarks of their respective owners and neither Yamaha Guitar Group nor Line 6 are associated or affiliated with them. These trademarks appear solely to identify products whose tones and sounds were studied by Line 6 during sound model development.
New Features in 3.10
Increased Oversampling Throughout
Helix Floor, Helix Rack/Control, Helix LT, Helix Native, HX Effects, HX Stomp, HX Stomp XL
Oversampling has been increased across the board, resulting in higher fidelity, fewer aliasing artifacts, and smoother decay trails, especially when running multiple distortion stages or with higher gain tones. Many people might not notice a difference, but those highly sensitive to aliasing will appreciate 3.10's smoother response. Amp and effects models have been optimized to accommodate these improvements without increasing DSP usage.
Customizable Stomp Switches
HX Stomp, HX Stomp XL [Feature already in Helix Floor, Helix Rack/Control, Helix LT, and HX Effects]
As long as something is assigned to a stomp switch (bypass one or more blocks, toggle parameter Min/Max, or Command Center command), switches in Stomp Footswitch Mode can now have custom labels and colors. This is especially helpful when multiple blocks, controls, or commands are assigned to the same switch.
- Touch a stomp mode footswitch to select it and from either the Bypass Assign or Command Center menu, press PAGE> and then Customize.
- Use the Upper Knob and Knob 2 (Character) to name the stomp.
- Press PAGE> and turn Knob 3 (Switch LED) to choose a custom color. When set to "Auto" (the default), the switch reflects its assignment (Delays are green, Filters are purple, Commands are white, etc.)
- When finished, press <PAGE and Knob 3 (OK).
Customizable Snapshot Switches
HX Stomp, HX Stomp XL [Feature already in Helix Floor, Helix Rack/Control, Helix LT, and HX Effects]
Switches in Snapshot Footswitch Mode can now have custom labels and colors.
- From Play View, press the Upper Knob to open the Preset List.
- Turn Knob 2 (Snapshot) to select the snapshot you want to rename and press ACTION.
- Press Rename Snapshot.
- Use the Upper Knob and Knob 2 (Character) to name the stomp.
- Press PAGE> and turn Knob 3 (Switch LED) to choose a custom color. When set to "Auto" (the default), the switch is white
- When finished, press <PAGE and Knob 3 (OK).
Tuner Trails
Helix Floor, Helix Rack/Control, Helix LT, HX Effects, HX Stomp, HX Stomp XL
Don't sleep on this one: The Tuner screen has a new "Trails" parameter. When set to "On," delay repeats and reverbs' decay continue to ring out and even the Looper keeps running when the tuner is engaged. No more awkward "everyone's staring at me because my B string went wonky."
Expanded 3.0 Models
Helix Floor, Helix Rack/Control, Helix LT, Helix Native, HX Effects, HX Stomp, HX Stomp XL
3.0 added a boatload of new creative effects and after collecting feedback from users, we've added new parameters to some of them to help expand their flexibility and fun factor. IMPORTANT! These new parameters won't show up in your existing presets; they'll only appear if you remove the block (or change the model and reload it). Also, if you've saved any of the following models' defaults, they will need to be re-tweaked and saved again.
-
Delay > Poly Sustain
- Auto EQ— Determines how much compensation EQ is applied to the sustained signal. If the sustained signal sounds too harsh when pitched up (or dull when pitched down), adjust this setting to taste. The higher the value, the more EQ is applied at the shift end points; when set to 0.0, no compensation EQ is applied
-
Operation—Determines what happens to your signal when Poly Sustain is turned on (remember, it's bypassed by default)
- "Mute All"—When Poly Sustain is on, THE ENTIRE PATH IS MUTED
- "Dry Kill"—When Poly Sustain is on, only the sustained signal is heard. TIP: With Poly Sustain on a parallel path, assign a second stomp switch to toggle between Mute All and Dry Kill. This lets you leave the block enabled and bring the sustained signal in and out by switching between the two values
- "Normal" (default)—When Poly Sustain is on, both the dry and sustained signals are heard. This is how Poly Sustain behaved in Firmware 3.0; that is, you're able to jam on top of the sustained drone
-
Delay > Glitch Delay
- Pitch—Determines the likelihood of repeats changing pitch, based on the new Interval 1 and Interval 2 settings (In 3.0, the repeats were fixed to an octave below and above). Was called "Octaves" in 3.0
- Interval 1—Sets the pitch of some repeats, the likelihood of which is determined by the Pitch parameter (from an octave down to an octave up)
- Interval 2—Sets the pitch of other repeats, the likelihood of which is determined by the Pitch parameter (from an octave down to an octave up)
- Low Cut—Applies a low cut (or high pass) filter to the slices, letting you remove the effected signal below a certain frequency
- High Cut—Applies a high cut (or low pass) filter to the slices, letting you remove the effected signal above a certain frequency
- Level—Controls the overall output level of the block
-
Pitch/Synth > 12 String
- PluckType—Optimizes the 12 String emulation for specific types of playing styles. We've also improved the onset detection and 12 String now uses less DSP
-
Looper > Shuffling Looper
- Pitch—Determines the likelihood of your slices changing pitch, based on the new Interval 1 and Interval 2 settings (In 3.0, the repeats were fixed to an octave below and above). Was called "Octaves" in 3.0
- Interval 1—Sets the pitch of some slices, the likelihood of which is determined by the Pitch parameter (from an octave down to an octave up)
- Interval 2—Sets the pitch of other slices, the likelihood of which is determined by the Pitch parameter (from an octave down to an octave up)
Instant Command Wait Time
Helix Floor, Helix Rack/Control, Helix LT, HX Effects, HX Stomp, HX Stomp XL
On the Command Center page, Instant commands (lightning bolt icon) have a new "Wait Time" parameter, letting you delay certain events by up to 1000ms. This is to help Helix/HX control older MIDI gear that may behave incorrectly when receiving multiple commands very close together. Unless you specifically need to delay a message, leave this set to "0 ms."
New and Improved MIDI Implementation
Helix Floor, Helix Rack/Control, Helix LT, HX Effects, HX Stomp, HX Stomp XL
- MIDI Snapshot changes on CC69 that are received during preset loads will now be buffered and executed once the preset load is finished. This means that you can send a MIDI Snapshot change immediately after a PC message to effectively load a preset with a different Snapshot than it was saved with
- Bank/Preset/Snapshot Up and Down messages how properly work via incoming FS1/FS7 emulation MIDI messages
- FS1/2/3 emulation MIDI messages can now be momentary for HX Stomp (values 64-127 = press; values 0-63 = release)
- Stomp switch emulation MIDI messages now work while in preset or snapshot footswitch mode
- New MIDI message (Helix Floor/Rack/LT/HX Stomp XL): CC71 engages the MODE switch
- New MIDI message: CC 72 value 64-127 = next preset, value 0-63 = previous preset
- New MIDI message (Helix LT, HX Stomp, HX Stomp XL): CC 73 toggles between Play and Edit views
Other Changes and Improvements in 3.10
- HX Edit and Helix Native now add support for macOS 11 Big Sur
- Helix Floor and Rack/Control only: The scribble strip above FS6 (MODE) now displays which mode is currently active—Preset or Stomp. You can still hold FS6 to engage hands-free Pedal Edit mode
- On the Controller Assign page, turning Knob 2 (Controller) no longer resets the Min Value and Max Value
Bug Fixes in 3.10/3.11
- 3.10 Pressing the Bank Down switch would skip banks in certain situations–FIXED
- 3.10 When Tuner View is active while Spillover is engaged, changing presets can sometimes cause audio output to stop—FIXED
- 3.10 The tuner screen and gain reduction meters could sometimes appear laggy—FIXED
- 3.10 In rare cases, an Impulse Response block's IR Select parameter can be reset to 1 after moving any other block to Path 2A—FIXED
- 3.10 HX Effects, HX Stomp, and HX Stomp XL only—Poly Pitch and Poly Sustain blocks could continue processing audio when the unit is in DSP Bypass—FIXED
- 3.10 The Agua 51 model could stop processing audio when its Bass parameter is set to 0.0 and its Mid parameter set to 10.0—FIXED
- 3.10 The Essex A30 model could stop passing audio after roughly 2 minutes when its drive parameter is set to 10.0—FIXED
- 3.10 In some cases, Command Center > HX Looper commands would not function while in Preset Spillover mode—FIXED
- 3.10 The Filter > Legacy > Slow Filter Mode parameter would be fixed on Up even when set to Down—FIXED
- 3.10 Delay > Cosmos Echo could exhibit a "ramp up" sound when enabled—FIXED
- 3.10 HX Effects only—Pressing and holding FS1+FS4 to cycle through Bank, Preset, and Snapshot Up/Down could inadvertently continue cycling through banks—FIXED
- 3.10 Many other minor fixes and improvements
- New in 3.11 HX Stomp, HX Stomp XL only—If a custom label is not assigned, tapping a stomp switch with multiple assignments would display "MULTIPLE [X]" instead of displaying its assignments—FIXED
- New in 3.11 HX Stomp, HX Stomp XL only—Stomp mode footswitches would not follow the Global Settings > Displays > LED Ring Brightness value—FIXED
- New in 3.11 HX Stomp XL only—The colors for Distortion and Reverb boxes on Play view were reversed—FIXED
- New in 3.11 Receiving a MIDI CC67 could cause Helix LT to freeze—FIXED
- New in 3.11 In some cases, a MIDI snapshot (CC69) message could fail to be recognized if sent immediately after a PC message—FIXED
- New in 3.11 (Helix Native/HX Edit) HX Stomp/HX Stomp XL only—Renamed snapshots would not appear in HX Edit's Command Center window—FIXED
- New in 3.11 (Helix Native/HX Edit) HX Stomp only—On rare occasions after restoring from a backup, HX Stomp's Input block could appear as "None"—FIXED
Known Issues in 3.10/3.11
- User model defaults for Delay > Poly Sustain, Delay > Glitch Delay, Pitch/Synth > 12 String, and Looper > Shuffling Looper have been reset due to each model's new parameters—FIXED
- Helix Native's performance can be laggy in new M1-based Apple computers
-
As Delay > Poly Sustain, Delay > Glitch Delay, Pitch/Synth > 12 String, and Looper > Shuffling Looper models have been updated, any existing user defaults for these models will need to be re-tweaked and saved again
-
In rare cases, after importing a .WAV file into the 'Empty' slot of an Impulse Response block set to the same index, all audio output can stop
-
Helix Floor/Rack/LT and HX Stomp only—Sending more than one MIDI program change messages one after another can sometimes cause HX Edit to lose connection
-
Helix LT only—FS1 and FS7 do not transmit Command Center messages
-
HX Stomp and XL only—Quickly scrolling across the signal flow view immediately after booting can sometimes cause HX Stomp/XL to freeze
-
HX Stomp and XL only—In rare cases, after restoring a 3.01 backup, parallel presets' blocks may be shifted one position to the right
-
Impulse responses with names consisting of more than 54 characters cannot be copied or exported
Edited by Digital_Igloo