

RandyInNashua
-
Posts
10 -
Joined
-
Last visited
Posts posted by RandyInNashua
-
-
One thing you can do is set the stomp that always works to the one you use all the time (next page or page down). If you configure the Helix correctly, the MODE button will change between Stomp/Snap mode and Stomp mode. When you need to use the back button, you press mode - "back" - mode. Put the "back" button to FS5 so that it is next to the mode button. Not ideal, but might work for you.
-
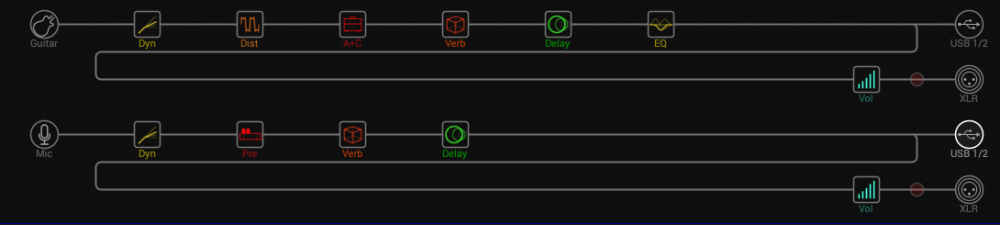
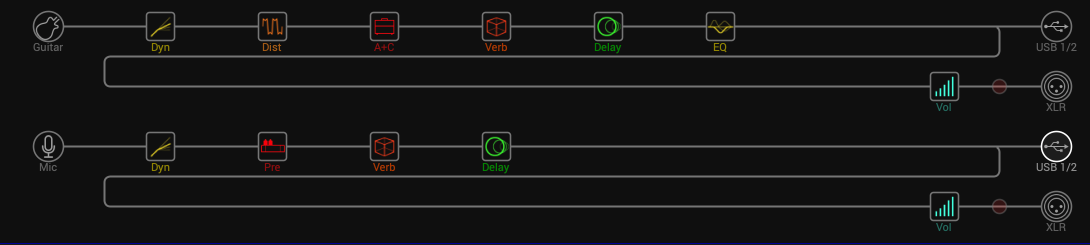
If you are only using a single path for each input, make sure one input is on path 1A and the other on 2A. Change both of the outs for these to USB 1/2 and hard pan them left and right in the output block. Add a Volume or Pan block to the end of each path and drag it down into path B. Move the split to the very end of the path and drag the merge down to create new outs. Set both of these outs to XLR. Change the global setting for Headphones Monitor to XLR. This setting is on pg 3 of the global Ins/Outs settings. You now have a few places that you can pan your headphones. The split blocks and the output blocks both have pan settings and if you used Pan blocks to create the new paths you can use those.
-
 2
2
-
-
When I first set up for 4CM I was also confused. What I finally figured out that helped me to visualize what was going on is that your amp's preamp section is in the FX Loop block of your preset. As mentioned above, anything in front of the FX Loop Block is between your guitar and your amp's preamp. Anything after the FX Loop Block is in your amp's fx loop, therefore between your amp's preamp and power amp.
A couple of things to keep in mind. It is possible to "replace" your amp's preamp with a Helix amp or preamp. I like to set up a single foot switch that bypasses the FX Loop Block while activating the Helix amp block. I can then easily switch between them. Normally you would not want to have the FX Loop Block and a Helix amp block active at the same time, although you can do anything you want if it gives you a tone you like. Since you are using your amp's power amp and cab, you will not need a cab/IR block.
If you want to send a tone to the front of house, you need to create a separate path for it and add a cab or an IR to that path.
-
Hopefully in a future update, a momentary option will be added to the Ext Amp switch making this easier to accomplish.
-
On 9/13/2018 at 1:43 AM, BassDemon said:
Do you know if the Ext Amp switching can be set to momentary?
It is possible to make the Ext Amp switching momentary. It's a bit tricky and I only know how to do it in HX Edit:
1. In the Command Center, assign the desired foot switch to the Ext Amp and select the type (Tip, Ring, or Both). Select the LED color and customize the label if you want to.
2. Switch the foot switch to the desired default state. This will be the state of the Ext Amp when the foot switch is not being pressed so this is important. When the LED is dim, the circuit will be open, when it is lit, the circuit will be shorted. For the Trio+ I needed it to be normally open, so I made sure that the LED was dim before proceeding to the next step.
3. Add a gain block to your preset and assign its bypass to the same foot switch and its Type to Momentary. It doesn't matter where in your signal path you add the gain block since it can be deleted when you're done.
4. Repeat for the other two Ext Amp types if desired. You can use the same gain block.
5. Delete the gain block, save the preset and you are all set.
If you did it correctly, the foot switch LED will change states when pressed and return to the default state when released, so for normally open, the LED will normally be dim and will get bright when pressed and return to dim when released.
-
I posted this on the Helix page in Facebook a few weeks ago. It is a procedure to do a factory reset and choose what to restore from the backup. There are a couple of new factory presets for 2.60.
Many of you may already know this, but some of you may not be aware that the current update process automatically restores your Helix with all of your presets including the Factory1, Factory2 and Template sets. For many this is fine, but the drawback is that there are often new Factory presets released with the major updates that are based on the new features included in the update. These are over written and therefore not available for those who may want to try them out or use them to create new presets. For this 2.60 update there are new presets for the 2 new amps for example.
Here is my work around for this. Be aware that this procedure will overwrite any changes you have made to the Factory presets.
Important: Make sure you have a full and up to date backup before you start this procedure!!! If your not sure, do one first. Create Backup under the File menu.
1.Update your Helix following the standard procedure.
2.Turn off the Helix
3.Turn on the Helix holding down footswitches 9 & 10 on the Floor/LT, encoders 5 & 6 on the Rack. Hold these down until you see the factory presets start to load. This will restore the Factory presets, templates, global settings and IRs.
4. Launch HX Edit and do a “Restore From Backup” from the File menu.
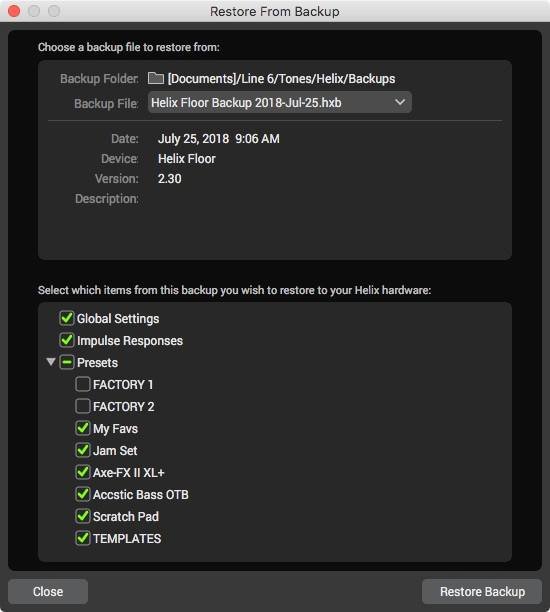
5. On the Restore From Backup popup expand Presets and deselect FACTORY1, FACTORY2. You may also wish to deselect TEMPLATES if you have not created any custom templates (see attached image).Once the restore is complete, I like to reboot one more time.
-
FYI, I've copied this to a Google Docs Spreadsheet for those interested as well.
Some of the conditional formatting works a little funky (i.e. if you change the BPM to 1.0, for some reason it won't color proplery, but ANY other value (besides 120 or 1) seems to color properly when there's a difference... Odd.
Feel free to make a copy for yourself:
https://docs.google.com/spreadsheets/d/1eITL0fiYdSba9DK-XVBp5ANkkQXsWR9oMxGyXzNVBWo/edit?usp=sharing
Not sure what you're seeing. It works fine for me. BPM of 120.0 should not be colored as it is the factory default. If I set it to 1, it turns red. Could be a version conflict. Of course 1.0 BPM would not be very likely...lol. Thanks for sharing it. I hope folks find it useful. I used it last night for the first time for the 2.2 update. Made it easy. Of course now I have to add the new midi settings.
-
I also created a spreadsheet for this. This version has combo boxes so that you can select settings and will flag settings that are different from the default settings. This simplifies re-applying the settings after an upgrade.
Using Helix 4CM with a Mesa Mini rectifier
in Helix
Posted
It sounds like you already figured it out, but I thought I would share my 4CM schematic. I did this schematic for my TubeMeister 18 which includes a Cab Sim circuit for direct to FOH, but you can just ignore that. I think it helps to have a visual of what is going on. I know it helped me. Good luck.