
stevekc
-
Posts
665 -
Joined
-
Last visited
-
Days Won
7
Posts posted by stevekc
-
-
Helix Floor - 3.51 Firmware update disabled my USB Audio I/O on Windows 8.1 laptop
No ASIO either - tried reinstalling the USB Driver - machine Device Manager reports Helix is connected - but none of my DAW apps (ASIO) or Windows Sound manager can locate the Helix as a sound I/O device
this all used to work on Helix Firmware 3.15
-
Fwiw, my Samsung Galaxy S10+ phone running Android 12 has no problems running all features of Catalyst Edit.
It even supports Samsung DEX Mode on external 1920×1080 touch screen
(NEXDOCK)
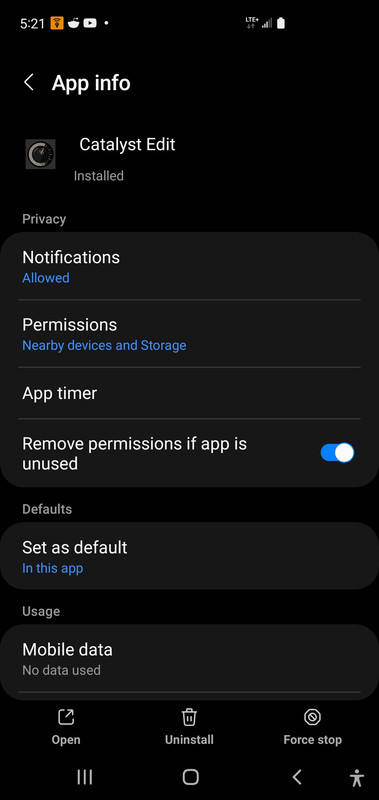
Re file saving to local memory on Android, you may have change the Catalyst Edit App security Permissions to allow it to read/write to local file folder
Here's my working Calalyst App settings
-
On 5/2/2022 at 12:56 PM, jounsik said:
Hi,
bad news. Although I installed new version of firmware and reseted amp, issues with oddly long time to switch the channel (both via foot switch and manually) and rumbling noise during channel change still remains. We have both (me and other guitarist) th same problem. Listen to these two amps. I do not believe this is common...
My Catalyst 200 reacts identically
-
https://www.vguitarforums.com/smf/index.php?topic=34346.0#msg253960
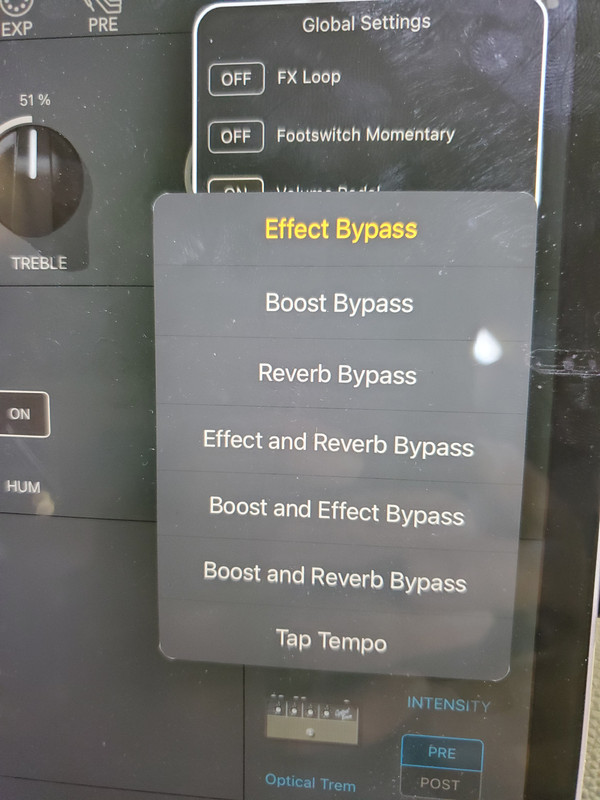
GLOBAL SETTINGS
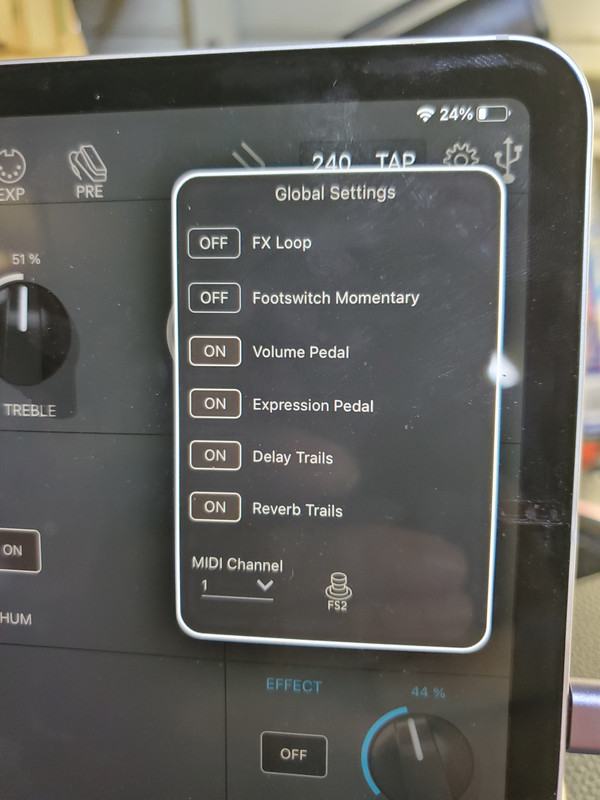
Observe Global Settings panel above.
The FX Loop is unity gain , with a straight patch cable connected from FX Send to FX Return , there is a -6 dB signal loss on FX Return when FX Loop is set to Power amp input and Loop is Engaged in the System settings
Line-6 probably designed the FX Loop in this manner to accommodate higher output levels from external MFX outputs levels. But worth knowing
FSW2 Assignment Options
-
I may revise this later as more details and testing continues
I only have access to a Catalyst 200Purchased open box from Sam Ash
I suspect prior owner felt the rotary Amp select switch was prone to random behavior. specifically at the change between CHIME and CRUNCH amp models
Since I had the Amp Chassis out. A small spritz of Caig DeOxit on the Encoder area where its contacts emerge on the side of the problem Amp Type Rotary Encoder solved that issue
I took the amp apart , and discovered a high reliable Main PCB, With Dual 100 watt @ 4 ohm Mono Class D Power Amps. Good Cirrus CS4272 24 bit codecs using 2 A/D's per signal input (Guitar In, FX Return ) for maximum dynamic range.
Stereo signal fed in into the TRS Aux Input appears in summed Mono to the internal Speakers. While stereo Aux signal can be monitored in Stereo via the TRS Headphone output. I expect Stereo USB Playback Audio to be able to be monitored in Stereo via Headphone Out as well.
The internal Catalyst Guitar processing and FX are Mono only
Using the LFS2 latching footswitch , there is a short gap of silence on Amp A/B channel selection change.
I'm glad I got the 200 , because the amp is voiced on the darker side - sounds of Bill Frizzel. Or Mark Knopfler "Shangri-La" era are easy and apparent- which is a great tone when playing lower volumes in smaller rooms without ice pick treble bleed.
A rookie who A/B tests Catalyst vs Katana may prefer the Katana 100. KATANA has as a higher piercing treble and perhaps is capable of a bit higher decibel output.
But I'm enjoying the polished tones emerging from Catalyst vs the Katana which often becomes a treble spike ear bleed without taming Katanas global EQ.
To be continued
Internal Views
https://www.vguitarforums.com/smf/index.php?topic=34340.0#msg253906Remember Catalyst has far fewer FX resources, vs Mustang GTX
Catalyst channel switching is sluggish with a noticeable mute
For professional use Catalyst is suited more for owners of Helix, Headrush, Kemper, Fractal, and want a guitar speaker power cab. With emergency fall back mode using Catalyst standalone. And work guitar Vol/Tone controls for Rhythm/Solo-old school
I figure a novice at guitar center may walk out with a Katana
While mature folks with older ears , and no desire for an ice pick in the ear amp experience will prefer a Quilter, then a Catalyst.
The Catalyst tones are nice. And suitable if you are only guitarist on the stage
But may get destroyed if your other guitarist has a genuine tube amp
But at majority of my live gigs , folks under age 45 vehemently hate loud live non master volume tube guitar amps.
While Bass can play at 2000 watts and 120 dBIf I showed up with my Vox AC30 and played it at the decibel levels it sounds best, I'd never get rehired by the venues I play.
Instead the trick is using gear that gets great dynamic sound of a record , but live real time at lower volumes - and that's where Catalyst shines and delivers that experience.
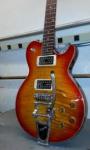
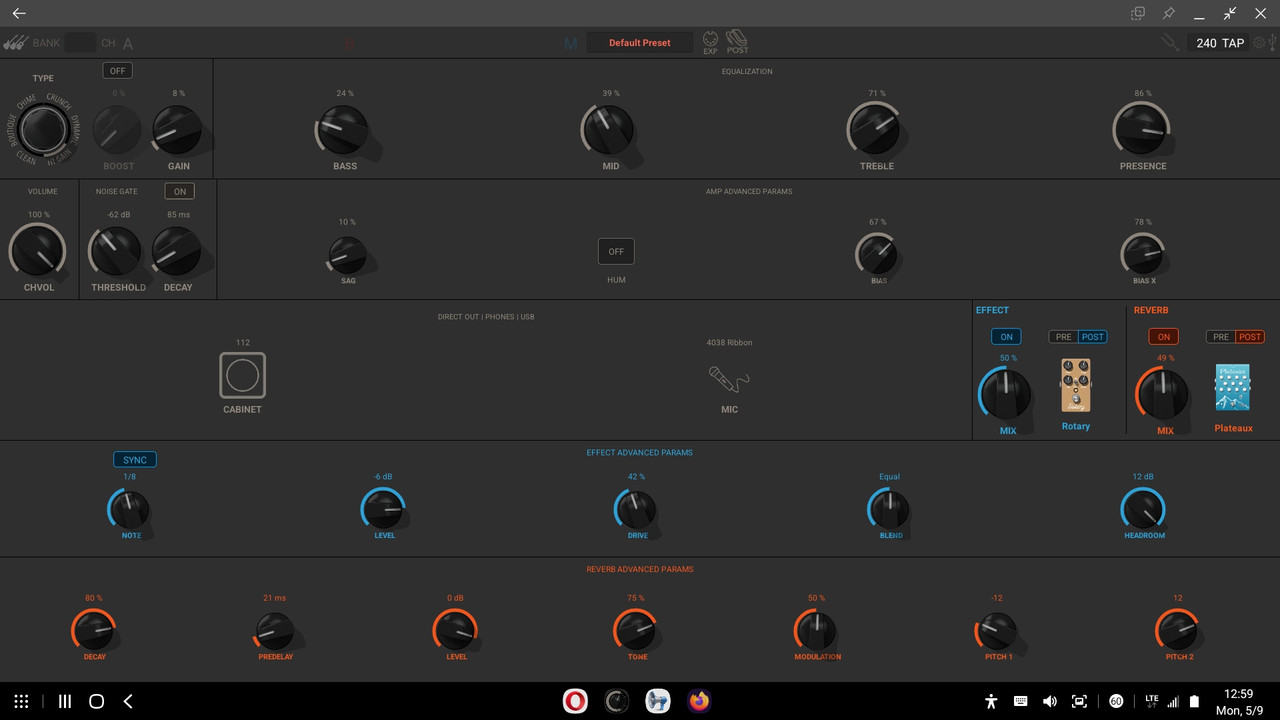
Using Catalyst Editor (iPad)OK, let's go Surfin
These settings were worth the purchase price for me - I could leave it here and play many surfing hits , just toggle tremolo on off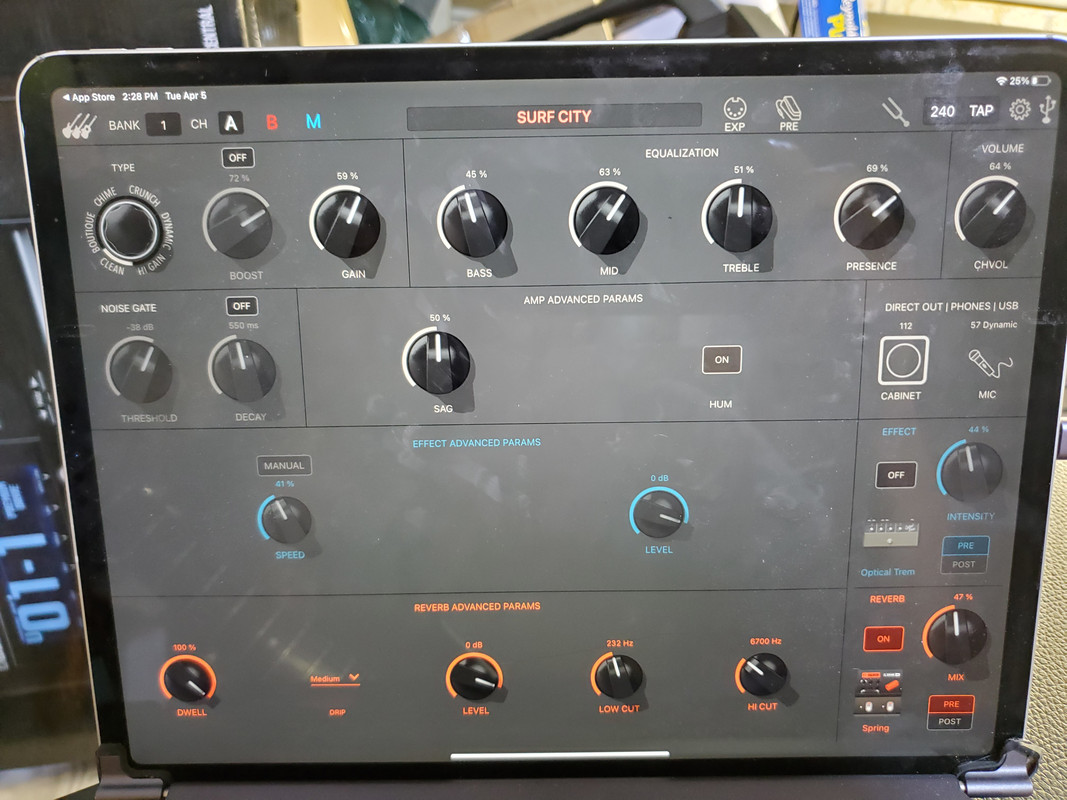
This is the Tone , and Catalyst gets very close, with more dynamic range than Mustang GTXJust palm mute on my Jazz Master delivers very close to this with dripping spring reverb
GLOBAL SETTINGS
Observe Global Settings panel above.
The FX Loop is unity gain , with a straight patch cable connected from FX Send to FX Return ,
When FX Loop is set to Power amp input and Loop is Engaged in the System settings there is a -6 dB signal lossLine-6 probably designed the FX Loop / Power Amp Return with a Pad in this manner to accommodate higher output levels from external MFX outputs levels.
FSW2 Footswitch Assignment Options
Today I'm able to open it up and play loud,Using the editor and adjusting BIAS finding many great tones
One example is with the Boutique Amp and Ducking Delay and a bit of Ganymede Reverb
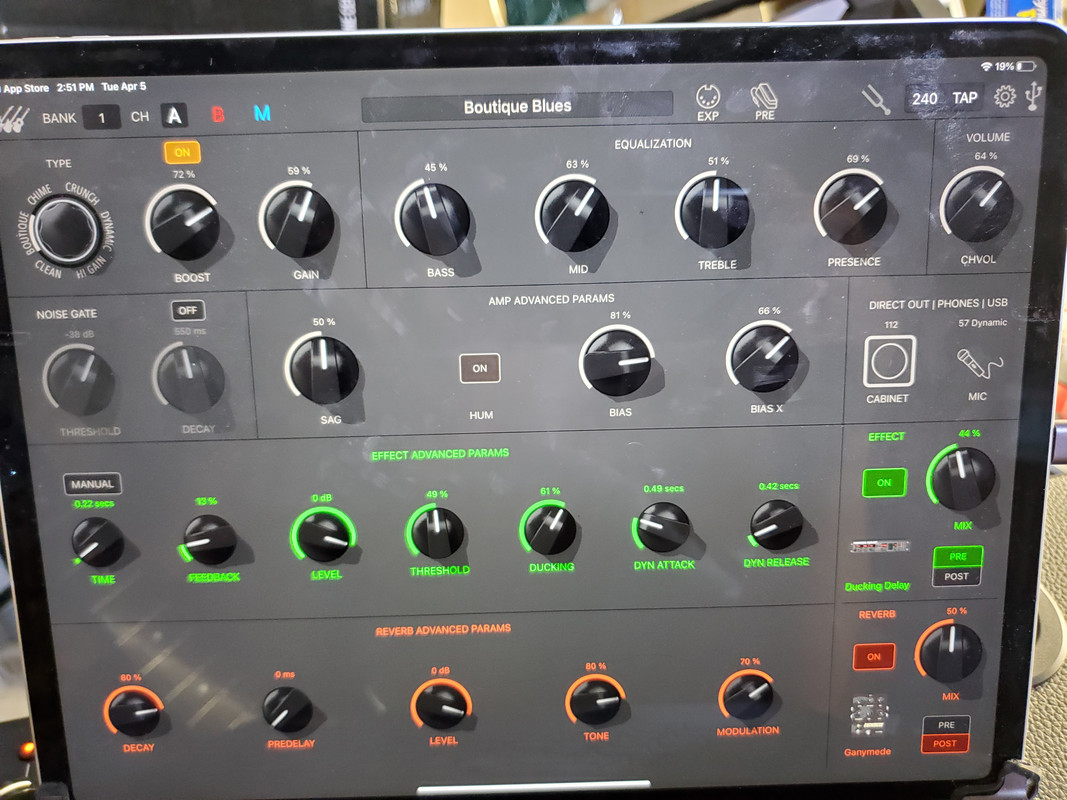
Catalyst has ability to clean to mean just using guitar Volume control
Very happy with its ability to drip Reverb surf tones too
And any Joe Bonamassa / Zeppelin record tones too just using built in FX
And lower the gain on the High Gain amp I was getting near Sonny Landreth tones.
Catalyst -Internal Views
Catalyst User Reviews
Catalyst FAQs
https://www.vguitarforums.com/smf/index.php?board=484.0
-
 1
1
-
 1
1
-
-
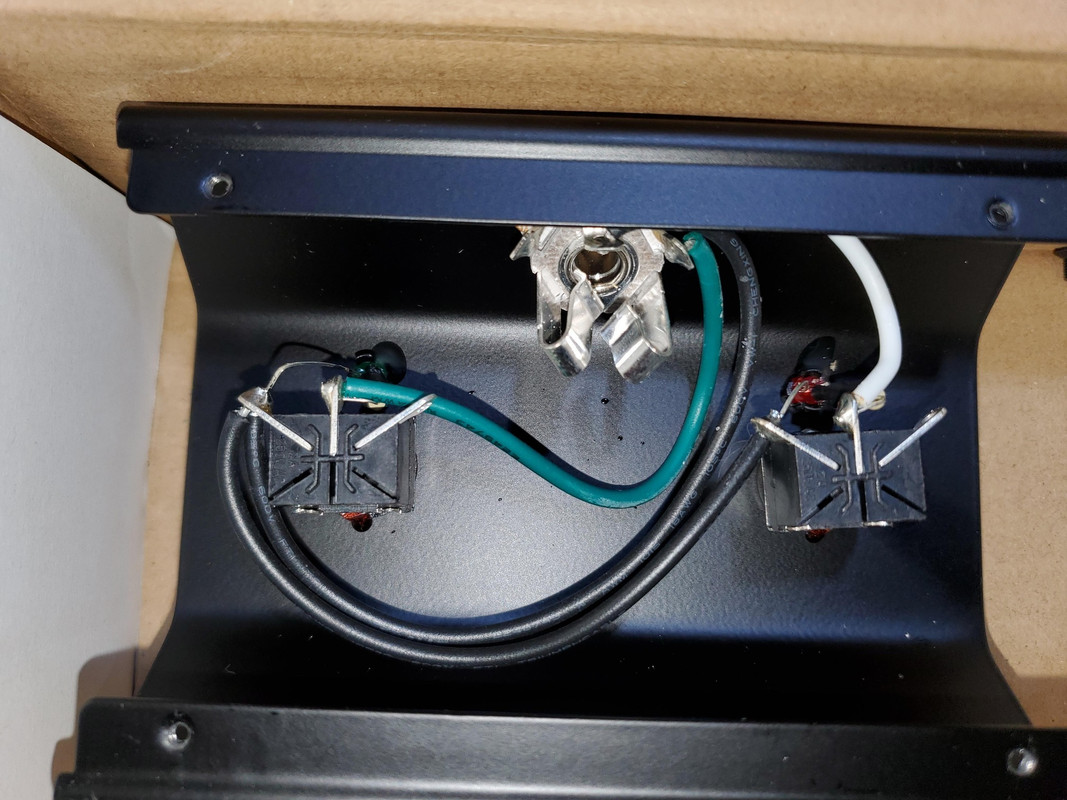
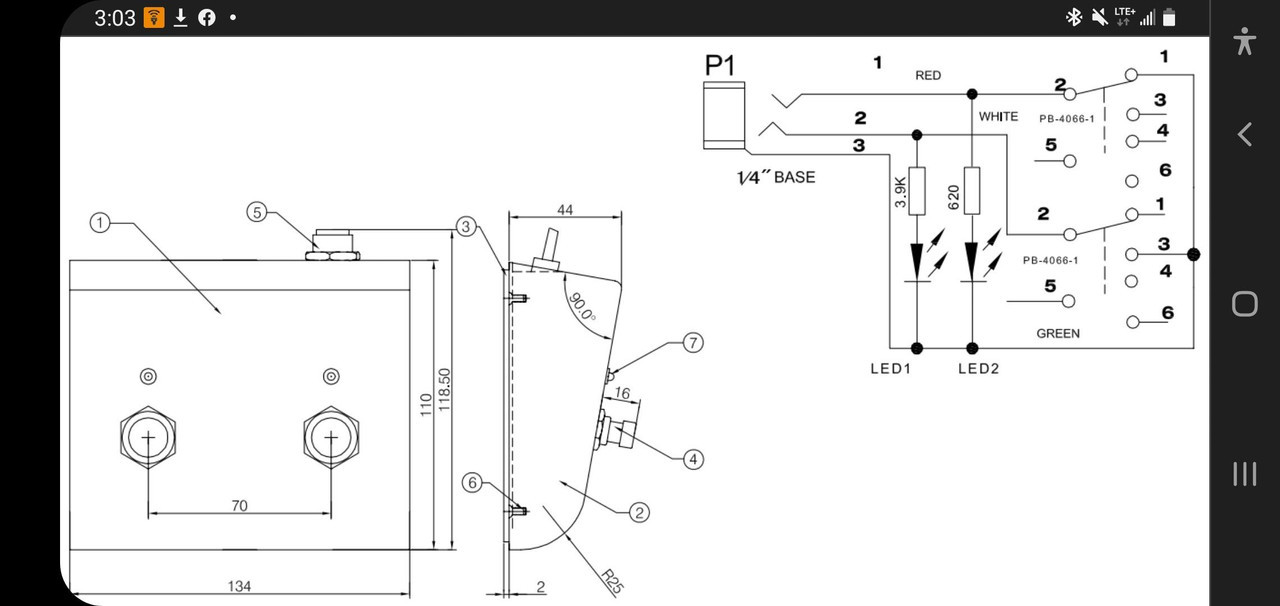
Catalyst Footswitch - is same circuit as Marshall Latching Dual Footswitch with LEDS
But Line-6 LFS2 employs 1K resistors instead
https://i.postimg.cc/zvCxmWRH/277440752-10227817443480313-5760046358682843373-n.jpg
-
I'm hopeful that Catalyst USB Audio 4in / 4 out is similar to the POD Go 4in/4out
and would allow Re-Amping
details on POD Go 4in/4out USB Audio on page 39 -
I do these mods

https://www.vguitarforums.com/smf/index.php?topic=9291.0 -
Line 6 P/N 50-02-0320-4
http://www.fullcompass.com/prod/277278-Line-6-50-02-0320-4
Main circuit board assembly for Line 6 JTV-89F electric guitar.
Line 6 50-02-0320-4
Main PCB Assembly for JTV-89F
OUR PART # 50-02-0320-4
http://web.archive.org/web/20170424062812/http://www.fullcompass.com/prod/277278-Line-6-50-02-0320-4 -
Already exists!
[img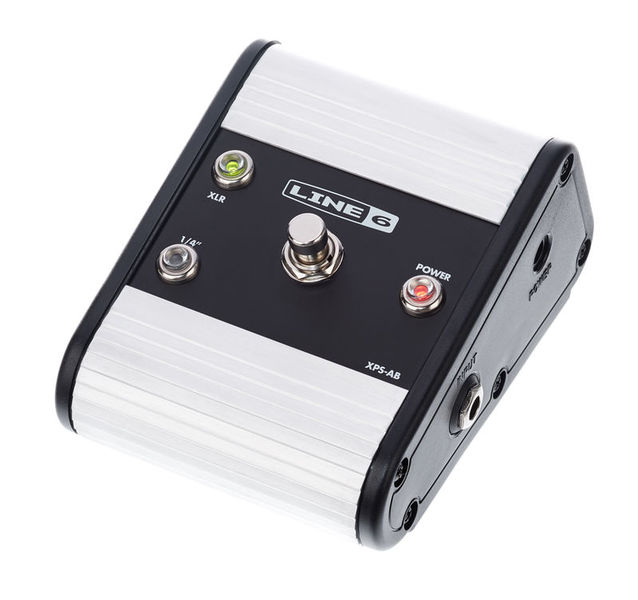 [/img]
https://www.thomann.de/gb/line6_variax_cabled_power_kit.htm
Line 6 Variax XPS A/B Box
Variax Cabled Power Kit for all JTV and Variax Guitars with XPS A/B Box, 15' Planet Waves TRS Cable, and PX-2g 9V AC Power Adapterhttps://www.sweetwater.com/store/detail/VariaxPwrKit--line-6-variax-cabled-power-kit
-
-
HX STOMP does NOT function as a USB Host
-
1
-
-
-
-
JTV-69 never employed that type spring
below is the Fender Tremolo with trem arm tension spring & ball


JTV-69 Tremolo Setup
-
On 5/4/2013 at 1:44 PM, jayson2 said:
Andy Z has a website with patches for Variax's over here:
http://www.instituteofnoise.com/L6/patches.asp
Cheers,
jayson
Still cant believe Line-6 can not host Variax Workbench / Workbench HD Patches at www.customtone.com
https://line6.com/customtone/?show_all=1meanwhile there is this source
To upload patches, simply hit "New Topic" (see tab on upper right) - and p -
Variax in a pedal with 13pin input?
https://www.vguitarforums.com/smf/index.php?topic=5213.0
http://www.rackvax.com/component/content/article/38-introscroller/154-rackvax-electric-has-arrived/

http://www.rackvax.com/store/#!/Do-It-Yourself/c/1173774/offset=0&sort=normalGK 13-pin to Variax Adapter Module ( for use with a guitar with Roland GK-3 13 pin PU
Now you can play the Variax sounds using any GK-equipped guitar without breaking your budget.
Use your guitar equipped with a GK-compatible 13-pin pickup to play the sounds available within Variax 300, 600, 500, 700 or James Tyler Variax using our GK-compatible Variax adapter interface.
Installation is as easy as disconnecting your Variax guitar's bridge connector cable and installing in its place the appropriate jumper cable (included) between the Variax main board and the GK 13-pin to Variax Adapter Module board.
Note: This board interfaces the audio signals from your GK pickup to the Variax hardware. Phantom power (±7V) must be supplied to the GK pickup by connecting another GK-compatible device to the adapter module's GK THRU.
Features:
- GK IN - plug in your 13-pin GK-equipped guitar here.
- GK THRU - This is the phantom power insert point. Connecting another GK-compatible device here will supply power to the pickup connected to GK IN. Can also be used to drive another GK-compatible device such as a Roland VG-99 simultaneously.
Included:
- GK 13-pin to Variax Adapter Module
- Adapter-bridge link cable for use with Variax 300/600/JTV, Variax 500 or Variax 700*
*Your choice of adapter module version affects which cable is included.
Variax 300/600/JTV version:
- 8-pin jumper cable for use with Variax 300, 600 and James Tyler Variax
Variax 500 version:
- 10-pin flex cable for use with Variax 500
Variax 700 version:
- 8-pin flex cable for use with Variax 700
Variax Bass 700 & 705 version:
- 8-pin jumper cable for use with Variax Bass 700 & 705
Specifications
Dimensions: 2.9" x 1.5" x 0.83" (73.7 x 38.1 x 21mm)
Weight: 2 oz.-
1
-
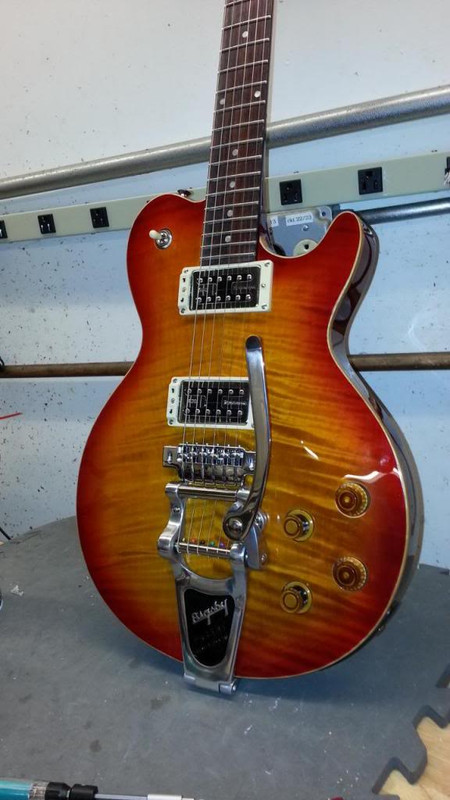
and if you have experience - Bigbsy can be added to JTV-59
details
https://www.vguitarforums.com/smf/index.php?topic=9291.0


-

JTV-69 Gen1

JTV-69 Gen2
-
Sonic Port vs Sonic Port VX - Yes They Are different
Only the SonicPort VX can connect to the USB connection to Mac/Win PC.
The SonicPort can NOT make the USB connection
http://line6.com/support/page/kb/_/mobile-products/sonic-port-mobile-in/sonicportconnections
SONIC PORT VX CONNECTIONS
1. Before connecting the Sonic Port VX, check your iPad, iPhone or iPod touch to be sure you have the latest version of the iOS operating system installed. Instructions for updating your iOS device are available HERE.
2. In order to enjoy POD® amp and effects processing, you’ll need our free Mobile POD application. The Mobile POD app also provides firmware updates to the Sonic Port VX hardware.
If your iPad, iPhone or iPod touch has internet access, we recommend that you first download and install our Mobile POD app from the App Store app before you attach your Sonic Port VX for the first time. Simply search for 'Mobile POD' on the app store to find and download the Mobile POD app.
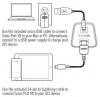
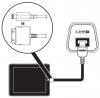
3. If you are using the Sonic Port VX with a iOS device, connect Sonic Port VX to your iPad, iPhone or iPod touch using the included 14-pin to Lightning connector cable. The Sonic Port VX has a red LED located on it's top side that will blink once a few seconds after the Sonic Port VX is successfully recognized by your iOS device. If you want to power/charge your iOS device (Lightning only) while using the Sonic Port VX, you can additionally connect the supplied USB-mini cable from the Sonic Port VX into a iOS USB power supply. If you are using the Sonic Port VX with a Windows computer, first make sure and download the Sonic Port Windows Drivers from our software page HERE before you connect the Sonic Port to your computer. If you are using the Sonic Port VX with MAC OS X 10.9 or above computer you will not need to install any drivers. To connect the Sonic Port VX to your computer simply use the supplied USB-A to USB-mini cable to connect it to your computer. Click the photo below for an illustration of these connections:
4. Connect your 1/4" instrument or other audio source to Sonic Port VX or Sonic Port. The Sonic Port VX and Sonic Port can only use one input source at a time, it will use whichever input is connected to first:
- Using Guitar In (mono): Connect a standard 1/4" guitar cable to the Sonic Port guitar input, then plug the other end into your guitar.
- Using AUX IN : Connect a standard stereo 1/8" line cable to the Sonic Port VX AUX input, then plug the other end into a line level audio output of your source equipment such as a keyboard, drum machine, mixer, or music player.
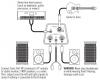
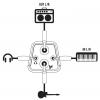
5. Connect two mono 1/4" Tip Sleeve cables to the Sonic Port VX's individual Left and Right outputs, then plug the other ends into a playback device such as a mixer, studio monitors, or powered PA speakers to monitor your audio. You can also connect one mono 1/4" Tip Sleeve calbe to only the Sonic Port VX's left output and the Sonic Port VX will sum together both the Right and Left outputs to allow you to connect it to mono sources such as a guitar or bass amp. To connect a pair of headphones or desktop speakers to the Sonic Port VX simply connect the 1/8" stereo cable into the 1/8" Headphone output on the Sonic Port VX. Click the photo below for a illustration of these connections:
6. If you would like to set the Sonic Port VX up on a mic stand or the included tabletop stand start off by threading the supplied mic stand mount onto the base of the Sonic Port VX. If you would like to use the Sonic Port VX on a mic stand, you can then simply attach the mic stand mount to a mic stand. If you would like to use the included table top stand for the Sonic Port VX, place the mic stand mount onto the tabletop stand and fasten them together using the supplied 1/4" thread as shown in the illustration below:

We recommend that you place the Sonic Port VX at least 10" away from the source that you are trying to record with the built in mics. We also recommend that you use pop screen with the Sonic Port VX when you are recording vocals.
7. Once you have made all your connections launch the iOS or computer app of your choice and your ready to go.
SONIC PORT CONNECTIONS
1. Before connecting the Sonic Port, check your iPad, iPhone or iPod touch to be sure you have the latest version of the iOS operating system installed. Instructions for updating your iOS device are available HERE.
2. In order to enjoy POD® amp and effects processing, you’ll need our free Mobile POD application. The Mobile POD app also provides firmware updates to the Sonic Port hardware.
If your iPad, iPhone or iPod touch has internet access, we recommend that you first download and install our Mobile POD app from the App Store app before you attach your Sonic Port for the first time. Simply search for 'Mobile POD' on the app store to find and download the Mobile POD app.
3. Connect the Sonic Port to your iPad, iPhone or iPod touch using the included 14-pin to Lightning connector cable or the 30 pin cable depending on your ios device.The Sonic Port has a red LED located on it's top side that will blink once a few seconds after the Sonic Port is successfully recognized by your iOS device. Click the photo below for a illustration of this connection:
4. Connect your 1/4" instrument or other audio source to the Sonic Port. The Sonic Port can only use one input source at a time, it will use whichever input is connected to first:
- Using Guitar In (mono): Connect a standard 1/4" guitar cable to the Sonic Port guitar input, then plug the other end into your guitar.
- Using IN L/R: Connect a standard stereo 1/8" line cable to the Sonic Port IN L/R input, then plug the other end into a line level audio output of your source equipment such as a keyboard, drum machine, mixer, or music player.
5. Connect a mono or stereo 1/4" cable to the Sonic Port OUT L/R output, then plug the other end into a playback device such as a guitar amp, mixer or powered speakers to monitor your audio. To connect a pair of headphones or desktop speakers to the Sonic Port simply connect the 1/8" stereo cable into the 1/8" Headphone output on the Sonic Port. Click the photo below for a illustration of these connections:
6. Once you have made all your connections launch the iOS app of your choice and your ready to go.
SONIC PORT VX CONNECTIONS
1. Before connecting the Sonic Port VX, check your iPad, iPhone or iPod touch to be sure you have the latest version of the iOS operating system installed. Instructions for updating your iOS device are available HERE.
2. In order to enjoy POD® amp and effects processing, you’ll need our free Mobile POD application. The Mobile POD app also provides firmware updates to the Sonic Port VX hardware.
If your iPad, iPhone or iPod touch has internet access, we recommend that you first download and install our Mobile POD app from the App Store app before you attach your Sonic Port VX for the first time. Simply search for 'Mobile POD' on the app store to find and download the Mobile POD app.
3. If you are using the Sonic Port VX with a iOS device, connect Sonic Port VX to your iPad, iPhone or iPod touch using the included 14-pin to Lightning connector cable. The Sonic Port VX has a red LED located on it's top side that will blink once a few seconds after the Sonic Port VX is successfully recognized by your iOS device. If you want to power/charge your iOS device (Lightning only) while using the Sonic Port VX, you can additionally connect the supplied USB-mini cable from the Sonic Port VX into a iOS USB power supply. If you are using the Sonic Port VX with a Windows computer, first make sure and download the Sonic Port Windows Drivers from our software page HERE before you connect the Sonic Port to your computer. If you are using the Sonic Port VX with MAC OS X 10.9 or above computer you will not need to install any drivers. To connect the Sonic Port VX to your computer simply use the supplied USB-A to USB-mini cable to connect it to your computer. Click the photo below for an illustration of these connections:
4. Connect your 1/4" instrument or other audio source to Sonic Port VX or Sonic Port. The Sonic Port VX and Sonic Port can only use one input source at a time, it will use whichever input is connected to first:
- Using Guitar In (mono): Connect a standard 1/4" guitar cable to the Sonic Port guitar input, then plug the other end into your guitar.
- Using AUX IN : Connect a standard stereo 1/8" line cable to the Sonic Port VX AUX input, then plug the other end into a line level audio output of your source equipment such as a keyboard, drum machine, mixer, or music player.
5. Connect two mono 1/4" Tip Sleeve cables to the Sonic Port VX's individual Left and Right outputs, then plug the other ends into a playback device such as a mixer, studio monitors, or powered PA speakers to monitor your audio. You can also connect one mono 1/4" Tip Sleeve calbe to only the Sonic Port VX's left output and the Sonic Port VX will sum together both the Right and Left outputs to allow you to connect it to mono sources such as a guitar or bass amp. To connect a pair of headphones or desktop speakers to the Sonic Port VX simply connect the 1/8" stereo cable into the 1/8" Headphone output on the Sonic Port VX. Click the photo below for a illustration of these connections:
6. If you would like to set the Sonic Port VX up on a mic stand or the included tabletop stand start off by threading the supplied mic stand mount onto the base of the Sonic Port VX. If you would like to use the Sonic Port VX on a mic stand, you can then simply attach the mic stand mount to a mic stand. If you would like to use the included table top stand for the Sonic Port VX, place the mic stand mount onto the tabletop stand and fasten them together using the supplied 1/4" thread as shown in the illustration below:
We recommend that you place the Sonic Port VX at least 10" away from the source that you are trying to record with the built in mics. We also recommend that you use pop screen with the Sonic Port VX when you are recording vocals.
7. Once you have made all your connections launch the iOS or computer app of your choice and your ready to go.
SONIC PORT CONNECTIONS
1. Before connecting the Sonic Port, check your iPad, iPhone or iPod touch to be sure you have the latest version of the iOS operating system installed. Instructions for updating your iOS device are available HERE.
2. In order to enjoy POD® amp and effects processing, you’ll need our free Mobile POD application. The Mobile POD app also provides firmware updates to the Sonic Port hardware.
If your iPad, iPhone or iPod touch has internet access, we recommend that you first download and install our Mobile POD app from the App Store app before you attach your Sonic Port for the first time. Simply search for 'Mobile POD' on the app store to find and download the Mobile POD app.
3. Connect the Sonic Port to your iPad, iPhone or iPod touch using the included 14-pin to Lightning connector cable or the 30 pin cable depending on your ios device.The Sonic Port has a red LED located on it's top side that will blink once a few seconds after the Sonic Port is successfully recognized by your iOS device. Click the photo below for a illustration of this connection:
4. Connect your 1/4" instrument or other audio source to the Sonic Port. The Sonic Port can only use one input source at a time, it will use whichever input is connected to first:
- Using Guitar In (mono): Connect a standard 1/4" guitar cable to the Sonic Port guitar input, then plug the other end into your guitar.
- Using IN L/R: Connect a standard stereo 1/8" line cable to the Sonic Port IN L/R input, then plug the other end into a line level audio output of your source equipment such as a keyboard, drum machine, mixer, or music player.
5. Connect a mono or stereo 1/4" cable to the Sonic Port OUT L/R output, then plug the other end into a playback device such as a guitar amp, mixer or powered speakers to monitor your audio. To connect a pair of headphones or desktop speakers to the Sonic Port simply connect the 1/8" stereo cable into the 1/8" Headphone output on the Sonic Port. Click the photo below for a illustration of these connections:
6. Once you have made all your connections launch the iOS app of your choice and your ready to go.
-
Look for Ethercon Cat-5 cable

http://www.contrik.ch/en-ch/products/nepk-ee-ef
NEPK-EE-EF-*
Flexible patchcable (ZNK CT2672601) twisted pair, UC300 HS26 4P, Cat. 5e, black PUR-rubber-jacket (resistant, nonabrasive, non-corrosive, flame retardant), assembled with RJ45 Hirose connectors, screened (NE8CAT6A-HRS) along with Neutrik etherCON cable connector shell with boot (NE8MC-B-1). Boot colors: black (other colors on request),
Order NumbersNEPK-EE-EF-0.5 = 0.5 meters
NEPK-EE-EF-1 = 1 meter
NEPK-EE-EF-2 = 2 meters
NEPK-EE-EF-3 = 3 meters
NEPK-EE-EF-5 = 5 meters
NEPK-EE-EF-7 = 7 meters
NEPK-EE-EF-10 = 10 meters -
I have both, and find the JTV much better. There's a lot of play in the tremolo arm of the Standard. you can correct it for a while by wrapping the threads in plumber tape. But you have to keep replacing the tape.
some may not be aware there is a solution for a screw in Tremolo bar that is "too wobbly"
This solution also works on the Variax Standard
Trem-Arm Tension Springhttp://guitartechnicalservices.co.uk/acatalog/2013_of_Archive.html

-
reduce moisture
I always leave a Silica Gel pack inside my Variax case - to absorb moisture in the air.

-
Think of the string like a garden hose wound too tight on a spool
The "big deal" with Locking Tuners it allows you to minimize and shorten the "non speaking" string length - too many string wraps on the tuner post = instability when performing dive bombs with your tremolo.
How to restring a Locking tuner guitar
1 ) Prior to installing the string - Use the tuning key to Align the tuners so the hole in each tuning post provides a straight line path for the string, and loosen the rear tuning wheels which clamp the string.
2 ) Thread the new string on the tremolo block, and thread it thru the tuning post, and pull it tight
3 ) For the top e, B, G, D strings , while pulling the string tension tight , use the rear locking wheel to tighten the clamp inside the tuning post to lock the string in place and tune string to pitch.
4 ) For the low E and A string I back off 1/4" inch prior to clamping the string with the rear tuner locking wheel , to provide a bit more string on the tuning post - allows those Junior Brown riffs ( go to 1:01 minute)
and if you do not have Locking TunersI use this method Think of the string like a garden hose wound too tight on a spoolMinimize and shorten the "non speaking" string length - too many string wraps on the tuner post = instability when performing dive bombs with your tremolo. \Same with playing blues and lots of String bending - too many wraps of string on the tuner post and a non lubricated Nut = out of tune guitar
-
 1
1
-


Helix Floor - 3.51 Firmware update disabled my USB Audio I/O on Windows 8.1 laptop
in Helix
Posted
It's the singular Fw 3.51 update which includes HXEDIT 3.51 , USB Audio drivers , etc broke on my win8.1 machine no USB Audio anymore
RETRIED on Win10 laptop and all works -except HX Edit ( which is only thing that worked on my Win8.1 machine
Seems the installer clobbered drivers