
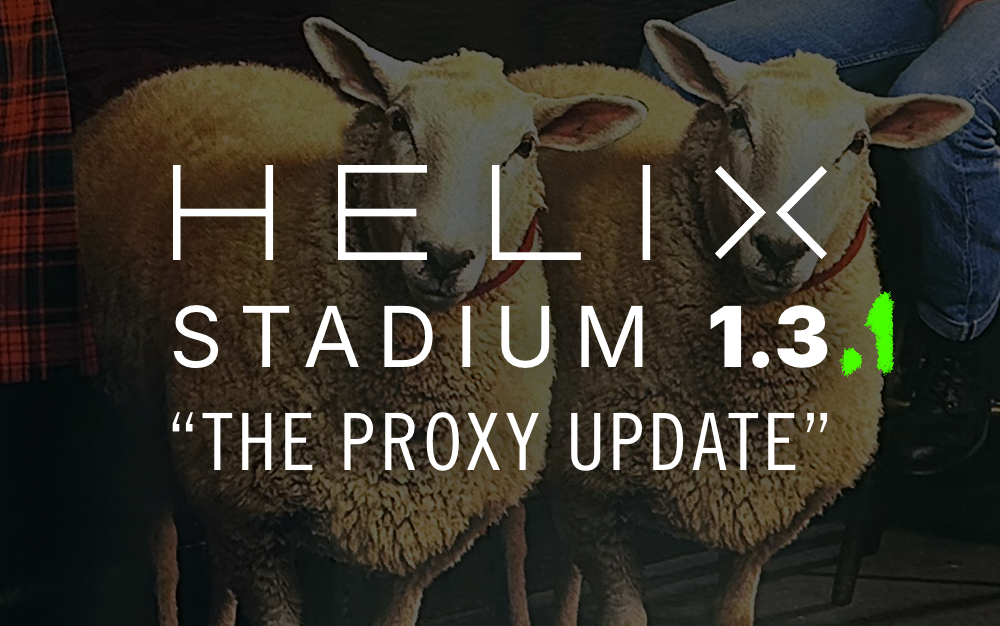
Helix Stadium 1.3.1 (released March 26, 2026) updates the Proxy cloning source signals to improve accuracy with some target devices, especially when rolling down the input level. IMPORTANT! The Helix Stadium app (macOS/Windows) remains at 1.3.
Helix Stadium 1.3 (released March 24, 2026) includes 5 new Agoura amp channels from 2 new amps, Line 6's new Proxy cloning engine, additional features, improvements, and bug fixes and is strongly recommended for all Helix Stadium users.
IMPORTANT! As always, you must also install the latest version of the Helix Stadium app, available here:
- macOS: https://line6.com/software/readeula.html?rid=13543
- Windows: https://line6.com/software/readeula.html?rid=13542
New Amps in 1.3
5 new Agoura amp channels bring the Agoura channel count to 55. If you count the 111 HX channels (and you should), that's 166 amp channels total.
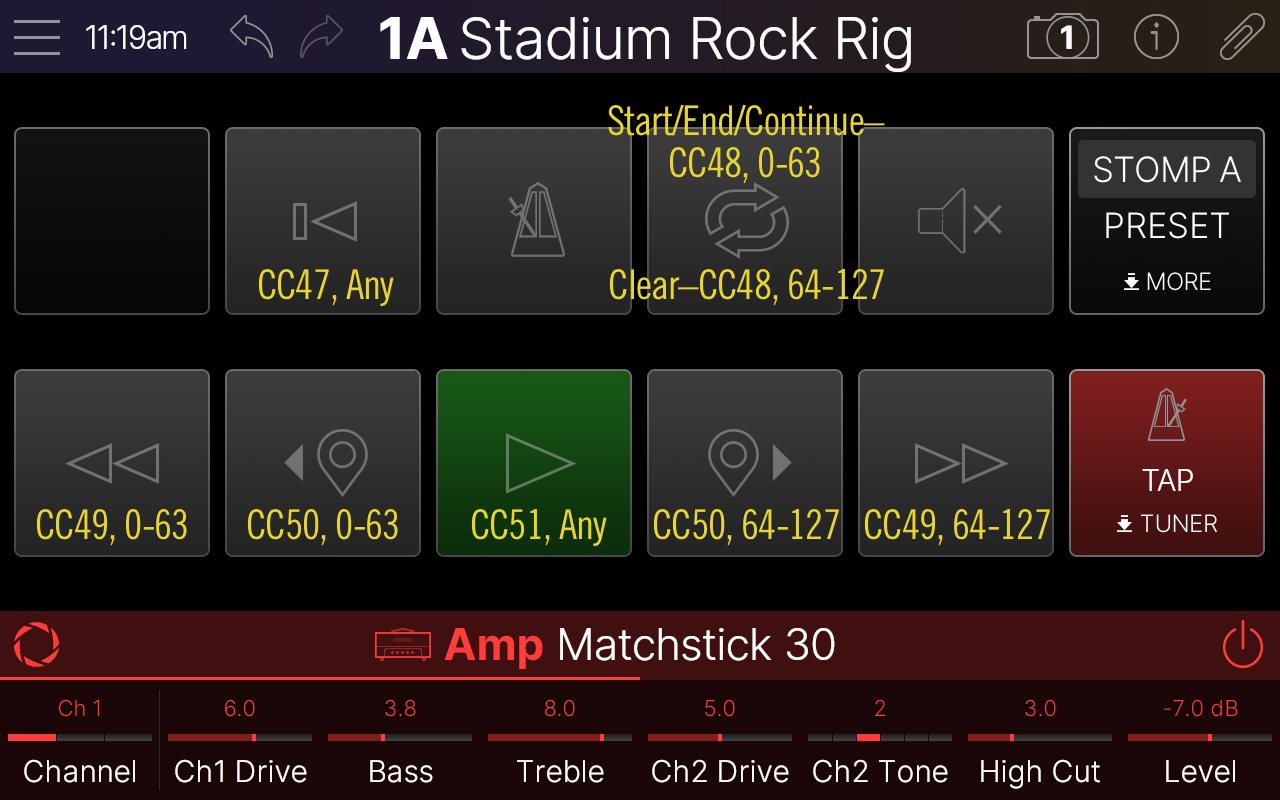
Amp > Matchstick 30 (Ch 1, Ch2, and Jumped channels), based on* the Matchless® DC30
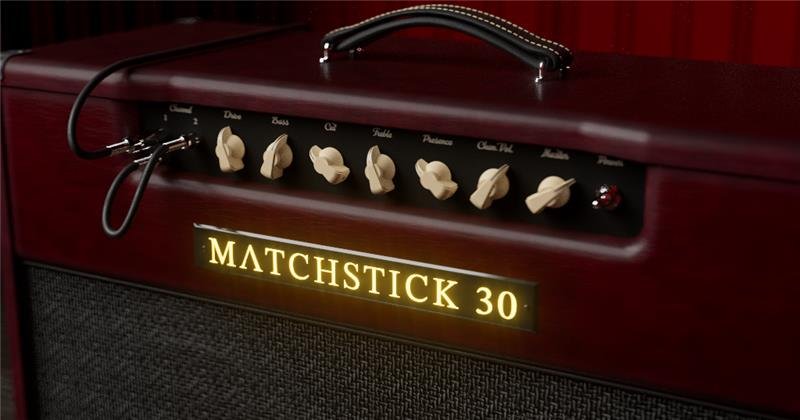
- Channel—Selects the amp channel or which input is connected. Choose "Ch 1," "Ch 2," or "Jumped."
- Ch1 Drive—Controls the amount of Channel 1 gain applied to the signal, which influences the level of distortion.
- Bass—Controls the low frequency EQ of Channel 1.
- Treble—Controls the high frequency EQ of Channel 1.
- Ch2 Drive—Controls the amount of Channel 2 gain applied to the signal, which influences the level of distortion and overall tone.
- Ch2 Tone—Selects one of six settings for varying the width of the tone envelope on Channel 2. Lower values result in thinner sounds; higher values result in thicker sounds.
- High Cut—Increasing this parameter attenuates high frequencies, effectively reducing the amp's brightness.
- Level—Controls the overall level of the Amp block. Unlike Master Volume, it has no effect on the block's tone.
- Master—Controls the Master Volume of the amplifier. As with the real thing, higher values can introduce power amp saturation that affects intensity and sag.
- Sag—Controls the amount of sag, or how much the power supply compresses or "droops" in response to striking the strings hard. Higher values provide more touch dynamics, sustain, and organic feel that's inherent in vintage tube amps; lower values offer a "tighter" responsiveness for a more modern feel.
- Ripple—Controls how much AC ripple interacts with your tone. Power amp circuits will sometimes let a little bit of rectified 120Hz hum (that the power supply filter caps can't quite fully remove) into the audio signal when the power supply is being pushed hard. Much like Hum, Ripple provides a bit of non-musical distortion to the power amp at distorted settings. "Stock" represents the stock location, which changes from amp to amp.
- Z PrePost—Determines the location of speaker impedance characteristics in the power amp, primarily due to negative feedback. Higher values mean the effects of the interaction appear at the output of the power amp (Post) and lower values mean more of the effect is fed back to the input of the power amp (Pre).
- Hype—Depending on the amp and/or amp settings, increasing Hype may subtly or dramatically adjust various behind-the-scenes parameters to make the amp sound and feel smoother, fuller, punchier, tighter, and/or more forgiving, but at the expense of accuracy.
Amp > Mandarin Rock 3 (Normal and Overdrive channels), based on* the Orange® Rockerverb 100 MKIII
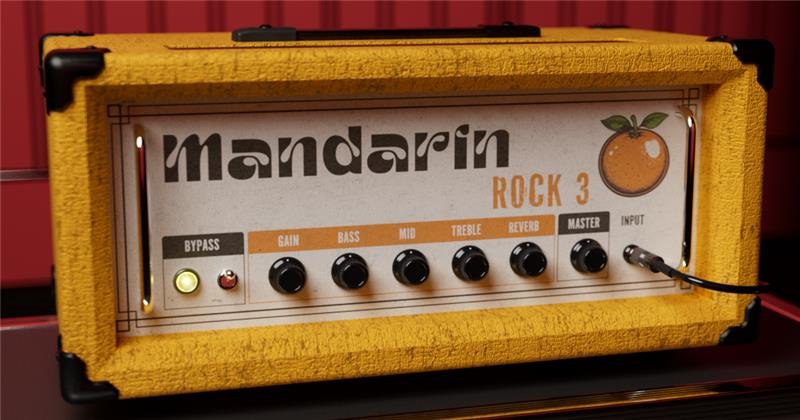
- Channel—Selects the amp's channel. Choose "Normal" or "Overdrive."
- Drive—Controls the amount of gain applied to the signal, which influences the level of distortion.
- Bass—Controls the low frequency EQ of the tonestack.
- Mid—Controls the midrange frequency EQ of the tonestack.
- Treble—Controls the high frequency EQ of the tonestack.
- OD Master—Controls the Master Volume of the Overdrive channel of the amplifier. As with the real thing, higher values can introduce power amp saturation that affects intensity and sag.
- Attenuator—Attenuates the signal between the amp's phase-inverter and power tubes.
- Level—Controls the overall level of the Amp block. Unlike Master Volume, it has no effect on the block's tone.
- Sag—Controls the amount of sag, or how much the power supply compresses or "droops" in response to striking the strings hard. Higher values provide more touch dynamics, sustain, and organic feel that's inherent in vintage tube amps; lower values offer a "tighter" responsiveness for a more modern feel.
- Ripple—Controls how much AC ripple interacts with your tone. Power amp circuits will sometimes let a little bit of rectified 120Hz hum (that the power supply filter caps can't quite fully remove) into the audio signal when the power supply is being pushed hard. Much like Hum, Ripple provides a bit of non-musical distortion to the power amp at distorted settings. "Stock" represents the stock location, which changes from amp to amp.
- Z Pre Post—Determines the location of speaker impedance characteristics in the power amp, primarily due to negative feedback. Higher values mean the effects of the interaction appear at the output of the power amp (Post) and lower values mean more of the effect is fed back to the input of the power amp (Pre).
- Hype—Depending on the amp and/or amp settings, increasing Hype may subtly or dramatically adjust various behind-the-scenes parameters to make the amp sound and feel smoother, fuller, punchier, tighter, and/or more forgiving, but at the expense of accuracy.
*NOTE: All product names used in this document are trademarks of their respective owners and neither Yamaha Guitar Group nor Line 6 are associated or affiliated with them. These trademarks appear solely to identify products whose tones and sounds were studied by Line 6 during sound model development.
New Features in 1.3
Proxy Cloning Engine
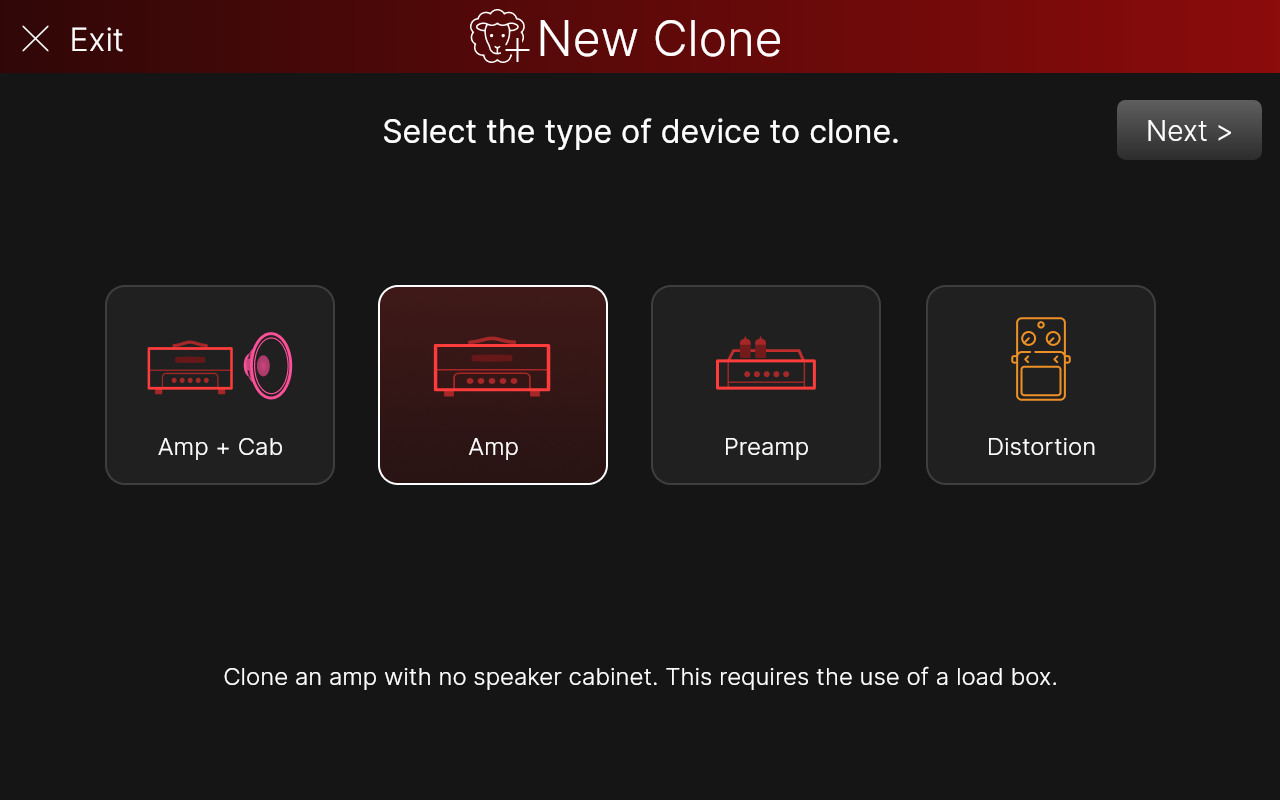
1.3 introduces Phase 1 of Line 6’s all new Proxy cloning engine, which lets you capture the virtual DNA of your favorite gear. The following types of devices can be cloned:
- Amp+Cab—Clone an amp including a speaker cabinet and microphone. You can also add one or more drive pedals before the amp to clone entire gain-based signal flows
- Amp—Clone an amp with no speaker cabinet. This requires the use of a load box
- Preamp—Clone a standalone preamp or the preamp portion of an amplifier. IMPORTANT: The amp or preamp must have a PREAMP OUT or FX SEND
- Distortion—Clone an overdrive, distortion, or fuzz pedal

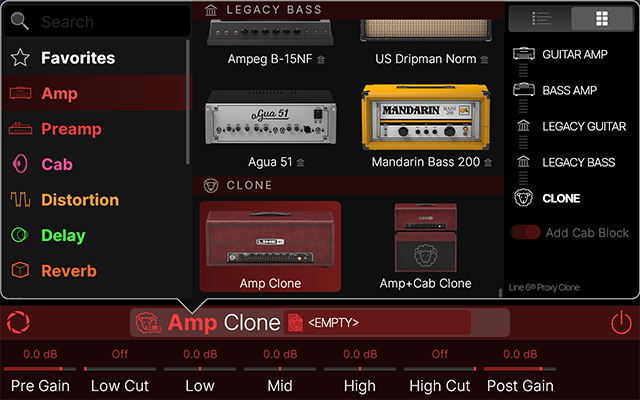
Cloning an Amp+Cab, Amp, Preamp, or Distortion
IMPORTANT! Detailed cloning instructions can be found in the Helix Stadium User's Manual.
Before cloning, do the following:
- Save your current preset to retain any edited settings.
- Disconnect any MIDI and USB cables from Helix Stadium to eliminate potential noise and interference.
- Connect Stadium’s main 1/4″ or XLR OUTPUTS to a monitoring system or the PHONES jack to headphones. Turn the Volume knob to adjust the 1/4″, XLR, or PHONES Output level for monitoring.
- Ensure your audio connections are as noise-free as possible for optimal cloning. If necessary, toggle the Ground Lift on your external devices, or use a line isolator or hum eliminator to reduce ground noise.
- Before creating an Amp+Cab type clone using a microphone on a speaker cab, first set Global Settings > Ins/Outs > Mic In Phantom Power On or Off, depending on whether your microphone requires phantom power. Please refer to your mic manufacturer’s specifications for its requirements.
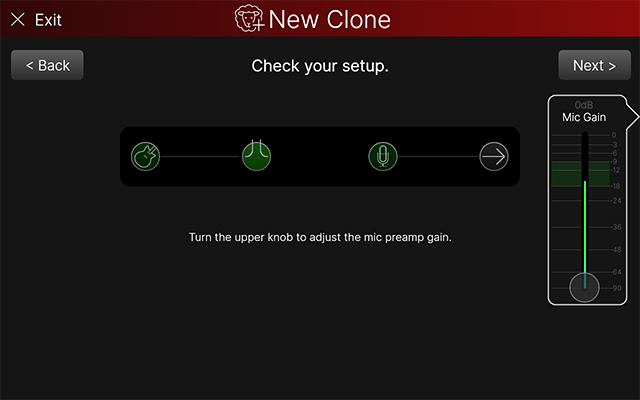
Tap Menu and then New Clone.

Tap the type of device you want to clone and then tap Next >.
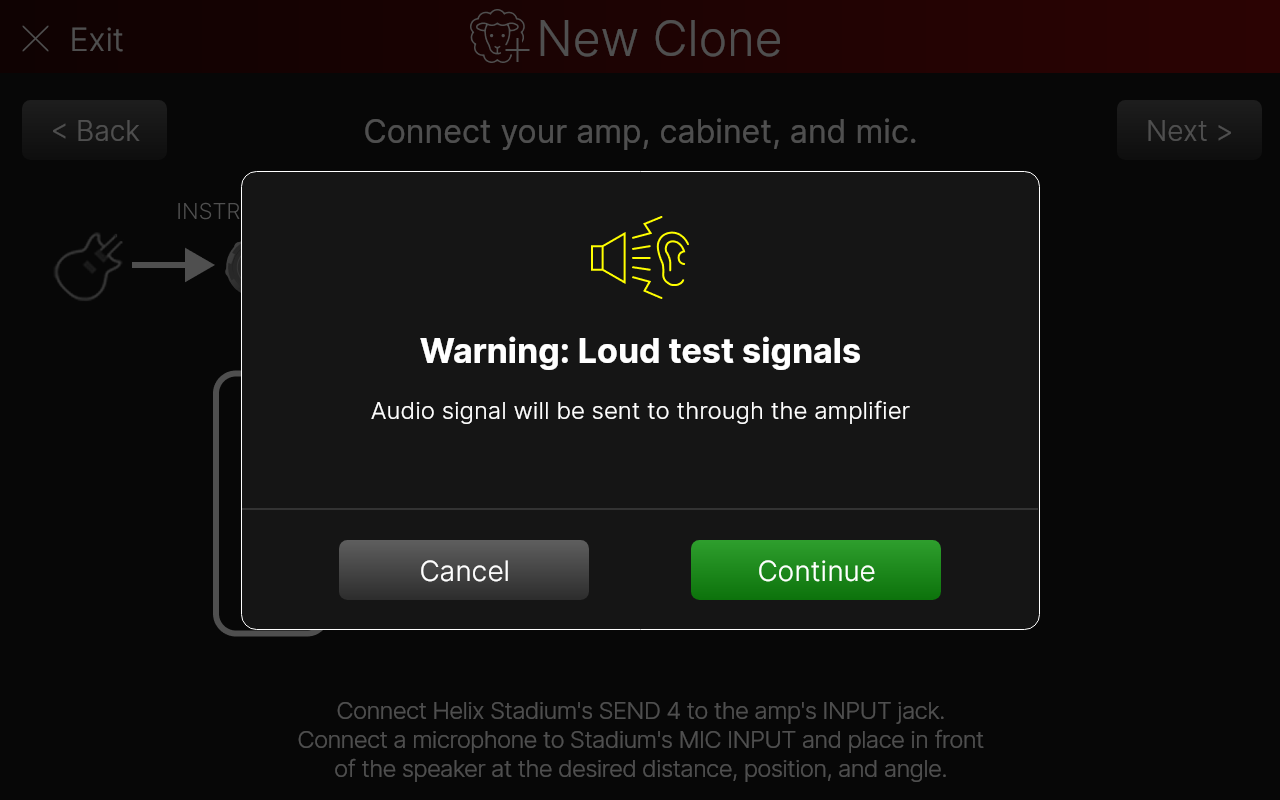
Amp+Cab only: A dialog appears, warning you it might get loud (below left). Tap Continue.
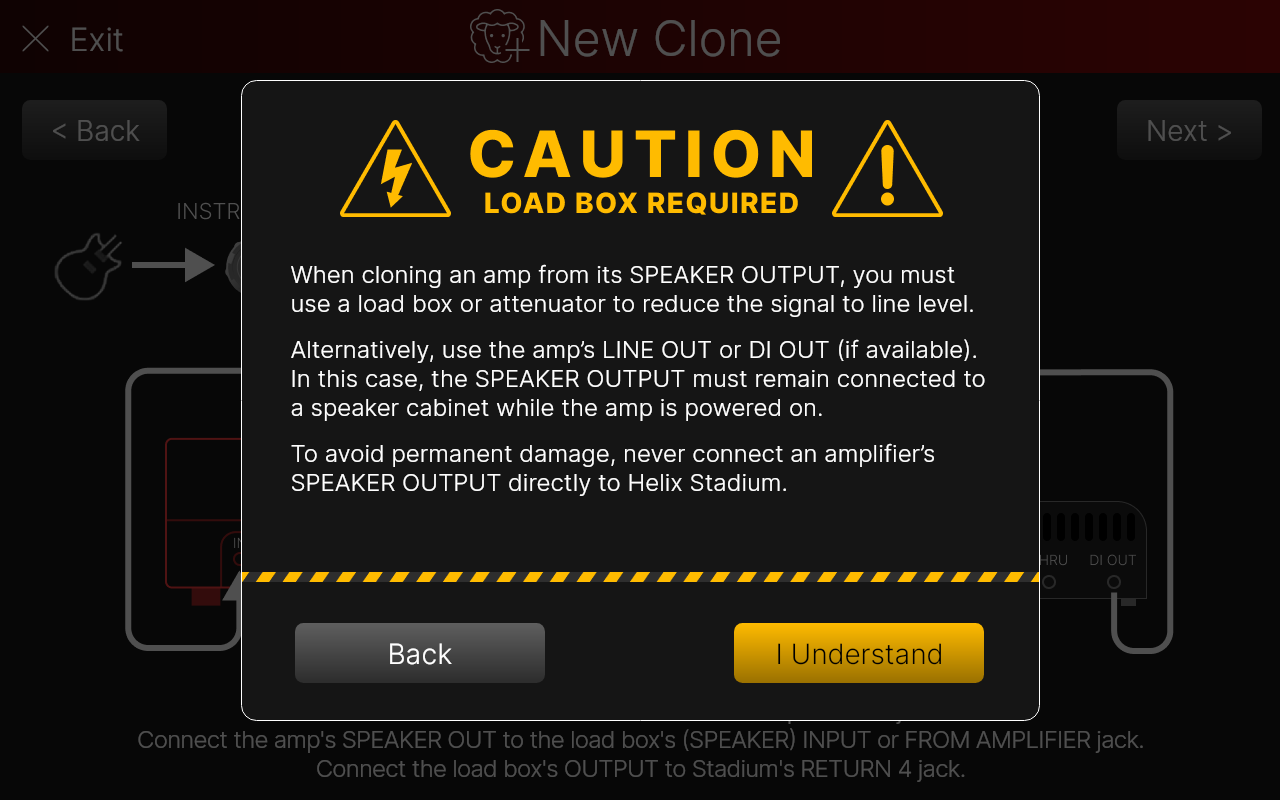
Amp only: A dialog appears, warning you to use a load box (below right). If you don't, both your amp and Helix Stadium can be damaged! Tap I Understand.
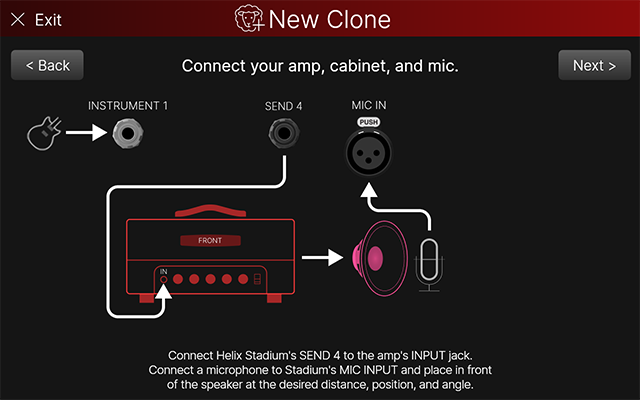
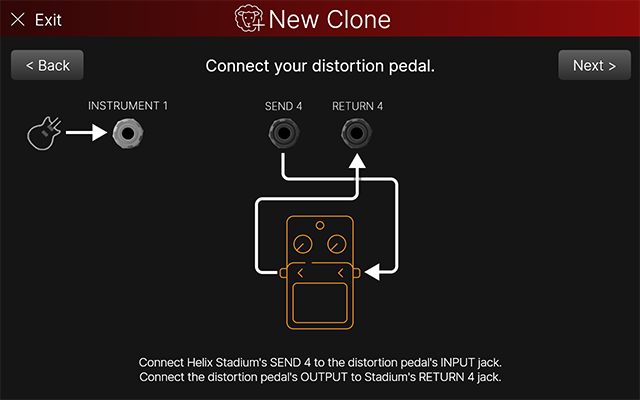
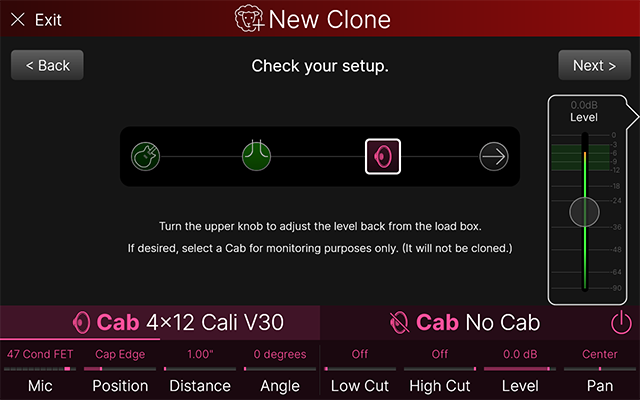
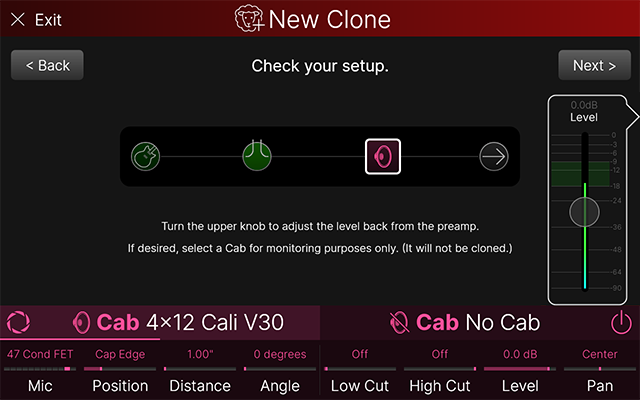
Closely follow the hookup instructions to connect your amp, preamp, or pedal to Helix Stadium and tap Next >. Note that each clone type provides different hookup instructions and there are slight differences in connections between Helix Stadium XL and Helix Stadium as well. (L-R: Amp+Cab, Amp, Preamp, Distortion.)


Depending on the type of clone, an Amp and/or Cab block may be automatically added to provide context when monitoring; these blocks are for monitoring purposes only; they are not captured as part of the clone. (For example, you probably don't want to hear an amp without a cab or a distortion pedal without both an amp and cab, but if you're playing 80s industrial songs, who are we to judge?)
Tap these block(s), choose the type of amp and/or cab, and adjust them to taste. Play your instrument and Turn the Upper Knob to adjust the Level slider so that the light green meter peaks within the dark green area. Once you have a good level, tap Next >. (L-R: Amp+Cab, Amp, Preamp, Distortion.)

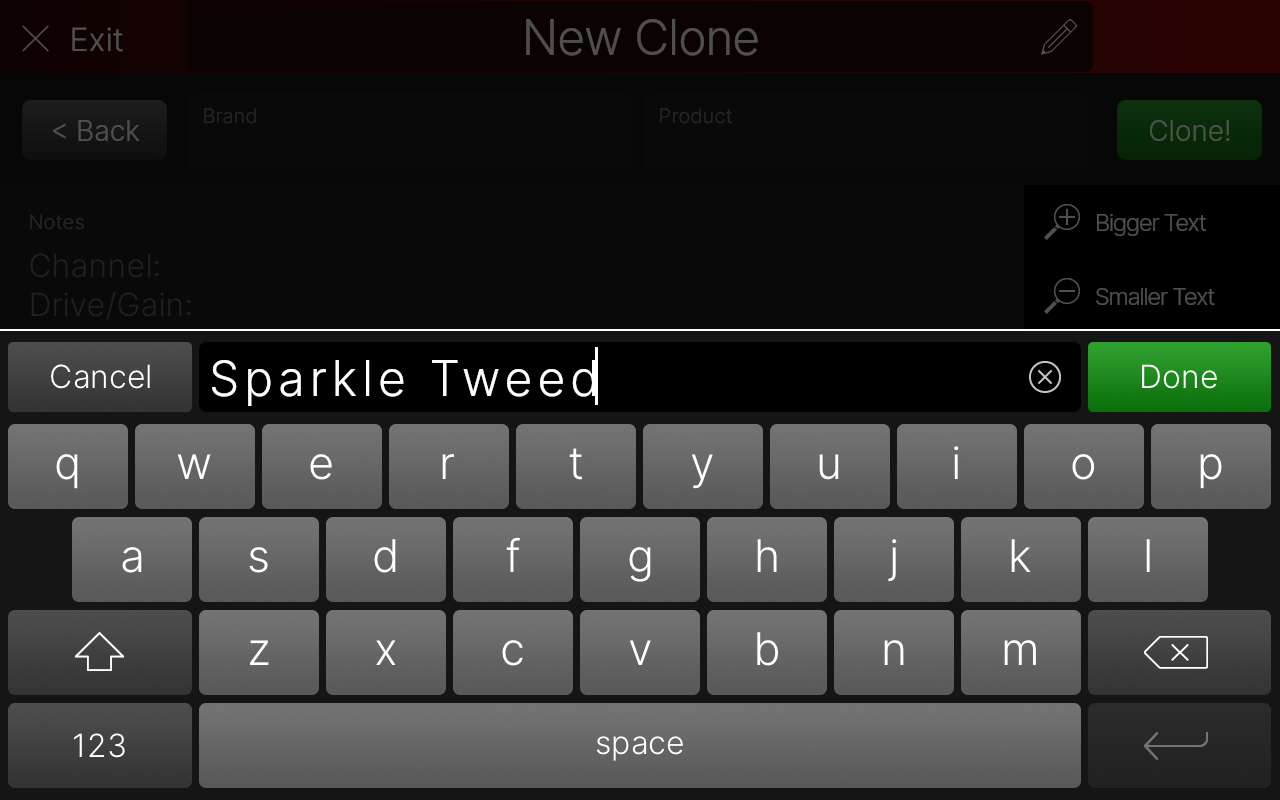
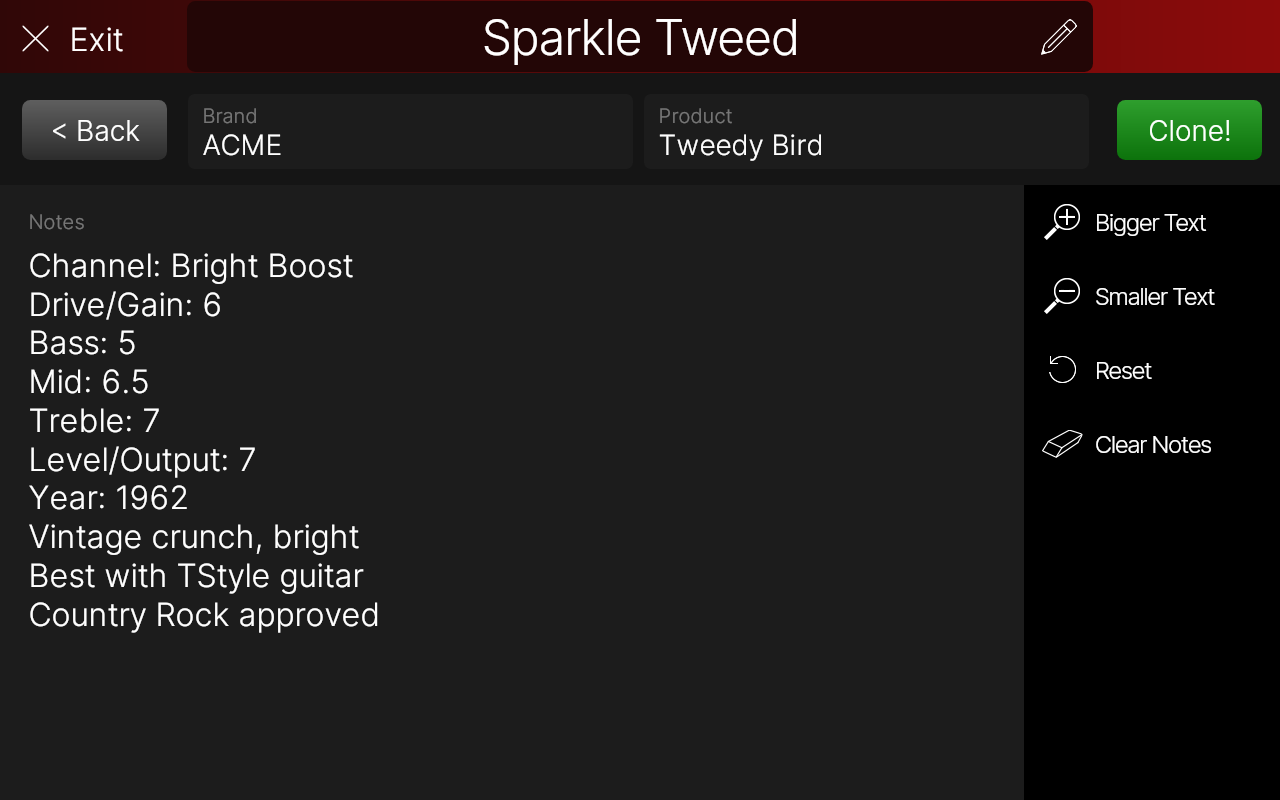
The keyboard appears. Type in the name of your clone and tap Done (below left). Tap the Brand, Product, and Notes panels to add descriptive info, such as your amp’s Channel, Gain, EQ settings, intended use, groan-worthy dad jokes, and any other details for reference (below right). This info is also utilized by Stadium’s Search function.
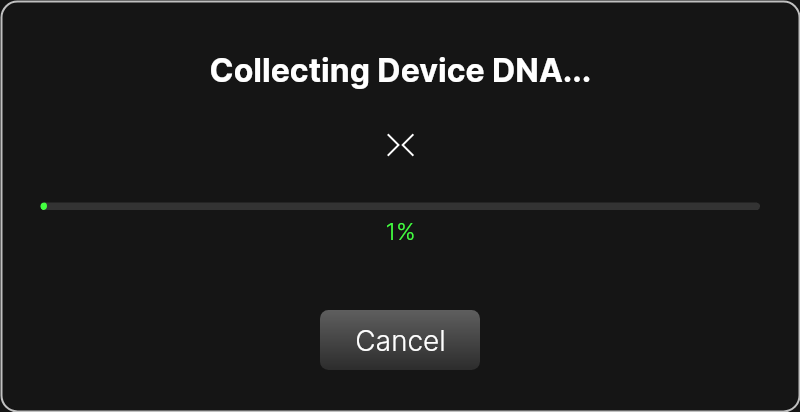
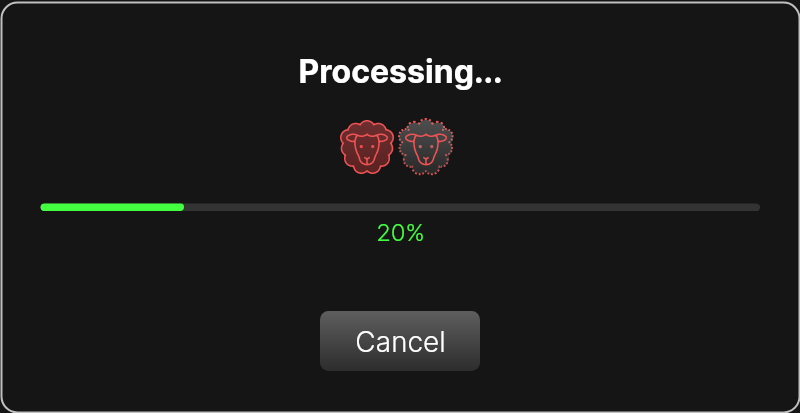
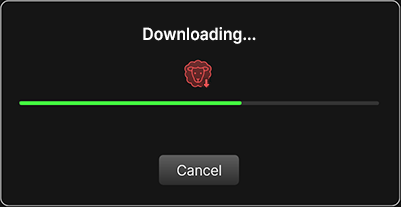
When you're ready, tap Clone! The cloning process happens automatically, and various dialog boxes display the current status.


When cloning is complete, the Compare screen appears. Press FS11 to toggle between the original device and your new clone.

If you're happy with the clone, tap Save. A dialog tells you where to find it:

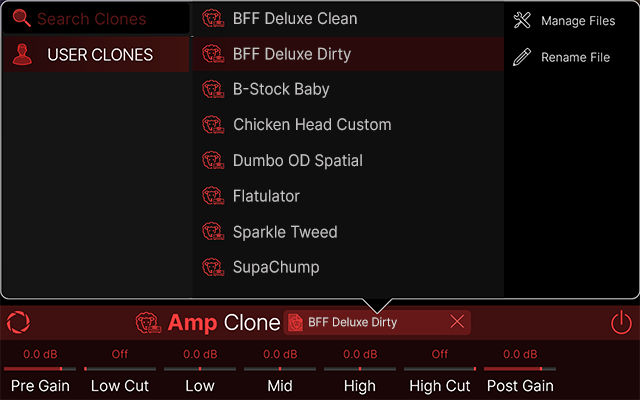
Selecting a Clone
IMPORTANT! Details on selecting and managing clones can be found in the Helix Stadium User's Manual.
Each clone type appears in its respective model category. (Amp+Cab clones appear in the Amp category.) From the Model List, select the proper category (Amp, Preamp, or Distortion) and tap Clone in the sidebar to quickly scroll down to the bottom of the list. Tap the clone item to select it.
Tap the "<EMPTY>" file selection box to open the list of clones for that clone type. Tap a clone to select it.
Cab IRs Per Snapshot
As with Helix/HX, different Cab IRs in Stadium can now be recalled per snapshot. From the Cab IR file browser, tap Snapshot Ctrl in the sidebar.
- Off (default)—The same Cab IR will be used for all snapshots
- On—A different Cab IR can be recalled with each snapshot. In previous versions, this value was disabled

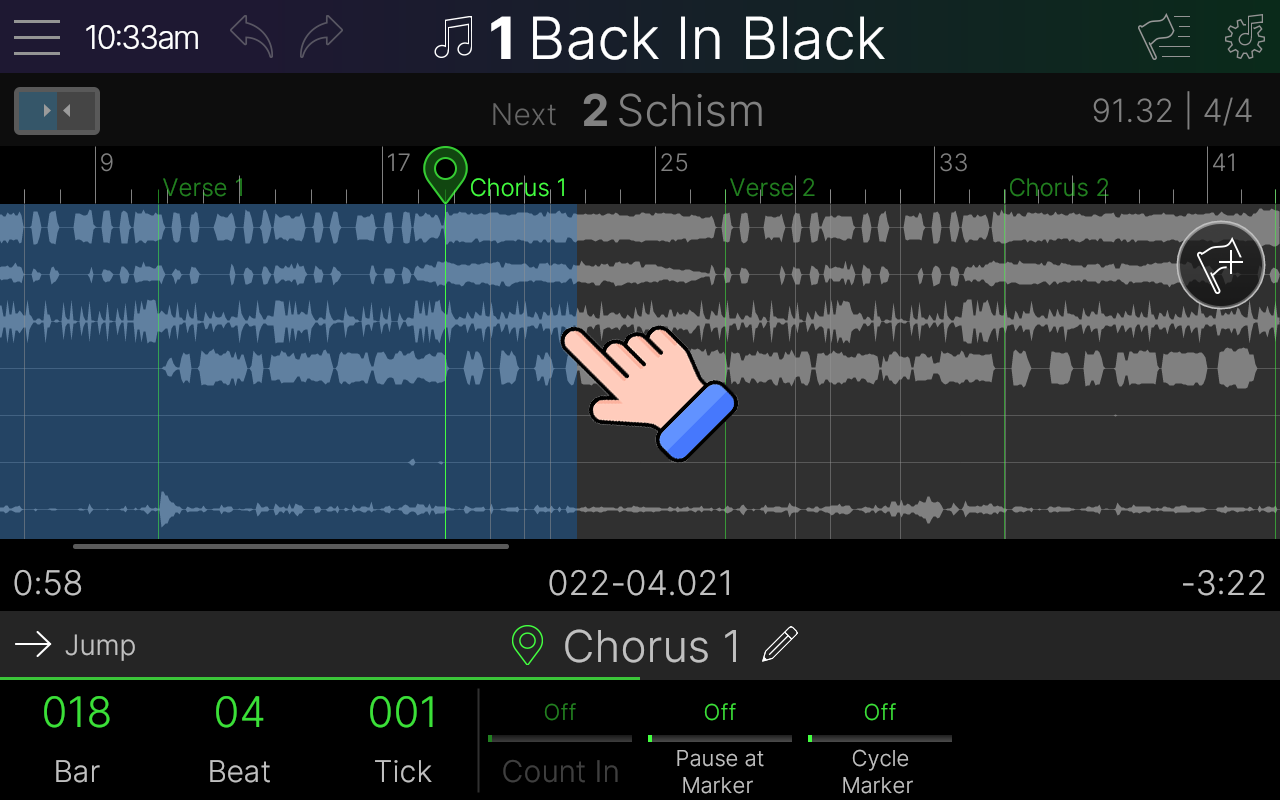
Song Flag Automation
Previous to 1.3, recalling presets, snapshots, external amp channels, MIDI PCs/CCs, etc. behaved like a simple event sequencer; that is, the message/change was only engaged when the playhead reached the flag's location. With 1.3, select flags now behave like true automation, where Showcase knows where you are in the song and automatically recalls the proper preset, snapshot, amp channel, MIDI PC/CC, or screen without needing the playhead to pass that flag's location. This allows you to freely jump around the song and know the proper sounds and states will show up at the right times, regardless of whether a flag is at that specific location or not.
For example, say we want to recall presets and/or snapshots during the song via Marker flags. (You can also accomplish this from the Start flag or dedicated Preset/Snap flags.) In earlier versions, tapping anywhere between markers (or navigating the song with your feet) wouldn't update any messages until the playhead reached a flag's location (say, recalling a preset/snapshot from the Marker > Verse 2 flag below). With 1.3, tapping anywhere between markers (or navigating the song with your feet) will now automatically recall the proper messages that should be active at that point in the song (say, the preset/snapshot assigned to the Marker > Chorus 1 flag below).
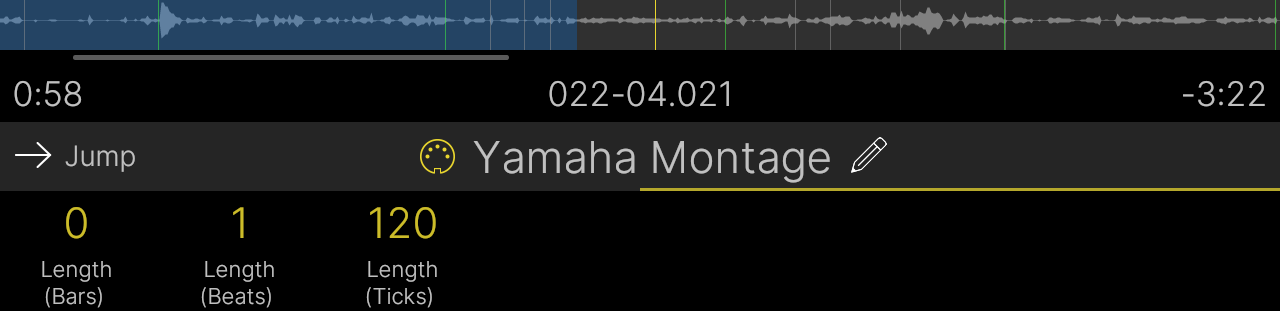
MIDI Note Flags
MIDI flags can now generate MIDI note messages to trigger synths, samplers, or drum machines. If your band is of the ambitious variety, you could even send MIDI notes to control certain video playback devices and/or MIDI-to-DMX lighting controllers.
- From Song view, tap Add Flag and drag a MIDI flag to the song's timeline where you want it to occur. Turns knobs 1-3 (Bar, Beat, Tick) to fine-tune its location.
- Turn Knob 4 (Type) to "Note" and adjust the note's settings:
- MIDI Channel—Sets the MIDI channel for the note message (1-16)
- Velocity—Sets the velocity for the note message (1-127)
- Length (Bars)—Sets the length of the MIDI note in bars. If less than a bar, leave this at 0
- Length (Beats)—Sets the length of the MIDI note in beats. If less than a beat, leave this at 0
- Length (Ticks)—Sets the length of the MIDI note in ticks (240 ticks per beat)

MIDI Recall of Playlists, Songs, and Markers
Playlists and songs can now be recalled via MIDI CC, and Stadium makes it really easy to see what messages to send.
From Song view, tap the song's name to open the Song List. The sidebar displays the MIDI CC messages used to recall the current playlist and song:
- Playlist—CC63, values 0-127 (SONG LIBRARY is value 0; each subsequent playlist is value 1-127)
- Song—CC10, values 0-127

In addition, markers can be selected/cued via MIDI as well:
- Marker—CC46, values 0-127 (Song Start is value 0, Marker 1 is value 1, Marker 2 is value 2, etc.)
MIDI Control of Song Playback
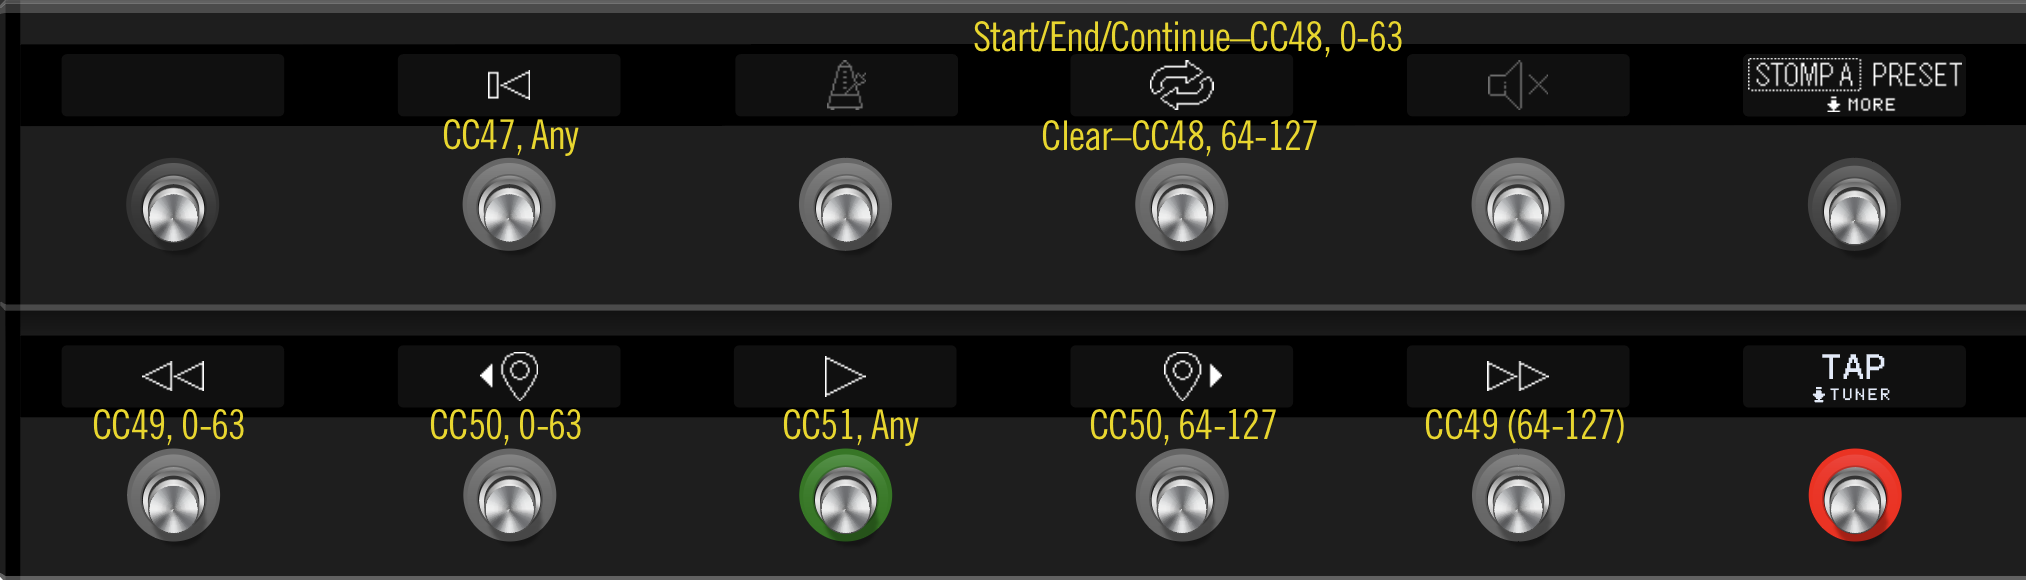
Additional MIDI CCs have been added for emulating Transport mode (controlling song playback) from external devices:
- Return to Zero—CC47, any value
- Cycle Clear—CC48, values 0-63
- Cycle Start/End/Continue—CC48, values 64-127
- Previous Song—CC49, values 0-63
- Next Song—CC49, values 64-127
- Previous Marker—CC50, values 0-63
- Next Marker—CC50, values 64-127
- Play/Pause—CC51, any value
Global Settings > Songs > Song Play
A new Global Setting determines what happens when playing a cued song, by either pressing the Play button, stepping on the Transport > Play switch, pressing the FS12 (Play) switch, tapping the Transport panel play icon, or now with 1.3, sending Helix Stadium a song select message (CC0, values 0-127, see MIDI Recall of Playlists and Song above). Now you can select songs without engaging playback.
- Play (default)—Engaging Play on a cued song (if Select Song is set to "Cue") or selecting a song (if Select Song is set to "Skip") plays instantly, like normal
- Load—Engaging Play on a cued song (if Select Song is set to "Cue") or selecting a song (if Select Song is set to "Skip") loads the song, but does not play it or load any preset/snapshot recalled with that song's Start flag. Pressing Play again plays the song and loads the Start flag's preset/snapshot (if enabled)
- Load+Preset—Engaging Play on a cued song (if Select Song is set to "Cue") or selecting a song (if Select Song is set to "Skip") loads the song, does not play it, but DOES load any preset/snapshot recalled with that song's Start flag. Pressing Play again starts the song.

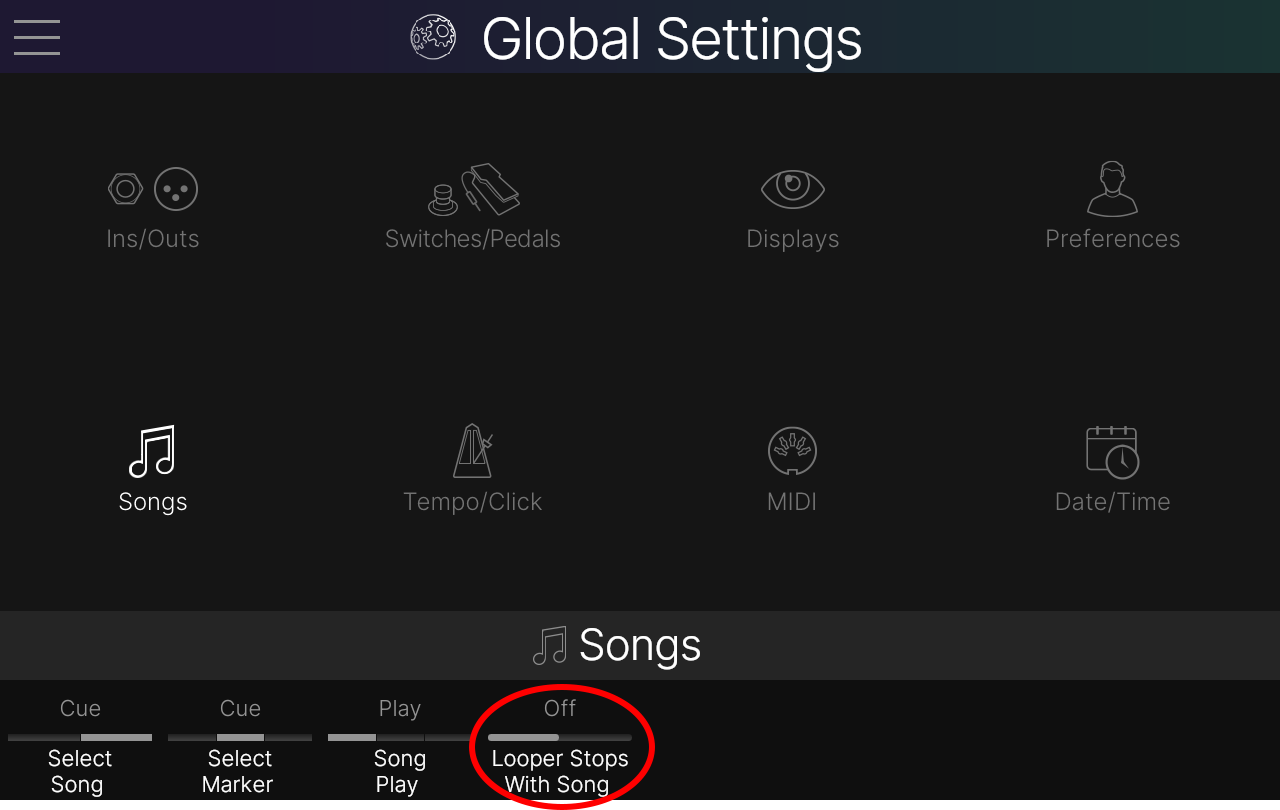
Global Settings > Songs > Looper Stops With Song
A new Global Setting determines whether the Looper stops when a Song is paused or stopped. NOTE: This parameter only applies to Looper flags added to songs; manual looper control (e.g. pressing looper switches) is not affected by this setting.
- Off (default)—Stopping/pausing the song does not affect looper playback
- On—Stopping/pausing the song or playing a different song (but not cueing a different song) stops the Looper
Improvements/Changes in 1.3
-
Helpful how-to videos have been embedded into 10 chapters of the Helix Stadium Owner's Manual. They're all meat, no filler, and after 24 minutes total, you'll be up and running with Helix Stadium. Stop doomscrolling and learn something new!
-
Certain Agoura amp and cab combinations are now more accurate at the top of the cab's passband (typically 3-6 kHz) and in a few cases, at a low frequency resonant peak (around 100 Hz). This does not affect any default amp/cab combinations
- Several Agoura amps have been further optimized to use less DSP
- Marker names now appear on the Song screen's ruler, which help indicate where you are in the song (see screenshot in Song Flag Automation above)
- To help avoid confusion, the Home screen's action panel's "Snapshot Bypass" item has been renamed "Snapshots Set Bypass" (It remains on by default.)
- Drag icons have been added to the Song Settings' tracks to make it obvious they can be reordered
- Helix Stadium app—Zones added to Focus view
- Helix Stadium 1.3.1—Updates the Proxy cloning source signals to improve accuracy with some target devices, especially when rolling down the input level
Bug Fixes in 1.3
- In certain instances, the login screen would display a blank QR code and the sequential code "1 2 3 4 5 6" ("That's amazing! I've got the same combination on my luggage!")—FIXED
- In certain circumstances, switching between two presets with the same mono Looper block while a loop is playing could cause a brief audio gap—FIXED
- Changing the Channel parameter on Amp > Cali 2C+ could result in an audible pop—FIXED
- If Delay > Legacy > Reverse's Time value is set to 0.0 ms, Stadium could stop passing audio—FIXED
- Setting an Input block to "None" could sometimes display the previously assigned input type's parameters in the inspector—FIXED
- If an Input block was assigned to Return 1/2, no other input block could be assigned to Return 1, Return 2, or Return 1/2—FIXED
- If a 1 Switch or Shuffling Looper is manually reassigned to a different stomp switch, switch operation could not work as expected—FIXED
- A handful of preset clips would not reset when tapping the RTZ (Return To Zero) icon—FIXED
- If a preset clip's Start and End values are set so the clip length is shorter than 5 seconds, playback could stop working—FIXED
- The preset clip's Start value could appear to overlap its End value—FIXED
- Moving a clip's End flag left and then right again wouldn't always return it to the true end of the clip—FIXED
- If many dozens of setlists, each containing many dozens of presets are created, deleting setlists and/or presets can lag—FIXED
- Saving a block as a User Model Default could turn off Snapshot Bypass (called "Snapshots Set Bypass" in 1.3)—FIXED
- In rare cases, pressing a Stomp A or Stomp B switch could engage the same switch in the other layer—FIXED
- When multiple block bypasses are assigned to a single stomp switch, the switch state could change after saving the preset—FIXED
- When FS1+FS7 is assigned to Preset Up/Down, Preset Down behavior would differ from Preset Up—FIXED
- From Combo mode, pressing FS1 or FS7 would not properly queue banks—FIXED
- From Combo mode, pressing FS1+FS7 would not enter Snapshot mode—FIXED
- Importing specific Helix/HX presets with very specific boundaries could cause Stadium to crash—FIXED
- Copying and pasting a Volume Pedal block would correctly retain default bypass and controller assignments, but they appeared as "None" in the Bypass/Control menu—FIXED
- Copying, pasting, and then clearing a block with MIDI parameter assignments could clear assignments from the first block—FIXED
- The Focus view background image for Amp > Solid 100 displayed a Depth knob, which isn't present in our version of the original amp (nor the model)—FIXED
- Quickly tapping different Mute buttons on the Matrix mixer screen could sometimes cause the visible mute state to invert—FIXED
- Enabling Snapshot control for a Command Center param can cause its value to stop changing if a subsequent parameter's Snapshot Control is enabled—FIXED
- If a stomp switch is assigned to Utility > Save, it scribble strip and switch LED would not always properly reflect the current dirty state—FIXED
- In rare cases, Stomp B mode scribble strips could display the wrong text—FIXED
- Turning Snapshot Control on and then off for select Cab > IR parameters would not disable snapshot control—FIXED
- If a stomp is assigned to both block bypass and select Command Center command(s), clearing the stomp would not always clear all assignments—FIXED
- In certain situations, the Home screen block, inspector, and Stomp switch could display different bypass states—FIXED
- If the same model is placed in the same path location in multiple presets, that block's inspector's apparent bypass state (or if a Delay or Modulation effect, its ms/Hz and note division toggle) could be retained in the other presets—FIXED
- If one of several screens was visible, touching a stomp switch wouldn't always jump to its assigned item—FIXED
- Copying and pasting effects auto-assigned to expression (like Wah, Pitch Wham, Volume Pedal, etc.) wouldn't always properly reflect the correct bypass state based on the current EXP 1/2 setting—FIXED
- Tuner Trails would not properly gray out when Tuner Output was set to "Processed"—FIXED
- If an external momentary switch is assigned to block bypass, assigning a Command Center command could clear the block bypass assignment—FIXED
- If a Command Center MIDI Note command's Note parameter is set to Snapshot Control, subsequent snapshot recalls could cycle between note on and note off—FIXED
- Command Center > Instant > MIDI command's Command parameter incorrectly displayed a Snapshot Control toggle—FIXED
- In rare cases, if Stadium was powered down shortly after transferring audio files, the files would not store properly and the song would exhibit no output—FIXED
- Adjusting a Hotkey flag while a song is playing could cause the UI to reboot—FIXED
- While Song view is active, snapshots could sometimes not be recalled correctly—FIXED
- In some instances, the onscreen Transport panel's pause button would require two taps to pause playback—FIXED
- If a song contained several Looper flags, looping could sometimes eventually fall out of sync with the audio, especially in songs with faster tempi—FIXED
- While a cycle is repeating a section of a song, any Looper flags between the Cycle Start and End points were ignored—FIXED
- When a Marker's Pause at Marker is turned on, any assigned preset and/or snapshot would be recalled when playback reached that Marker flag; it should only be recalled when engaging that Marker—FIXED
- After manually changing presets, cueing an Marker flag earlier in the song could sometimes not recall that Marker's preset—FIXED
- Changing a Start flag's Setlist, Preset, or Snapshot parameter was sluggish—FIXED
- If Start, Marker, and/or Preset/Snap flags appear very close together at the beginning of a song, in certain cases, a preset or snapshot recall could fail to engage—FIXED
- Selecting a preset from any Start, Marker, or Preset/Snap flag would always display them in banks of 4 (A, B, C, and D) instead of reflecting the Global Settings > Preferences > Preset Numbering value—FIXED
- From the Song List, tapping any song's End of Song icon and then pressing Song could leave the End of Song panel visible—FIXED
- If Global Settings > MIDI > Send PC w/ Preset is enabled and Start, Marker, and/or Preset/Snap flags appear very close together at the beginning of a song, the same Preset and/or Snapshot CC values could be sent twice—FIXED
- Start and Time flag Time Signatures could have a numerator set to values lower than 1, which could cause Stadium to crash—FIXED
- Adding a Utility > Tuner On or Tuner Off flag to bars 5 or 6 in a new song could cause Stadium to crash—FIXED
- Stadium Floor only—Holding FS6 (MODE) would not automatically switch to display More mode in Play view—FIXED
- Stadium Floor only—If an expression pedal is assigned to multiple parameters, assignment would not always be visible from Play view—FIXED
- Stadium Floor only—When in Play view while Combo footswitch mode was active, certain operations could cause the UI to reboot—FIXED
- Stadium Floor only—Command Center > Looper command values would not change per snapshot—FIXED
- Stadium Floor only—Pressing FS1+FS7 from Snapshot mode to enter Preset mode could disable FS6 (MODE)—FIXED
- Helix Stadium app—Editing Global EQ from the editor could not be reflected visually on the hardware's Global EQ screen—FIXED
- Helix Stadium app—In certain cases, saving a preset could cause the IR in a Cab > IR block to not load properly—FIXED
- Helix Stadium app—When importing very long impulse responses (like stupid long, like "American Pie" long), the Helix Stadium app could sometimes not truncate them properly, resulting in unpredictable behavior—FIXED
- Helix Stadium app—Saving a preset by clicking the Save icon correctly maintains the current setlist whereas saving the preset by selecting Edit > Save Preset (or pressing Alt/Command-S) would switch back to the USER PRESETS folder—FIXED
- Helix Stadium app—Changing Command Center > MIDI Note's Momentary/Latching setting from the editor would not update the same setting in the hardware—FIXED
- Helix Stadium app—Clicking the Helix Stadium icon in the dock would not automatically open a device window—FIXED
- Many other fixes and improvements
