

POD Go 1.30 (released October 5, 2021) includes a new amp, new effects, new features, improvements, and bug fixes and is recommended for all users of POD Go and POD Go Wireless. Here's a video if you're in a hurry.
How do I update to 1.30?
- Connect POD Go/POD Go Wireless to your computer and launch POD Go Edit. The software will walk you through the entire procedure, including backing everything up to your computer, updating POD Go Edit, and updating the firmware.
I updated but why don't I see [Model X]?
POD Go Edit can't magically see new models added to your POD Go hardware; you MUST update POD Go Edit to 1.30 as well. Here's a link:
- macOS: https://line6.com/software/readeula.html?rid=10708
- Windows: https://line6.com/software/readeula.html?rid=10709
My POD Go is at version 1.XX. Can I go straight to 1.30?
Yes.
Anything else I should know?
Yes. We STRONGLY recommend performing a factory reset AFTER UPDATING your POD Go firmware to 1.30 and THEN RESTORING YOUR BACKUP. (Backing up is part of the update process). Here's how to perform a factory reset. IMPORTANT: MAKE SURE YOU HAVE A BACKUP FIRST, AS A FACTORY RESET WILL ERASE ALL YOUR WORK!
- While holding footswitches C and D, turn on POD Go/POD Go Wireless.
New Amp in 1.30
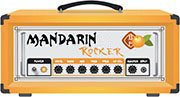
- Mandarin Rocker, based on* the Orange® Rockerverb 100 MKIII (Dirty Channel). NOTE: We decided to slightly alter the model so that at lower settings, the Drive knob's taper exhibits a smoother transition into distortion.
New Effects in 1.30

-
Distortion > Ratatouille Dist (Mono, Stereo), based on* the 1984 Pro Co RAT. Turns out our Vermin Dist model was broken. Sorry! We were going to replace it completely but a bunch of people had presets with the old version. On top of that, we found out our RAT's LM308 chip had crapped out since we modeled it last so we decided to get it into perfect working order and start from scratch.
- Gain—Sets the amount of distortion
- Filter—Sets the amount of high cut (low pass) filter applied to the distortion, basically letting more treble through (lower values) or filtering it out (higher values)
- Level—Sets the overall level of the block
-
Modulation > Retro Reel (Mono, Stereo), Line 6 Original effect that simulates playing a signal back from an analog tape machine. This signal can be distorted, filtered to sound older or more lo-fi, and modulated with wow and flutter.
- Wow Fluttr—Determines how much warbly tape sound is heard
- Saturation—Adds analog tape saturation and at high enough settings, distortion. At lower settings, it's great for simply warming up a tone
- Low Cut—Determines the frequency of the Low Cut (High Pass) filter. At higher settings, can provide a lo-fi effect
- High Cut—Determines the frequency of the High Cut (Low Pass) filter. At lower settings, can provide the natural high-end roll-off of old tape
- Tape Speed—Changes both the rate of the modulation applied by the Wow Fluttr control and the filtering response of the analog tape emulation
- Level—Sets the overall level of the block
- Texture—Adjusts the amount of the NAB tape EQ in the simulated tape path. When Saturation is set to 0.0, the texture is invisible. When Saturation is turned up, the texture will affect the tightness (or looseness) of the distortion
-
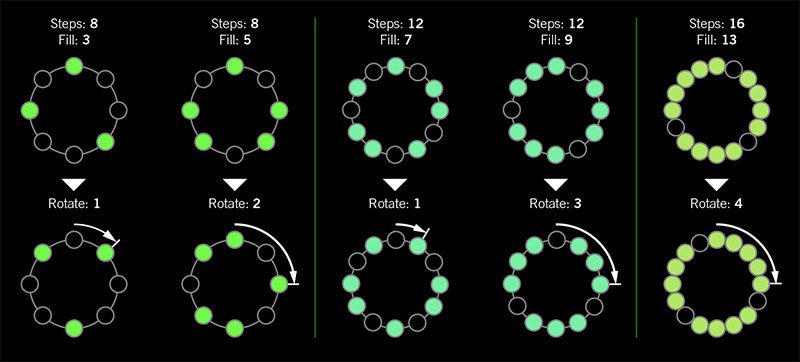
Delay > Euclidean Delay (Mono, Stereo), Line 6 Original delay based on Euclidean algorithms. Creates multitap patterns by setting the length of the pattern (Steps) and the number of taps (Fill) in the pattern. The Euclidean algorithm spaces taps as evenly as possible throughout the pattern, resulting in rhythms from traditional to highly complex. Settle in because this one'll require diagrams and charts and whatnot.
- Step Time—Sets the time between steps. The total delay time is Time x Steps, so [Time: 1/16 x Steps: 8] is a 1/2-note. Press the knob to toggle between ms/sec and note values
- Feedback—Controls the overall number of repeats heard for the entire sequence. If you want to hear all fills in the sequence only once, set to 0%
- Steps—Determines the number of steps in the sequence (1-16; see diagram below)
- Fill—The number of active taps, whose spacing is set by Euclidean algorithms (1-16, see diagram below). If Fill is higher than Steps, the extra taps are ignored
- Rotate—Rotates all fills forward by the same amount (0-15; see diagram below). Used If you like the sound of a repeat pattern but want the fills and gaps shifted forward
- Mix—Controls the wet/dry mix of the delay. When set to 0%, no delay is heard; when set to 100%, no dry signal is heard
- Low Cut—Applies a low cut (high pass) filter to the fills, letting you remove the effected signal below a certain frequency
- High Cut—Applies a high cut (low pass) filter to the fills, letting you remove the effected signal above a certain frequency
- Level—Controls the overall output level of the block
- Trails—When on, delay repeats continue to ring out after the block is bypassed
I was told there'd be no math!
Sorry. If you'd like to read more about Euclidean rhythms, check this out: https://splice.com/blog/euclidean-rhythms/ Or if you'd like to know more about Euclidean math, see ya' in a semester or two! https://en.wikipedia.org/wiki/Euclidean_algorithm
-
Reverb > Dynamic Hall (Mono, Stereo), Line 6 Original hall reverb
- Decay—Sets the decay of the reverb (0.1 sec ~ 45.0 sec, or Infinity) TIP: Assign a second stomp switch to toggle between a lower Decay value and Infinity. Label it "ForEVER ever?"
- Predelay—Determines the amount of delay heard before the signal enters the hall. Can sometimes result in more definition between the dry and effected signals
- Room Size—Sets the size of the hall (10, 20, or 30 meters). NOTE: This parameter actually changes the algorithm so you'll hear a small bump when changing it. Therefore, we don't recommend assigning Room Size to snapshots or other controllers
- Diffusion—Sets the amount of smearing between discrete echoes, sometimes resulting in a softer effected signal
- Damping—Determines the frequency above which the reverb will be absorbed. For example, if your hall is full of people wearing fake ocelot jumpsuits, more high frequencies would be absorbed than if the room were empty
- Mix—Controls the wet/dry mix of the reverb. When set to 0%, no reverb is heard; when set to 100%, no dry signal is heard
- Motion—Sets the amount of randomization, which can be helpful to minimize any metallic artifacts common in static reverbs. At higher values, can impart a bit of modulation to the effected signal
- Low Freq—Sets the frequency below which the Low Gain parameter is applied
- Low Gain—Sets the reverb time for frequencies below the Low Freq value. Values below 0.0dB mean the bass frequencies decay faster than the treble frequencies; values above 0.0dB mean the bass frequencies decay slower than the treble frequencies
- Low Cut—Applies a low cut (or high pass) filter to the reverb, letting you remove the effected signal below a certain frequency
- High Cut—Applies a high cut (or low pass) filter to the reverb, letting you remove the effected signal above a certain frequency
- Level—Controls the overall output level of the block
- Trails—When on, reverb decay continues to ring out after the block is bypassed
-
Reverb > Hot Springs (Mono, Stereo), Line 6 Original spring reverb
- Dwell—Adjusts the strength of the signal sent into the spring tank. Higher values result in a longer decay
- Spring Count—Sets how many springs are in the tank (1, 2, or 3, and numerous values in between)
- Drip—Adjusts the intensity of the spring reverb, or how much "ploink" you might hear
- Low Cut—Applies a low cut (or high pass) filter to the reverb, letting you remove the effected signal below a certain frequency
- High Cut—Applies a high cut (or low pass) filter to the reverb, letting you remove the effected signal above a certain frequency
- Mix—Controls the wet/dry mix of the reverb. When set to 0%, no reverb is heard; when set to 100%, no dry signal is heard
- Level—Controls the overall output level of the block
- Trails—When on, reverb decay continues to ring out after the block is bypassed
*NOTE: All product names used in this document are trademarks of their respective owners and neither Yamaha Guitar Group nor Line 6 are associated or affiliated with them. These trademarks appear solely to identify products whose tones and sounds were studied by Line 6 during sound model development.
New Features in 1.30
User Model Defaults
1.30 lets you save any amp, cab, or effect block's settings as default, so every time you call that model up, it sounds exactly the way you want it. Or, if you want to revert it to factory default, you can do that too. Editing/saving a User Default does not affect any existing instances of the model currently in use in your presets.
- From Edit view, choose any effect, amp, or cab and tweak it exactly how you like it.
- Press ACTION and then User Default. From POD Go Edit, right-click (Mac: control-click) the block icon and select "User Default."
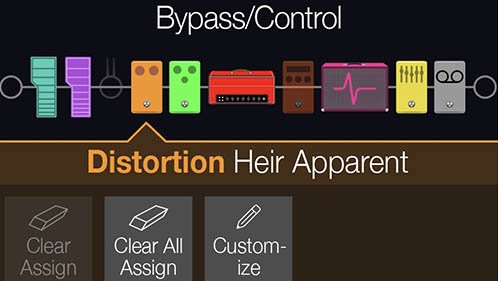
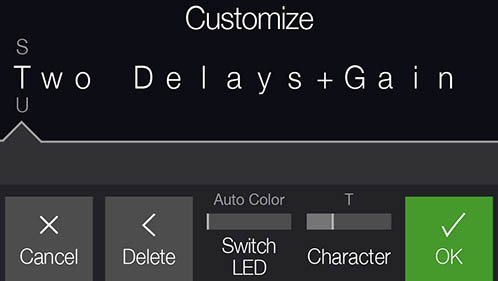
Customizable Stomp Switches
POD Go 1.30 adds the ability to customize the LED colors and onscreen labeling of stomp switches.
- Press <PAGE and PAGE> to open the main MENU and then press Knob 1 (Bypass/Control).
- Turn the Upper Knob to select the desired block and then turn Knob 2 (Switch[Controller]) to select FS1 ~ FS6.
- Press ACTION and then Knob 3 (Customize).
- Use the Upper Knob and Knob 4 (Character) to rename the Stomp switch. Turn Knob 3 (Switch LED) to choose the desired color for the switch.
- Press Knob 5 (OK) when finished.
Customizable Snapshot Switches
Switches in Snapshot Footswitch Mode can now have custom labels and colors.
- From Play View, press the Upper Knob to open the Preset List.
- Press Knob 5 (Rename Snapshot).
- Use the Upper Knob and Knob 4 (Character) to rename the Snapshot. Turn Knob 3 (Switch LED) to choose the desired color for the switch.
- Press Knob 5 (OK) when finished.
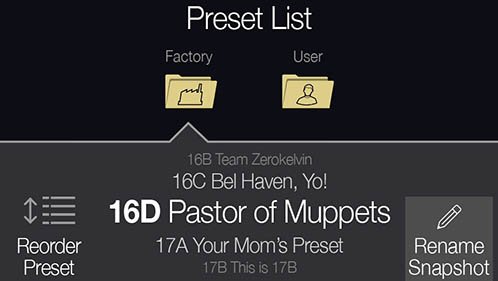

On Play view, when in Snapshot footswitch mode, custom snapshot names appear in the boxes with smaller camera icons:

Global Settings > Ins/Outs > Volume Knob
Prior to 1.30, POD Go’s Volume Knob only controlled the Main Outs (and Phones out, of course). Now you can choose whether it controls the Main Outs, Amp Out, or both. IMPORTANT: When connecting POD Go's AMP OUT to the input of a guitar or bass amp, we strongly recommend leaving Global Settings > In/Outs > Volume Knob to "Main Outs," as turning the Volume knob with any other setting will be like adding many boost pedals or attenuators between POD Go and your amp; that is, it'll probably sound totally wrong. Only set this to "Amp Out" or "Both" when connecting the Amp Out to a full-range, flat response (FRFR) speaker, studio monitor, or similar playback system.
Global Settings > Switches/Pedals > FS7/8 Function
Prior to 1.30, POD Go’s Footswitch 7/8 jack supported an expression pedal or two additional stomp switches. You can now assign them to Bank Up/Down, Preset Up/Down, or Snapshot Up/Down, so you can leave POD Go in Stomp mode (with all 6 stomps) and still navigate presets and snapshots from external switches.
Wireless Transmitter Updating via POD Go Edit
POD Go Wireless can now update a connected G10T or G10T II via POD Go Edit.
Bug Fixes in 1.30
- Changing Wah or Volume/Pan models could could inadvertently change the block's bypass state–FIXED
- In some cases, the 6 Switch Looper would not reflect the proper states in Play View—FIXED
- In rare cases, some graphic anomalies could appear on the LCD—FIXED
- If a Modulation > Deluxe Phaser (set to 2 Stage) was moved, it could freeze POD Go—FIXED
- If an Amp > Agua 51 block is set with Bass to 0.0 and Mid to 10.0, it could cease processing audio—FIXED
- In rare cases, repeated, incessant reordering of blocks via POD Go Edit could cause POD Go to freeze—FIXED
- In certain cases, exiting footswitch modes could cause the display to inadvertently change from Play view to Edit view—FIXED
- In certain circumstances, loading a preset with specific Delay > Legacy models could cause them to behave as Authentic instead of Transparent—FIXED
- Many other minor fixes and improvements
Known Issues in 1.30
- If many parameters are assigned to the expression pedal, POD Go Edit may fail to reflect some parameters' correct Min and Max values
- In some cases, loading a .WAV file into the currently active IR slot can cause the block to cease passing audio until a different IR location is selected
- When Modulation > Chorus' WavShape is set to "Saw Up" or "Saw Down," the block collapses the signal to mono when after the Amp block
- A minor thump may be heard when loading a Distortion > Kinky Boost, Dhyana Drive, or Tycoctavia Fuzz
- In rare cases, if Delay > Glitch Delay is in the active preset, performing a firmware update can cause POD Go to freeze on the splash screen
- Renamed footswitch assignments that are at the character limit and also contain special characters may cause lines to temporarily appear along the bottom of the screen when toggled. Please shorten the customized name by 1 character to avoid this as a temporary workaround until this is addressed in a future release.
- POD Go Edit—After copying/pasting an Input or Output block “Failed to undo edit buffer: …" can appear
- POD GO Edit—Adjusting some parameters can fail to display the preset name in a dirty state (italics)