With the implementation of Midi in Helix Native 1.60 you can now control parameters and snapshot changes via Midi. Here are some instructions for how to get that set up with popular DAWs. Once you have the Midi input set up wit the DAW, you can perform the following functions.
MIDI block bypass—Right-click (or Control-click) the desired block and from the pull-down menu, select MIDI Bypass > MIDI In. Then click the Automation/Controller Assign tab and choose the desired CC#. Note that there are lots of CCs that Helix Native will ignore, as these are reserved for Helix hardware functionality. See the Helix Native Pilot’s Guide for more information
MIDI parameter control—right-click (or Control-click) the desired parameter and from the pull-down menu, select Controller Assign > MIDI CC. Then click the Automation/Controller Assign tab and choose the parameter from the list. Adjust the MIDI CC#, Min, and Max Values
MIDI snapshot select—To select a snapshot in Helix Native, send it a MIDI CC#69 message. Value 0 will recall Snapshot 1, Value 1 will recall Snapshot 2, Value 2 will recall Snapshot 3, and so on
Ableton
1. Add Helix Native to either an individual Audio Track or to your Master Output.
2. Create a MIDI track (Create | Insert MIDI Track).
3. From the "MIDI From" drop down menu on your newly created MIDI track, choose the external controller you want to use to control Helix Native
4. Set the Monitor selector on the MIDI track to "In" instead of "Auto"
5. From the "MIDI To" drop down, choose the track you have added Helix Native
to.
Pro Tools
1. Click on Setup menu, MIDI, then MIDI Input Devices…
2. Make sure your MIDI Controller is listed and checked
3. Add Helix Native to an audio track
4. Add an instance of a midi track
5. Assign the output of the Midi track to Helix Native
6. Put the Midi track in record ready
7. You can now utilize midi control
Reaper
To assign an external MIDI controller knob or otherwise to a HELIX Native parameter within Reaper, one will need to:
1. Click on Reaper’s ‘Options’ > ‘Preferences’ > ‘MIDI Devices’, then choose and enable your MIDI controller.
2. Right-click on the Tracks column and choose to ‘insert virtual instrument on new track’, then choose ‘VST3’ (that’s where Native will be).
3. Once you’ve populated the plug-in on the track, simply click onto the desired effect parameter while the effect is highlighted and then right-click and choose ‘automation assign’, next choosing which knob or key on your controller you want to control the effect parameter with on your MIDI device; once you’ve chosen the desired knob then click on the HELIX Native button labeled ‘Param’ in the upper right corner of the Native window.
4. Click ‘Learn’ and then move the MIDI controller knob back and forth all the way. Once you’ve done this click ‘OK’.
This should complete the assignment process for one parameter, if you desire more external control simply repeat this process for the other knobs and parameters.
Cubase
1. Arm a track with the Helix Native plugin
2. Navigate to the “studio” tab from the Cubase setting window
3. Select “studio setup”
4. Expand the “remote devices” file from the settings selection to reveal “generic remote”
5. Change the MIDI input and output to match the controller you are connecting
6. From the “vst” section located at the bottom of this window select Helix Native by double clicking the channel section.
7. From this window you will be able to activate each switch/knob of your MIDI controller
8. Within Helix Native, select your desired parameter and right click to open the “controller assign” window.
9. Select your preferred knob or switch you wish to control you desired parameter
Logic Pro X
First, make sure your MIDI controller is recognized by Logic Pro X – the application will automatically ask you to auto assign all of the parameters when you first plug in the controller. You should choose auto assign from the beginning when starting Logic.
Screenshots can be found here: https://support.apple.com/en-us/HT205896
Once you have the controller assigned, you’ll be able to start assigning controls within Helix Native.
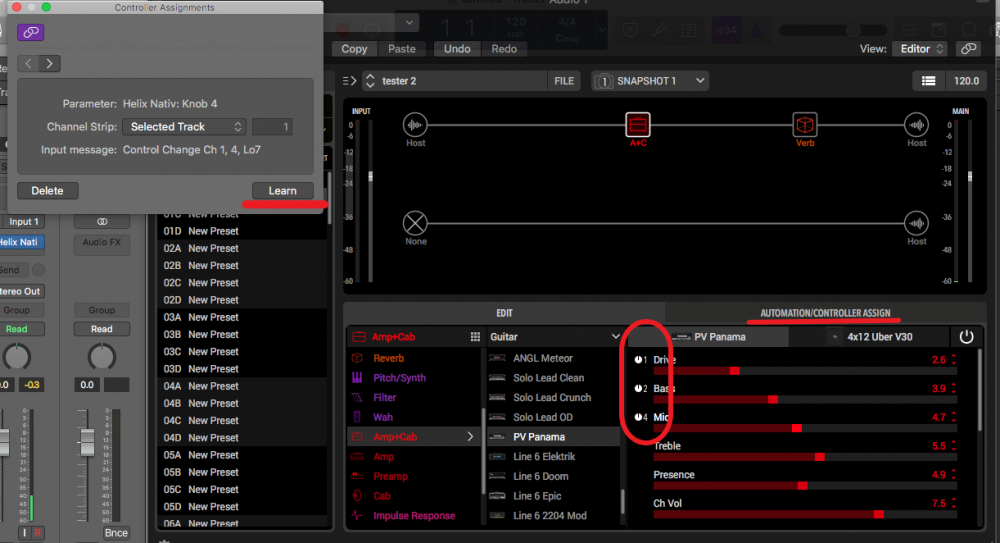
1. Open up Helix Native within your track, and then assign your automation knob to the parameter you would like to control. You can control click on the parameter, or go into Automation/Controller Assign and assign the knob manually.
2. Once you have the knob assigned. Go into the menu Logic Pro X > Control Surfaces > Controller Assignments…
3. In the Controller Assign Window, you will click on “Learn” and then click on the desired parameter. Then turn the knob to make sure it’s recognized. You should see the parameter moving with the position of the knob. You will also see a knob icon appear to the left of the parameter when assigned.
Edited by Line6Will

