

Helix/HX 3.15 (released February 8, 2022) includes a new Line 6 original amp, 10 new Helix effects, 18 additional Legacy effects, new features, additional improvements, and bug fixes, and is recommended for all users.
How do I update to 3.15?
If you're running HX Edit 3.01 or higher (released on Feb 2, 2021), just connect Helix/HX to your computer via USB and launch HX Edit. The software will walk you through the entire procedure, including backing everything up to your computer and updating both HX Edit and your Helix/HX firmware. If you're running an older version of HX Edit, you must update it before updating your Helix/HX hardware.
Before updating Helix Native, it is highly recommended that you export a preset/setlist bundle. This is done by going to Settings (the gear icon in the bottom left of the window), the Presets/IRs tab, and clicking Export Bundle. Some hardware compatibility modes (HX Stomp, HX Stomp XL, HX Effects) do not have this feature as they only have one setlist. In these cases the setlist will need to be exported.
I updated but why don't I see [Model X]?
HX Edit can't magically see new models added to your Helix/HX hardware; you must update HX Edit as well (which you would've done had you followed "How do I update to 3.15?" above). Here's a link to HX Edit 3.15:
- macOS: https://line6.com/software/readeula.html?rid=11009
- Windows: https://line6.com/software/readeula.html?rid=11007
My Helix/HX is at version X.XX. Can I go straight to 3.15?
Yes, but note that if you're starting from 2.80 or lower, the update will appear to happen twice. This is normal.
Anything else I should know?
Yes. We STRONGLY recommend performing a factory reset AFTER UPDATING your Helix/HX firmware to 3.15 and THEN RESTORING YOUR BACKUP. (Backing up is part of the update process). Here's how to perform a factory reset. IMPORTANT: MAKE SURE YOU HAVE A BACKUP FIRST, AS A FACTORY RESET WILL ERASE ALL YOUR WORK!
- Helix Floor/LT: While holding footswitches 9 & 10 (bottom row, 2 middle switches), turn on Helix Floor/LT
- Helix Rack: While holding knobs 5 & 6 (2 furthest right knobs below the screen), turn on Helix Rack
- HX Effects: While holding footswitches 6 & TAP (2 farthest right switches on the bottom row), turn on HX Effects
- HX Stomp: While holding footswitches 2 & 3, turn on HX Stomp
- HX Stomp XL: While holding footswitches C & D, turn on HX Stomp
New Amp in 3.15
Helix Floor, Helix Rack, Helix LT, Helix Native, HX Stomp, HX Stomp XL
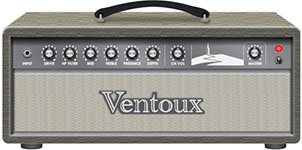
Amp/Preamp > Line 6 Ventoux, Line 6 Original.
"The amp model name is Ventoux, which is a mountain in the south of France that is a legendary cycling climb. I did it in 2018 and it was awesome and very hard.
This model comes from a physical amp idea I had a while back. I was going to build it as a tube amp first. There are only so many hours in a day, though. The idea was to create a “coveted boutique amp” that had a different origin story. Most coveted boutique amps come from modified black panel Fenders or modified Marshall circuits. I wanted to do the same thing, but base it on the early 70s Orange circuits and the mid-wattage Fender Tweed circuits.
Ventoux has a unique topology. In an indirect way, every knob is kind of a gain/drive control. The tone controls adjust the character and/or amount of the overdrive in those frequencies. This might be seen as complicated by some, but I find it exciting and full of possibilities."
—Ben Adrian, Sound Design Manager
- Drive—Controls the amount of amp drive
- HP Filter—Higher values result in tighter distortions and thinner cleans; lower values result in looser distortions and warmer cleans
- Mid—Allows for more character than most. At lower values it's like the scooped sounds of traditional 60s Fender amps; at higher values it's flatter, like the 50s tweed amps that have very little tone-shaping in the circuits. Plus, a full-up mid sound will get a nice crunch when Drive is up
- Presence/Depth—You may have noticed this amp was lacking regular bass and treble controls. That is accounted for with Depth and Presence controls; bass and treble for the power amp. These actually occur in the circuit just before phase inverter, but they really need the whole power amp to function. They also affect the character of the power amp distortion
- Ch Vol—Sets the overall level of the Amp block
- Master—Ventoux's Master volume exists in an "impossible" place for a physical amp. Generally, you'll want to leave this at 10.0, like a vintage amp with no master volume. However, a variety of textures can be had by reducing the level
New Helix Effects in 3.15
Helix Floor, Helix Rack, Helix LT, Helix Native, HX Effects, HX Stomp, HX Stomp XL
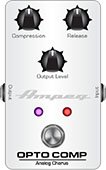
Dynamics > Ampeg Opto Comp (Mono, Stereo), based on* the Ampeg Opto Comp compressor pedal.
- Compress—Controls how much level the compressor detector circuit receives. More level = more compression. (Ampeg Opto Comp has a fixed threshold and ratio)
- Release—Controls how long it takes for the compressor to stop reducing gain. At 0.0, the release is 75 ms; at 10.0, the release is around 600 ms
- Mix—Controls the wet/dry mix of the compressor. When set to 0%, no compressed signal is heard; when set to 100%, no dry signal is heard
- Level—Sets the overall level of the block

Modulation > Ampeg Liquifier (Mono, Stereo), based on* the Ampeg Liquifier chorus pedal.
- Rate—Adjusts the speed of the chorus’ low-frequency oscillator (LFO) from slow to fast
- Depth—Adjusts the amplitude of the modulation, from mild to deep
- Mix—Controls the wet/dry mix of the chorus. When set to 0%, no chorus is heard; when set to 100%, no dry signal is heard
- Type—Liquifier is actually two choruses in one, hence the "Dual" default. If you'd prefer it to behave more like a traditional chorus pedal, choose "Single"
- Headroom—Some mod pedals' internal signal paths exhibit a bit of grit, especially when placed after a high-gain amp block. Negative values increase the perceived amount of grit; positive values clean things up a bit. At 0dB, the model behaves like the original pedal
- Level—Sets the overall level of the block
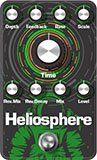
Delay > Heliosphere (Mono, Stereo), Line 6 Original delay with reverb injected into the feedback loop.
- Time—Sets the delay time. Press the knob to toggle between ms/Sec and note values
- Feedback—Controls the overall number of repeats. To hear only one repeat, set to 0%
- Rate—Controls the rate or speed of modulation
- Depth—Controls the depth or amount of modulation
- Mix—Controls the wet/dry mix of the delay. When set to 0%, no delay is heard; when set to 100%, no dry signal is heard
- Level—Sets the overall level of the block
- Scale—For stereo delays, the Time parameter sets the left side. The right side's time is always some percentage of the left's time, and is determined by the Scale parameter. For example, if Time is set to 500ms, and Scale is set to 70%, the left delay is 500ms and the right delay is 350ms (or 70% of 500ms). When scale is set to 100%, left and right delays are the same
- Rev Mix—Controls the wet/dry mix of the reverb inside the delay's feedback loop. When set to 0%, no reverb is heard
- Rev Decay—Sets the decay of the reverb
- Headroom—Some delay pedals' internal signal paths exhibit a bit of grit, especially when placed after a high-gain amp block. Negative values increase the perceived amount of grit; positive values clean things up a bit.
- Trails—When set to "Off," delay repeats are instantly muted when the block is bypassed. When set to "On," delay repeats continue to decay naturally when the block is bypassed or a different snapshot is selected
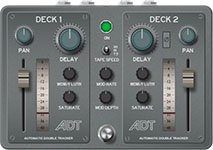
Delay > ADT (Mono, Stereo), Line 6 Original double-tracking tape emulation.
- Delay 1, Delay 2—Sets the delay time for each deck. Delay 1 can go up to 20ms and Delay 2 can go up to 200ms
- WowFlutr1, WowFlutr2—Determines how much warbly tape sound is heard for each deck
- Saturate1, Saturate2— Adds analog tape saturation and at high enough settings, distortion. At lower settings, it's great for simply warming up a tone
- Deck 1 Vol, Deck 2 Vol—Sets the level of each deck independently. Deck 2 is a bit lower than Deck 1 by default
- Deck 2 Pol—Flips the polarity of deck 2
- Mod Rate—Controls the rate or speed of modulation applied to Deck 2
- Mod Depth—Controls the depth or amount of modulation applied to Deck 2
- Level—Sets the overall level of the block
- TapeSpeed—Changes both the rate of the modulation applied by the WowFluttr control and the filtering response of the analog tape emulation
- Texture— Adjusts the amount of the NAB tape EQ in the simulated tape path. When Saturation is set to 0.0, the texture is invisible. When Saturation is turned up, the texture will affect the tightness (or looseness) of the distortion
- Low Cut—Applies a low cut (high pass) filter to the decks, letting you remove the effected signal below a certain frequency
- High Cut—Applies a high cut (low pass) filter to the decks, letting you remove the effected signal above a certain frequency
- Deck 1 Pan, Deck 2 Pan—Pans each deck left and right
- EnvThresh—Sets the level above which engages the envelope. When on, picking harder can impart very slight pitch fluctuations by tweaking Deck 2's delay. Subtle, but fun
- Trails—When set to "Off," delay repeats are instantly muted when the block is bypassed. When set to "On," delay repeats continue to decay naturally when the block is bypassed or a different snapshot is selected
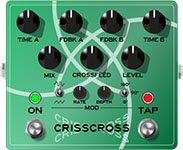
Delay > Crisscross (Mono, Stereo), Line 6 Original dual delay with cross-feedback between the two delay lines.
- Time A, Time B—Sets the delay time for each of the two delay lines. Press the knob to toggle between ms/Sec and note values
- Feedbk A, Feedback B—Controls the number of repeats for each delay line. To hear only one repeat, set to 0%
- Pan A, Pan B—To achieve the widest stereo field, set Pan A to L100 and Pan B to R100
- Mix—Controls the wet/dry mix of the delay. When set to 0%, no delay is heard; when set to 100%, no dry signal is heard
- Level—Sets the overall level of the block
- Crossfeed—Controls the amount of the A delay line fed back into the B delay line and vice versa
- Headroom—Some delay pedals' internal signal paths exhibit a bit of grit, especially when placed after a high-gain amp block. Negative values increase the perceived amount of grit; positive values clean things up a bit.
- Mod Rate—Controls the rate or speed of modulation
- Mod Depth—Controls the depth or amount of modulation
- Shape—Sets the modulation's wave shape (Sine or Triangle)
- Phase—Determines the modulation's phase relationship between the two delay lines. At 0°, the delay lines modulate together; at 180°, modulation is inverted from one another
- Bit Depth—Lowers the bit depth of the delay repeats for a grungier sound. For more transparent results, set to "24 bits"
- Sample Rate—Lowers the sample rate of the delay repeats for a grungier sound. For more transparent results, set to "48kHz"
- Low Cut—Applies a low cut (high pass) filter to the repeats, letting you remove the effected signal below a certain frequency
- High Cut—Applies a high cut (low pass) filter to the repeats, letting you remove the effected signal above a certain frequency
- Trails—When set to "Off," delay repeats are instantly muted when the block is bypassed. When set to "On," delay repeats continue to decay naturally when the block is bypassed or a different snapshot is selected
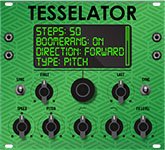
Delay > Tesselator (Mono, Stereo), Line 6 Original. Tesselator is part morphing delay, part loop sampler, part drone machine... it's stellar for creating rhythmic pads, textures, or pitch/filter ramp effects to play over and has been placed in the Delay category so you can run multiple instances at once. Once audio is captured and repeating, you can effectively transition/morph between two states—First and Last, each with its own time, speed/pitch, HP filter, and LP filter—by applying increasing amounts to each repeat until the target settings are reached.
- Assign Tesselator to a stomp footswitch. It's bypassed by default.
- Play a chord and while it's ringing, press the Tesselator switch. Audio captured BEFORE the switch press is repeated and manipulated by the following parameters:
- First—Determines the length of the first step in the sequence, that is, the length of repeated audio when first engaged. Press the knob to toggle between ms and note values
- Last—Determines the length of the last step in the sequence. If shorter than the First step's time, the sequence will get shorter; if longer than the First step's time, the sequence will get longer. If First and Last are the same time, the sequence length remains constant (Ex. 1 below). Press the knob to toggle between ms and note values
- Steps—Determines how many steps there are in the sequence (1 ~ 50). For example, if your first step is 100ms and your last step is 500ms, each successive step in the sequence will lengthen from 100ms to 500ms. The more steps you have, the longer it takes to reach the last step and therefore, the longer it takes to alter the sequence's characteristics
-
Direction—Determines the direction of the steps:
- Forward: Each step plays back normally (Ex. 2a below)
- Reverse: Each step plays back in reverse (Ex. 2b below)
- Fwd/Rev: Steps alternate between forward and reverse (Ex. 2c below)
- Boomerang—When off, the last step in the sequence repeats indefinitely. When on, all steps play forward, then backward, then forward again, etc. (Ex. 3a below)
-
Operation—Determines what happens to your signal when Tesselator is turned on (remember, it's bypassed by default)
- "Mute All"—When Tesselator is on, THE ENTIRE PATH IS MUTED
- "Dry Kill"—When Tesselator is on, only the effected signal is heard. TIP: With Tesselator on a parallel path, assign a second stomp switch to toggle between Mute All and Dry Kill. This lets you leave the block enabled and bring the effected signal in and out by switching between the two values
- "Normal" (default)—When Tesselator is on, both the dry and effected signals are heard
-
Ramp—Determines whether any speed/pitch changes across the sequence reference a static or semitone value
- "Speed" (default)—Sets the target speed of the last step. Use the Speed parameter to set the specific value (0% ~ 200% speed)
- "Pitch"—Sets the target pitch of the last step. Use the Pitch parameter to set the value (-12 ~ +12 semitones; see Ex. 3c below)
- Speed—Sets the target speed for the last step. For example, if set to "200%," the last step's pitch will be twice as high as the first step and if set to "0%," the last step will appear to stop completely, almost like a glitchy tape stop effect. Disabled unless Ramp is set to "Speed"
- Pitch—Sets the target pitch for the last step. For example, if set to "-12", the last step will be an octave lower than the first step. Disabled unless Ramp is set to "Pitch" (see Ex. 3c below)
- HP Filter—Very different from Helix's traditional Low Cut and High Cut filters. Sets the high-pass (low cut) filter target for the last step. For example, if set to a higher value, each successive step will filter out more bass until the last step of the sequence
- LP Filter—Very different from Helix's traditional Low Cut and High Cut filters. Sets the low-pass (high cut) filter target for the last step. For example, if set to a lower value, each successive step will filter out more treble until the last step of the sequence (Ex. 3b below)
- FX Level—Controls the level of the effected signal
- Level—Controls the overall output level of the block
Woohoo! More charts and diagrams!
Tesselator is capable of hundreds of unique sounds, and it's impossible to illustrate them all, but here are a few examples:
Example 1: If Knob 1 (First) and Knob 2 (Last) are set to the same value (say, 1/4 note), the same length of audio repeats until Tesselator is bypassed. In this case, it acts very much like Delay > Ratchet, except the audio is captured BEFORE the stomp press, not after.
Example 2: If Knob 2 (Last) is set to a shorter time than Knob 1 (First), steps in the sequence progressively get shorter (Ex. 2a). If Last is set to a longer time than First, steps in the sequence progressively get longer. The last step is repeated indefinitely until Tesselator is bypassed. Setting Direction to "Reverse" (Ex. 2b) reverses all steps; setting Direction to "Fwd/Rev" (Ex. 2c) alternates between forward and reversed steps.
Example 3: Turning Boomerang to "On" plays the entire step sequence forward, then backward, then forward again, etc. (Ex. 3a) Decreasing LP Filter to a lower value progressively darkens each step in the sequence (Ex. 3b). Increasing HP Filter to a higher value progressively thins out each step in the sequence. Setting Ramp to "Pitch" and Pitch to a value other than "0" will change the pitch of each step until it lands on the target pitch at the last step. For example, if Pitch is set to "+5" and you play an E note, the last note in the sequence will be an A, or 5 steps higher (Ex. 3c). If you want the last A note to repeat indefinitely instead of stepping back down to E, turn Boomerang back to "Off."
TIP: You can change all of these parameters while Tesselator is... tessellating, to create evolving, engaging soundscapes. Run it into Pitch > Dual Pitch and Reverb > Shimmer and prepare to waste hours in drone land.

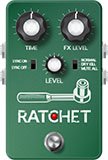
Delay > Ratchet (Mono, Stereo), Line 6 Original buffer sampler/delay. Used to capture and loop a short snippet of audio (whose length is determined by the Time parameter) while the block is enabled. Great for rhythmic stutter effects. You could almost consider Ratchet a simplified version of Tesselator, where the audio is captured AFTER the footswitch press, not before.
- Assign Ratchet to a stomp footswitch. It's bypassed by default.
- While playing, press the Ratchet switch. Audio captured AFTER the switch press is repeated for as long as the block is enabled. For this reason, it may be best to make the switch momentary, and only step on the Ratchet switch when you change chords, almost like a rhythmic sustain pedal.
- FX Level—Controls the level of the looped audio
- Level—Controls the overall output level of the block
- Time—Predetermines the length of the audio to be recorded and looped. To loop an entire 4/4 bar, choose "1/1"; to stutter your playing, start with "1/16" or "1/32"
-
Operation—Determines what happens to your signal when Ratchet is turned on (remember, it's bypassed by default)
- "Mute All"—When Ratchet is on, THE ENTIRE PATH IS MUTED
- "Dry Kill"—When Ratchet is on, only the effected signal is heard. TIP: With Ratchet on a parallel path, assign a second stomp switch to toggle between Mute All and Dry Kill. This lets you leave the block enabled and bring the effected signal in and out by switching between the two values
- "Normal" (default)—When Ratchet is on, both the dry and effected signals are heard

Reverb > Dynamic Plate (Mono, Stereo), Line 6 Original plate reverb typically found in high-end studio rack reverbs.
- Decay—Sets the decay of the reverb (0.1 sec ~ 45.0 sec, or Infinity)
- Predelay—Determines the amount of delay heard before the signal enters the plate. Can sometimes result in more definition between the dry and effected signals
- Damping—Determines the frequency above which the reverb will be absorbed. For example, if your hall is full of people wearing fake ocelot jumpsuits, more high frequencies would be absorbed than if the room were empty
- Mot Rate—Motion Rate, or how fast the echoes' intensity changes, due to changes in plate tension or temperature
- MotRange—Motion Range, or how much the internal delays change. Similar to the modulation control on older tank reverbs
- Mix—Controls the wet/dry mix of the reverb. When set to 0%, no reverb is heard; when set to 100%, no dry signal is heard
- Low Freq—Sets the frequency below which the Low Gain parameter is applied
- Low Gain—Sets the reverb time for frequencies below the Low Freq value. Values below 0.0dB mean the bass frequencies decay faster than the treble frequencies; values above 0.0dB mean the bass frequencies decay slower than the treble frequencies
- Low Cut—Applies a low cut (or high pass) filter to the reverb, letting you remove the effected signal below a certain frequency
- High Cut—Applies a high cut (or low pass) filter to the reverb, letting you remove the effected signal above a certain frequency
- Level—Controls the overall output level of the block
- Trails—When set to "Off," the reverb decay is instantly muted when the block is bypassed. When set to "On," the reverb continues to decay naturally when the block is bypassed or a different snapshot is selected
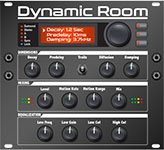
Reverb > Dynamic Room (Mono, Stereo), Line 6 Original room reverb typically found in high-end studio rack reverbs.
- Decay—Sets the decay of the reverb (0.1 sec ~ 3.0 sec)
- Predelay—Determines the amount of delay heard before the signal enters the room. Can sometimes result in more definition between the dry and effected signals
- Damping—Determines the frequency above which the reverb will be absorbed. For example, if your room is full of people wearing foam high school mascot costumes, more high frequencies would be absorbed than if the room were empty
- Diffusion—Sets the amount of smearing between discrete echoes, sometimes resulting in a softer effected signal
- Mot Rate—Motion Rate, or how quickly the room's shape may be changing, due to people moving, doors opening or closing, etc.
- Mix—Controls the wet/dry mix of the reverb. When set to 0%, no reverb is heard; when set to 100%, no dry signal is heard
- Low Freq—Sets the frequency below which the Low Gain parameter is applied
- Low Gain—Sets the reverb time for frequencies below the Low Freq value. Values below 0.0dB mean the bass frequencies decay faster than the treble frequencies; values above 0.0dB mean the bass frequencies decay slower than the treble frequencies
- Low Cut—Applies a low cut (or high pass) filter to the reverb, letting you remove the effected signal below a certain frequency
- High Cut—Applies a high cut (or low pass) filter to the reverb, letting you remove the effected signal above a certain frequency
- EarlyReflc—Sets the amount of early reflective room sound
- Level—Controls the overall output level of the block
- Trails—When set to "Off," the reverb decay is instantly muted when the block is bypassed. When set to "On," the reverb continues to decay naturally when the block is bypassed or a different snapshot is selected
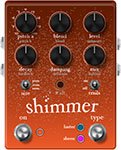
Reverb > Shimmer (Mono, Stereo), Line 6 Original shimmer reverb. We originally planned to release Shimmer as two distinctly different reverbs—Luster and Sheen—but combining them into a single model and letting you seamlessly switch back and forth via a footswitch or snapshots seemed cooler.
-
Type—Determines the type of shimmer effect applied. TIP: Assign Type to a footswitch (or snapshots) to try both within the same preset
- "Luster"—More of a traditional, reverb pedal-type shimmer effect with tighter definition in the lustery bits
- "Sheen" (default)—More of a lush, studio plugin-type shimmer effect with a massive, sheeny bloom
- Pitch 1—Sets the interval of the first pitchshifter. Set to "Oct Up" for more traditional shimmer sounds; set to "Oct Down" for something a bit creepier. Note that Pitch 1 and Pitch 2 have 0.1 semitone resolution between -1and +1
- Pitch 2—Sets the interval of the second pitchshifter
- Intensity—Controls the mix between the pitchshifted and non-pitchshifted reverb
- Feedback—Controls the number of times the pitchshifting recirculates through the reverb
- Pitch Blend—Controls how much of Pitch 1 is heard vs. Pitch 2 (set to "Even" by default)
- Mix—Controls the wet/dry mix of the reverb. When set to 0%, no reverb is heard; when set to 100%, no dry signal is heard
- Decay—Sets the decay of the reverb (0.1 sec ~ 45.0 sec or Infinity)
- Predelay—Determines the amount of delay heard before the signal enters the room. Can sometimes result in more definition between the dry and effected signals
- Room Size—Sets the size of the room (10, 20, or 30 meters)
- Damping—Determines the frequency above which the reverb will be absorbed
- Diffusion—Sets the amount of smearing between discrete echoes, sometimes resulting in a softer effected signal
- Motion—Sets the amount of randomization, which can be helpful to minimize any metallic artifacts common in static reverbs. At higher values, can impart a bit of modulation to the effected signal
- Low Cut—Applies a low cut (or high pass) filter to the reverb, letting you remove the effected signal below a certain frequency
- High Cut—Applies a high cut (or low pass) filter to the reverb, letting you remove the effected signal above a certain frequency
- Level—Controls the overall output level of the block
- Trails—When set to "Off," the reverb decay is instantly muted when the block is bypassed. When set to "On," the reverb continues to decay naturally when the block is bypassed or a different snapshot is selected
*NOTE: All product names used in this document are trademarks of their respective owners and neither Yamaha Guitar Group nor Line 6 are associated or affiliated with them. These trademarks appear solely to identify products whose tones and sounds were studied by Line 6 during sound model development.
New Legacy Effects in 3.15
Helix Floor, Helix Rack, Helix LT, Helix Native, HX Effects, HX Stomp, HX Stomp XL
18 additional effects—most from the FX Junkie model pack for POD Farm 2.5—have been added to the Legacy subcategory in their respective effects categories. Don't sleep on these!
- Distortion > Bronze Master (Legacy), based on* the Maestro® Bass Brassmaster. Originally designed for bass, but equally cool on guitar, the Maestro® Bass Brassmaster is considered by many to be the Holy Grail of bass distortion units, an ultra-rare bird designed in the early 70’s for Maestro® by synth genius Tom Oberheim. NOTE: The Blend parameter is not like overall distortion Mix; instead, it sets how much of the filtered signal passes through the clipping/octave circuitry
- Distortion > Killer Z (Legacy), based on* the BOSS® Metal Zone MT-2. Equipped with a dual gain circuit, the MT-2 provides amazing sustain plus heavy mids and lows similar to a stack of overdriven amps. We’ve simplified the EQ controls a bit to make the Killer Z model, but you’ll still find the sought after flavor of the MT-2 style sound
- Modulation > Tape Eater (Legacy), Line 6 Original. If you’ve ever had a cassette player eat a tape before you’ll know what we’re talking about. Try this with a slow speed setting and a 100% wet mix
- Modulation > Warble-Matic (Legacy), Line 6 Original. This effect is reminiscent of the Sweeper model, but when used subtly it can produce a nice mild phasey sound or with Depth maxed out you can simulate the sound of an alien spacecraft landing in one of those old 50’s sci-fi movies
- Modulation > Random S&H (Legacy), Line 6 Original. This has a similar effect as the old Oberheim® Voltage Controlled Filter. It creates changes in tone by randomly emphasizing certain frequencies. Try pressing the Speed knob to lock it to tempo and playing single chords to that tempo
- Modulation > Sweeper (Legacy), Line 6 Original. Imagine having 2 wah pedals on steroids separated in a stereo field that are pulsating in opposite positions and you’re close to what you’ll hear here. Use the Q and Freq parameters to set the character of the sweep and adjust Depth to go from subtle to full on freak out. Any resemblance to guitar tracks heard in a particular genre of B films is strictly coincidental
- Delay > Phaze Eko (Legacy), Line 6 Original. Starting with the basic tone of our EP-1 tape delay emulation, they’ve added something very much like a Uni-Vibe to the delay repeats. The result is an echo unit that gives you unique new creative possibilities for adjusting the tone of your delays with a beautiful, burbling texture
- Delay > Bubble Echo (Legacy), Line 6 Original. Bubble Echo has a sample-and-hold filter on the repeats. It takes a filter sweep (like the one on Sweep Echo), chops it up into little bits, and rearranges them semi-randomly, so that it sounds like sudden little bits of wah pedal randomly sprinkled about
- Pitch/Synth > Synth Lead (Legacy), Line 6 Original. These are styled after popular analog monophonic synth lead sounds from Moog, ARP and Sequential Circuits
- Pitch/Synth > String Theory (Legacy), Line 6 Original. This emulates classic synth string sounds like those found in the ARP Solina String Ensemble and the Elka® Synthex. The harder you pick, the brighter the sound. We somehow had two separate effects called "Synth String"—one from POD Farm 2.5 and the other from FM4, which was already added to Helix/HX in 1.50. Renamed the POD Farm version "String Theory" to avoid confusion
- Pitch/Synth > Synth FX (Legacy), Line 6 Original. These sounds aren’t really designed to be musical. These are more “special effects” sounds. You’ll hear a lot of these kinds of sounds in movie soundtracks
- Pitch/Synth > Buzz Wave (Legacy), Line 6 Original. These are cool combinations of saw and square waves with fast vibrato. The 8 different Wave parameters offer different vibrato speeds and different pitches
- Pitch/Synth > Rez Synth (Legacy), Line 6 Original. These are all sweeping low pass filter effects with the resonance set high. Resonance is a peak at the frequency of the low pass filter
- Pitch/Synth > Saturn 5 Ring Mod (Legacy), Line 6 Original. Ring modulators take two signals (one supplied by your guitar, the other supplied by the effect) then adds and subtracts similar frequencies. Electro-Harmonix® makes a ring modulator pedal called the Frequency Analyzer that is a popular guitar effect. The only limiting factor is that the pitch of the signal provided by the effect is constant. Meaning you have to play only in the key of that pitch to be musical
- Pitch/Synth > Double Bass (Legacy), Line 6 Original. This effect has two oscillators that track the pitch of your guitar—one square wave tuned one octave down, and one saw tooth wave two octaves down
- Pitch/Synth > Seismik Synth (Legacy), Line 6 Original. This effect has an oscillator that tracks the pitch of your guitar. You can choose between 8 different wave shapes which give you different “flavors”—all of them one or two octaves down from the original pitch
- Pitch/Synth > Analog Synth (Legacy), Line 6 Original. These are great for funky synth guitar (or bass) lines. These sounds were made popular by Moog and ARP
- Pitch/Synth > Synth Harmony (Legacy), Line 6 Original. If you loved those big synth leads from 70’s era prog bands then you’ll love this effect. There are two synth waves at work here. Your first two parameters allow you to choose a pitch interval of your original note played. The Wave parameter works differently from what you’d expect with the other synth models; here it controls the gain of the saw wave, while the square wave gain remains constant
New Features in 3.15
Apple Silicon Support
Helix Native
The Helix Native VST/AU/AAX plug-in now natively supports M1 and newer Apple computers without Rosetta. NOTE: HX Edit software has worked with M1 Macs from day one.
Input Block > Per-Preset Guitar Pad
Helix Floor, Helix Rack/Control, Helix LT, HX Stomp, HX Stomp XL
The Input > Multi and Input > Guitar block now has an additional Guitar Pad parameter that lets you engage the analog guitar pad per preset ("Off" or "On). Or you could leave it set to "Global" and continue to turn the guitar pad on and off from the Global Settings menu. NOTE: For HX Stomp and HX Stomp XL, "Global" refers to the Global Settings > Ins/Outs > Input Level setting. When Pad is on, it's the same as if Input Level is set to "Line"; when off, it's the same as if Input Level is set to "Inst[rument]."
Per-Snapshot Command Center > HX Snpsht Values
Command Center > HX Snapshot command parameters can now be controlled by Snapshots themselves. For example, imagine that you are on Snapshot 1 and create an HX Snapshot command on FS2. You set it so that pressing that switch recalls Snapshot 3. You then switch to Snapshot 3 and set the same switch to recall Snapshot 6. Recall Snapshot 6 and set the switch to recall Snapshot 2. Finally, you recall Snapshot 2 and set the switch to recall Snapshot 1. Now, you go back to Snapshot 1 and begin pressing the switch. Each successive press recalls the assigned Snapshot and you would cycle Snapshot 1 > 3 > 6 > 2 > 1 > 3 > 6 > 2 and so on for each switch press. NOTE: this assumes that the Snapshot Edits global is set to Recall. If it's set to Discard, you'd have to save the preset after each set in order for the changes to stick
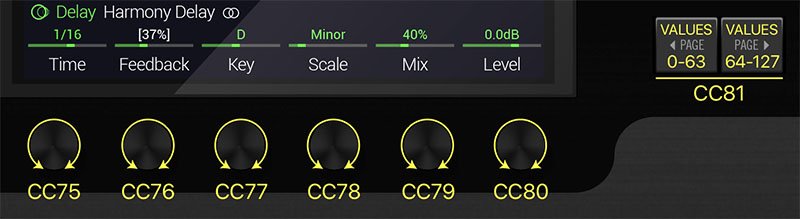
Global MIDI Control of Knobs 1-6, <PAGE/PAGE>, and Preset Save
Helix Floor, Helix Rack, Helix LT, HX Effects, HX Stomp, HX Stomp XL
Instead of manually having to assign parameters to incoming MIDI CC messages, Knobs 1-6 for any block on the Home screen (Knobs 1-3 on HX Effects, HX Stomp, or HX Stomp XL) respond to new global MIDI CCs. This turns any programmable MIDI keyboard or tabletop controller into a simple way to edit blocks without having to reach down (for those of you who can't be bothered to use Pedal Edit Mode). In addition, sending Helix/HX a CC74 message will save any changes to the preset. IMPORTANT! We ran out of reserved Global CCs and unfortunately had to steal five user-assignable CCs for this feature. Any parameters you've assigned to CC77-CC81 will have to be remapped. Sorry 'bout that.
Other Changes and Improvements in 3.15
- Bypass Assign > EXP Pedal 1/2 now has a new Behavior parameter to control how bypassing is handled. The default value "Toggle" behaves as this feature always has - bringing the pedal past threshold will toggle the block's bypass state from what it is currently (i.e. enable if currently bypassed and vice versa). "Toe Down" and "Heel Down" always bypass the block at the designated position, regardless of the block's starting state. So with "Heel Down" selected, the block will always enable when you cross the Position threshold and bypass when you return below it
- The max delay time for several Delay > Legacy models has been increased from 2 seconds to 2.5 seconds
- Numerous additional minor improvements to Delay > Legacy models
- Delay > Multitap 6 has been optimized to use less than half the DSP as in pre-3.15 builds
-
MIDI CC69 values are now transmitted upon snapshot change
-
We ran out of reserved Global CCs and unfortunately had to steal five user-assignable CCs for MIDI control of Knobs 1-6 and <PAGE/PAGE>. Any parameters you've assigned to CC77-CC81 will have to be remapped
-
Encoder ballistics have been improved. For parameters with hundreds of values, you can now go from Min to Max in a couple of turns
-
HX Stomp XL only: Global Settings > Footswitches > Snapshot Mode adds a third value—Toggle, like the one in HX Effects and POD Go. This remembers whether Preset Mode is in Preset or Snapshot mode and allows for toggling between Stomp and Snapshot mode via the MODE switch
Bug Fixes in 3.15
- Amp/Preamp > Das Benzin Lead channel output was set to -36dB instead of -24dB—FIXED
- Amp/Preamp > Voltage Queen's Master volume only affected one side of the push/pull power amp—FIXED
- Distortion > Ampeg Scrambler's oversampling wasn't fully implemented—FIXED
- IR names with more than 54 characters couldn't be copied or exported from HX Edit
- HX Stomp, HX Stomp XL, HX Effects only: Pressing TAP to reset LFOs now properly works on switch press, not release—FIXED
- HX Stomp, HX Stomp XL only: Some Preamp blocks would display an Amp block icon in the inspector header—FIXED
- HX Stomp XL only: Command Center > HX Snapshot commands assigned to Hold would not function properly on FS1 and FS4—FIXED
- HX Edit only: In rare cases, dragging in an IR from the list to the signal flow could sometimes create a None block instead of an Impulse Response block—FIXED
- HX Edit only: While Spillover is active, dragging a block across path A/B could occasionally fail—FIXED
- HX Edit only: After moving a block with Spillover active, changing a block from mono to stereo could occasionally fail—FIXED
- HX Edit only: While Spillover is active, the bypass state appearance of blocks could occasionally not match that of the hardware—FIXED
- HX Edit only: DSP allocation of poly pitch blocks could occasionally not match that of the hardware—FIXED
- HX Edit only: IRs with names longer than 54 characters couldn't be copied or exported—FIXED
- HX Edit only: When saving a favorite, the Enter key on extended QWERTY keypads was inoperable—FIXED
- HX Edit only: Snapshot-controlled Command Center changes would sometimes not be maintained across copy/paste or preset export/import—FIXED
Known Issues in 3.15
- Copy/pasted blocks retain their favorited status after overwriting an existing favorite
- When a snapshot is reloaded, a duplicate PC message is not transmitted, regardless of the Global Settings > MIDI/Tempo > Duplicate PC Send setting
- In some cases, the current Variax tone knob's position may not be recalled across preset changes
- Delay > Ducked Delay's ducking is inactive if DynAttack is maxed out at 2.000s
- When Global Settings > Preferences > Snapshot Edits is set to "Discard," holding FS12 to save changes in Pedal Edit mode does not save snapshot-controlled parameters
- After changing a different delay's Time parameter from ms to note values, selecting Delay > Tesselator causes its Knob 1 parameter label changes from "First" to "Time 1"
- When Delay > Tesselator and Ratchet's Operation is set to "Mute All," the entire path is muted, regardless of whether the block is active or bypassed
Edited by Digital_Igloo