
edstar1960
-
Posts
976 -
Joined
-
Last visited
-
Days Won
6
Everything posted by edstar1960
-
VDI cable/jack life expectancy
edstar1960 replied to indianrock's topic in James Tyler Variax Guitars / Workbench HD
I have been using my VDI cables with my Variax guitars for many years and not had an issue. I now have 3 cables - 2 long ones and one short one - just in case one of them fails - but so far so good. -
Sound quality differences going from POD to PA in various ways
edstar1960 replied to telecustom88's topic in POD HD
I think, if you are using powered active speakers then usually they have an XLR OUT or THRU which can be fed direct to FOH as a LINE LEVEL DI signal (not mic or instrument level - so it will be a strong signal and needs to go into suitable channel on mixer that can attenuate volume if needed) and that level should not be affected by the master volume of the powered speaker. However, if you are using passive speakers then the XLR OUT or THRU level will be affected by the master volume of the main driving amp/speaker, so these would not be suitable for sending to FOH mixer. Always check the exact specification of whichever speaker you are using to be sure. -
Sound quality differences going from POD to PA in various ways
edstar1960 replied to telecustom88's topic in POD HD
I think it is important to clarify what happens at the mixer block section, as simply centering the mixer block pans may not produce the desired result, - it all depends on how you have the rest of the patch set up. You have Path A which consists of L+R stereo path, and Path B which consists of L+R stereo path going into the mixer block, and coming out of the mixer block you have the Post-mixer path which consists of an L+R stereo path. The default mixer setting for Path A is100% pan L, and for Path B 100% pan R. This results in just the L path from path A going to the L path post-mixer, and just the R path from path B going to R path post-mixer, resulting in one complete stereo signal. If both Path A and Path B have their pan set to 0%, or centre, then the L side of Path A plus the L side of Path B are combined and go to the post-mixer L side, and the same happens for the R side resulting in a doubling of the signal strength in the post-mixer path. In other words, centering the pans merges two stereo signals into one, but keeping the pans 100% L and R, means you keep the same signal strength, but you only get the L side from Path A and the R side from Path B (unless you reverse the Pan settings for each path so you get R side from Path A and L side from Path B). Remember also that you can adjust the volume level for both Path A and Path B at the mixer block - either adding up to +12b or reducing to infinity or muting. This allows you to be quite inventive in your routing options. If you want to keep things simple, then you can choose to use just Path A or just Path B, and then mute the one you are not using, then Pan to 0% or center the path you are using at the mixer block, and then effectively you have one (single) stereo path from pre-split path, along the chosen path, and then post-mixer path. So no doubling of signals or paths occur. I tend to stick to one path for most of my patches, but obviously if I want to use two amps I need to use both paths and think carefully about the routing. Sometimes I will use both paths post-amp, and have an fx only on one path, and then use the mixer block to blend in the amount of that fx I require - I do this when the "mix" parameter of the fx block doesn't give me the blend that I need. But once again I have to carefully consider the routing and the mixer block settings Sorry to ramble on - but I thought it was worth clarifying. -
Correct.
-
Sound quality differences going from POD to PA in various ways
edstar1960 replied to telecustom88's topic in POD HD
One thing to note. If you are taking one XLR out from the POD to the PA, you are only getting one side of the stereo signal - either the L or R channel depending on which one you use. If you take one 1/4 inch out from the POD then you will get both sides of the stereo signal (L+R) as it will automatically sum both L and R together and give you the whole stereo (L+R) signal out of the 1/4 inch output you have chosen. If you use both 1/4 inch outputs then each one will get it's corresponding side of the stereo signal, L or R. Furthermore, the XLR signal is at mic level and the 1/4 inch output is at line level - so there is a significant difference on volume output as well - let alone the fact that with the XLR you are only getting half of the total signal. You have also introduced your Fender Deluxe Reverb into the chain, which is another stage adding gain, as well as tonality and tube warmth to the signal, then you are taking that and putting it through an H&K Red Box which is now adding an extra speaker simulation on top. So it is no wonder there is a big difference between the two sounds when they hit your PA. The XLR route is giving you only side of the stereo signal path at mic level - and it gives you the PODs onboard cab sims (assuming you have CAB selected in your patch). The 1/4 inch route is giving you summed (both) L+R sides of stereo signal path at line level, with POD cab sim, going into a Fender Deluxe Reverb tube amp, going into an H&K Red box with cab sim. To successfully use the XLR path to capture both L+R channels, you need to design your patches so that they sum the stereo L+R signal paths into the single XLR output you will be using - so if you are using the L output, sum and pan everything to the L path and ensure nothing goes to the R path to ensure you are capturing the entire signal. Also, use the MIXER Block in the patch to boost the volume of the signal if necessary, and then boost the signal further at the PA channel input if needed, and add some EQ if necessary to fatten up the sound. You should be able to get the XLR output to sound very similar if not identical to the 1/4 inch output by doing that. Obviously it won't have the Fender Deluxe Reverb tube amp and the H&K cab sim affecting the signal path - so you won't be able to get an identical sound to what you have explained above - but you shouldn't need the extra amp and cab sim to get a good sound out of the PA direct from the POD. Having said all that - there is no "wrong way" to use a POD - you set it up and use it in any way you want to get the tone you want. Hope that helps explain why you experienced such a difference when using the 2 connection methods. To summarise: XLR L output will always give you just the L signal path XLR R output will always give you just the R signal path 1/4" L output will give you summed L+R signal paths as long as nothing plugged into 1/4" R 1/4" R output will give you summed L+R signal paths as long as nothing plugged into 1/4" L If both 14/" outputs are used then L will just give L signal path and R will just give R signal path. For each patch, what signal actually appears at the L and R stereo channel outputs depend entirely on where you have placed fx and amps on the pre, parallel A/B, and post paths, and whether the fx are stereo or mono, and also how the mixer block pan/balance values are set. So you can design each patch to sum everything onto either the L or R channel output, or allow identical mono signals to be placed on both L+R channel outputs, or set it up for true stereo output with the L and R channels containing relevant parts of the L and R outputs of stereo fx blocks. You can see how quickly signal path flow can get very tricky to follow. * Edited to make clearer and avoid confusion - used "side" instead of "half" referencing L/R channels/paths. Plus added summary section. -
Just out of interest. Has anyone tried using HD500 patch with NO CABS going into a Stagesource L2/L3 set in ELECTRIC GUITAR mode? The ELECTRIC GUITAR setting emulates a 212 combo amp and I just wondered whether anyone had tried this and thought that it was a better/easier solution than using the HD500 onboard CABS? Or has anyone compared that setting to using an outboard cab simulator like the ADA or H&K redbox? And if so - what did you think - worse/better/same? Thanks.
-
Thanks for the info - I will look them up if I need them. I can get to Milton Keynes and Northampton in about an hour or two driving. Are there any other locations in South East England? Thanks.
-
Thanks for the advice. I do live near the coast. However, I don't have any problems with the chrome on the tailpiece or the machine heads, and my strings never rust or deteriorate quickly and I would expect my strings to show signs of high salt or corrosive skin oils. I only rest my hand slightly on the tailpiece when I play, so I don't think I rub at all when palm muting or playing - at least not consciously. The only wear I am seeing is on the top of the piezos and within the groove underneath where the strings sit.
-
Yep - it doesn't appear to be an issue and I think it is commonplace - but as you have to really look very closely to spot the wear on the piezos (with a magnifying glass if your eyesight is not perfect) most players won't even realise it has happened. A quick glance at my JTV59 and it looks like it is in perfect condition - no discernible wear.
-
Thanks Bradley. Good to know that your JTV59s both have the same wear and that both sound fine and you don't get any metallic overtones. It means I can rule out the wear on my piezos being the cause of my issue. Incidentally, I also have a JTV69 that I have hardly played and the piezo's on that are still in perfect condition and it does not suffer from the metallic overtone that I get from the JTV59. Guess the cause of the metallic overtone has got to be from somewhere else - I will keep looking.
-
Thanks for the responses. Is this issue commonplace? Does every JTV owner have some degree of the plating wearing off the piezos and the strings wearing their own grooves into the piezos? Or are there owners out there that have piezos with the plating still intact, and no string grooves after years of regular use?
-
I got my JTV59 soon after they were first released - probably within 6 months - and I have used it regularly but as I am a hobby player it has probably only been played on average about 3 to 4 hours a week over last 6 years, and there have probably been weeks at a time when it has not been played. Bottom line is it has not been heavily used like a professional instrument would have been in that time. I noticed that the tops of the piezo's on the low 3 strings seemed to have a copper colour reflection and looked a bit dull and so I got out a magnifying glass and had a good look at them. I could see that the silver covering had been completely worn away, showing a copper and metallic inner layer on the crowns of the piezo's. When I moved the string out of the slots, I could see that the string windings had left an impression behind in the groove on the top of the piezo. I rest my hand on the bridge when I play but I know that I do not sweat acid as my strings never rust and last for weeks, so the only thing coming in contact with the top of the piezo's is the skin on the side of my hand. That skin is not made of sandpaper and I can't see how that contact could cause the covering of the piezo to wear away in that way - even if I spent weeks just rubbing the top of a piezo with my finger I would not expect any material to get worn away. Also, I can't see how the string windings of the LOW E could cause an impression on the surface of the piezo. Just how soft are they? My piezo's appear to be working perfectly well - although all models seem to have a metallic overtone that I have never managed to remove regardless of what I have tried - sometimes I have reduced the metallic overtone but never eliminated it. The plain strings have also bitten into the body of the piezos which may explain why they sometimes don't ring cleanly on the modelled sounds. I am concerned that the strings biting into the piezos may be the cause of the metallic overtones I hear on the models and would love to resolve that if I can - but I can only think the solution would be to file out the grooves which would only be temporary because as soon as I restrung the guitar the new strings would start creating new grooves. I am also concerned that eventually this gradual wearing away will cause the piezos to fail at some point. What are the piezos covered with? Is it normal that this covering should wear away just from skin contact? Remember I don't sweat acid and never have problems with strings rusting or going dull quickly. Is it normal that the strings bite into the piezos and create their own grooves? Although certainly that must create problems when changing string type or gauge because if the new wound strings don't match the existing grooves then artefacts will get picked up and transmitted through to the modelled sounds? Maybe that is why the metallic overtone on mine has got worse over the years? Each string change contributing to the problem? I am attaching a picture taken using the magnifying glass and my mobile phone for everyone to see the problem. Although I have to reduce it's original size due to the file size restriction - I only have 339 KB left and the image is 1.7 MB ! Hopefully it will be good enough to demonstrate the problem.
-
Thanks for the clarification.
-
Great to hear that your problem is pretty much fixed. So - just to be clear - they only worked on the nut slot and the saddle slots (front and back) around the piezo for just the LOW E 6th string? What exactly did they do to the nut slot? And what exactly did they do to the piezo shell - just widen the front and back slots - or did they do anything else? Thanks for sharing all this info with everyone.
-
Have you tried moving the bridge further back so that it covers the bridge height screws? In other words, the access slots are further back so you can't adjust the height screws with the allen key? With the bridge further back like this, you can then hopefully adjust the saddles of the E, A and D to optimal positions.
-
HD500X amp models quite bright and fizzy - am I doing it wrong?
edstar1960 replied to colmac2000's topic in POD HD
If you are using headphones make sure the output setting is STUDIO/DIRECT. And make sure your patches use the FULL amp models with SPEAKER simulation on. Then tweak/adjust each patch to taste. Use the LOW CUT in the speaker settings to address too much bottom end. Also, make sure you are using good quality headphones with a good frequency range. -
Good luck - look forward to hearing your update once you get it back.
-
I can't speak for every JTV59. But for my JTV59, I think if the bridge height screws were both 5mm further back, then the slots in the bridge to access the height screws would be more centrally aligned allowing more backwards and forwards movement for the whole bridge. That in turn would allow the string saddles to be moved further back if necessary - although it may prevent them from being moved as far forward as required if somebody prefers to set higher action. The fact that the entire bridge can be moved forward or backward should provide the necessary flexibility to get the string saddles in the perfect positions for intonation even if it does mean that the bridge itself will obscure and possibly prevent access to the bridge height screws. But as I mentioned above - if you set the height first and then move the bridge backwards/forwards and adjust saddles then you should be ok. I know that is not perfect but it should be a workable solution. Obviously, if the entire bridge is moved to the furthest extend backwards, and the string saddle still hits the back of the bridge and the intonation is still not correct because it requires the saddle to be moved further back then I would say that there is a manufacturing fault and the guitar should be returned as faulty.
- 24 replies
-
- 2
-

-
- jtv59variax 59
- intonation
- (and 2 more)
-
I have a JTV59 and when I set the intonation on mine, I found I was quickly at the end of the extent of movement for the low E saddle. So I had to move the entire bridge backwards using the tiny screws that allow it to slide backwards on the mounts, and I found that it soon started covering the large screws used for height adjustment. In other words, the slot through which you access the height adjustment screws was moving backwards and the screws started to get obscured by the bridge. I think the easiest solution in these cases is to set the string height (action) first - then once happy with that you set the intonation - if you can't move the saddles back far enough to get the correct intonation then you have no choice but to move the entrie bridge back so it starts to cover the height adjustment screws. This should not be a problem because you have set your desired string height already. Obviously, if you wish to change string height after setting intonation, then you will have to slide bridge forward again to access the height adjustment screws. Hope that helps.
- 24 replies
-
- 1
-

-
- jtv59variax 59
- intonation
- (and 2 more)
-
That makes sense. I can understand why you would not be keen to do more detailed testing - that all sounds very complicated and time consuming - so I hope you can make some headway and fix the annoying plink on your JTV in the near future. In this thread people have reported varying affects from changing strings, usually only providing a slight mitigation of the plink with mellower or coated strings, and people have also reported mitigating the plink to varying levels by customizing the variax models within Workbench HD in certain ways but doesn't work for everyone. I don't recall anyone having any success with swapping cables - so your experience matches the earlier reports. Good luck with the next step - hope you get it fixed !
-
The absolute proof will be if you can fix the plink on your JTV but also get the plink to appear on your band mates guitar by changing the same variables on his JTV 89 that fixed it for you. That would nail the cause. However, based on what has already been reported, I doubt that will happen. I don't recall anyone starting with a perfect JTV without plink and then say they have done something which has made their JTV start plinking. Plenty of people have started with plink and then mitigated the issue to varying degrees by a variety of methods as described in this enormously long thread. It seems if you have a good JTV then it stays good. If you have one with a plink then it stays with a plink although it may be possible to mitigate it to varying degrees of success. I look forward to hearing the results of all your tests and I hope they can shed some more light on this enduring mystery......
-
Interesting indeed. You can easily identify whether or not items 1 to 3 are the cause or rule them out. Firstly, if your band mate is willing to try, he can swap back to using D'addario 10's to see if the plink starts occurring on his guitar. You can also try using DR Pure Blue 10's to see if the plink disappears from your guitar Secondly, your band mate can try using the stock models to see if the plink starts occurring, and you can try loading his customised models on your guitar to see if the plink disappears. Thirdly, he can try using your VDI cable and you can try using his VDI cable to see whether the plink gets introduced on his guitar and removed from yours. Item 4 - good luck with that! I am guessing that swapping electronic components may be very tricky - but I am really not qualified to comment on it. Certainly, having access to two JTV 89's, one that plinks and one that does not, puts you in a unique position to research the problem. Up till now only Line 6 have been able to do that side by side comparison - and then decided that they would no longer be pursuing a solution but did not provide any detailed information as to what they found and why they would not be resolving it. If you do pursue it further, I would be interested in hearing what you find. Thanks very much.
-
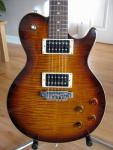
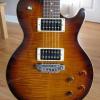
I have not seen the cherry burst other than in pictures - but I guess it will have the same flamed maple pattern but with a burst that is red rather than brown. Interestingly, I originally ordered a cherry but they could not get hold of one so they offered me the tobacco instead and I accepted - and I was thrilled when I got it - it looked so much nicer in the flesh - so I am not at all disappointed that I didn't get the cherry.
-
I have the JTV59 in Tobacco and mine has an almost identical finish to the one in the picture. I think it is an excellent finish. I think the vast majority of them are finished to a similar standard but as with all production runs, there must be some that are not quite as good, so you cannot guarantee every single one will be as good - but I think you would probably be very unlucky to get a new one with not such a good finish - and if that is the case - if it is new - then you can always ask to swap it for another one if it is not up to standard.
-
You are welcome. :)